Electronic image noise is unavoidable with digital cameras. With astronomical subjects, it can be disturbing if it is clearly visible due to a "grizzly" structure (bottom left). Noise-free photos appear "smoother" (top right):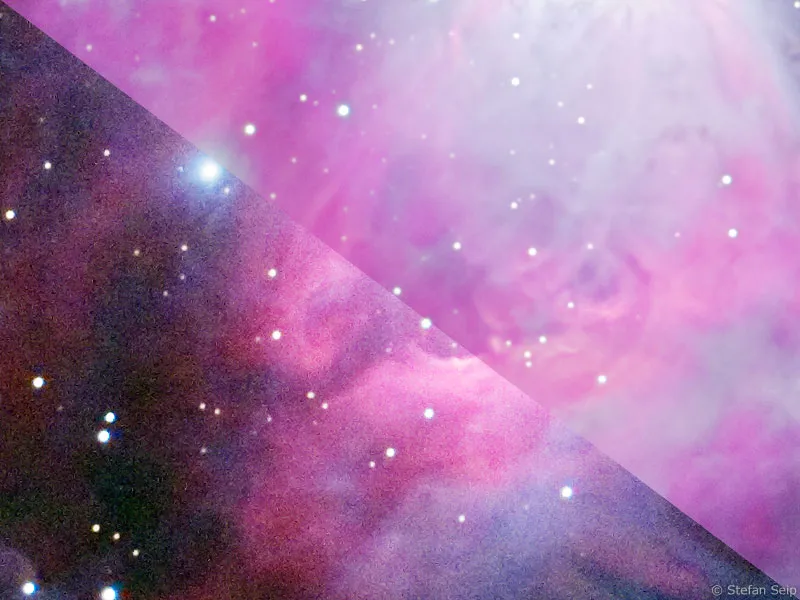
Part 16: Getting to grips with electronic image noise
The "spectre" of digital photography is "noise". The subject fills a number of forums on the Internet, where there are endless discussions about which digital camera "noises" more and which less.
On the one hand, the discussion about noise is "whining on a high level" when you look at the results that a modern digital camera delivers even at high and highest ISO values.
Chemical films with such a high sensitivity show a pronounced grain structure in the images, which is far more pronounced and disturbing than the noise of digital cameras.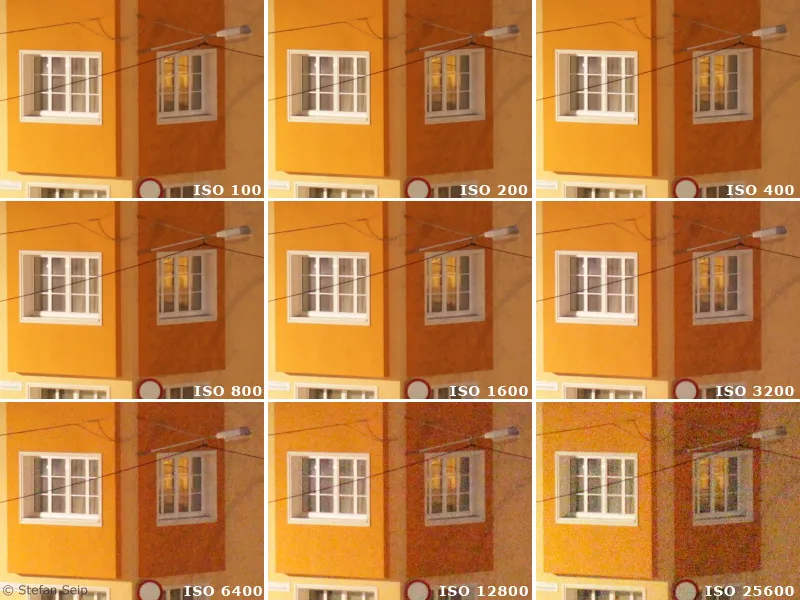
Influence of the ISO value on noise. Here you can see small sections of a full-size image taken with a Canon EOS 5D Mark II. They show impressively what modern cameras can achieve.
This image example shows tiny sections of test photos with different ISO values, displayed in "100%" size, i.e. one pixel of the camera is displayed on one pixel of your monitor. This scaling shows image errors and noise most clearly. But does it also make sense to "scrutinize" photos at this size and really look for noise? The answer is only "yes" if poster-size prints are planned. On prints in "standard" formats up to around 13x18 centimetres, there will be little or nothing to see. So don't let the "noise discussions" drive you crazy and always keep the intended use in mind instead of perceiving visible image noise on the monitor as a serious problem.
On the other hand, noise that is clearly visible on the finished image, i.e. the printout or a projected image, can also be disturbing. Especially in astrophotography, where low-light objects often have to be imaged with long exposure times and possibly high ISO values, image noise can escalate into a problem. It is then good to know which factors influence the noise and what measures can be taken to keep it in check.
Instead of the term "noise", it is actually better to talk about the "signal-to-noise ratio" (also known as "SNR" or S/N). This expresses the relationship between the recorded light coming from the subject (the "signal") and the noise signal that occurs. It is a dimensionless number that takes on larger values when the signal becomes stronger and/or the noise signal becomes smaller. If the signal is not stronger than the noise signal, a motif can no longer be depicted, it is lost in the noise, so to speak.
First of all, I would like to list the factors that influence the signal-to-noise ratio in digital photography. This list is to be understood in general terms and does not take into account the sometimes specific issues of celestial and astrophotography.
1. predetermined parameters when using a specific camera (therefore cannot be influenced by the photographer without changing the camera):
- Sensor size
There is a correlation between the size of the sensor and the noise behavior. More precisely, it depends on the size of the individual pixels. The smaller the pixels, the less favorable the signal-to-noise ratio. This is why the noise in digital compact cameras is comparatively high because they contain very small recording sensors. Digital SLR cameras perform better because their sensors (and therefore also the pixels) are significantly larger.
Excerpts from test shots taken with three different cameras at the same ISO setting:
Left: Leica D-LUX 3, sensor size 8.6 x 4.8 mm.
Center: Canon EOS 40D, sensor size 22.2 x 14.8 mm.
Right: Canon EOS 5D, sensor size 35.8 x 23.9 mm.
It can be clearly seen that the noise decreases with increasing sensor size.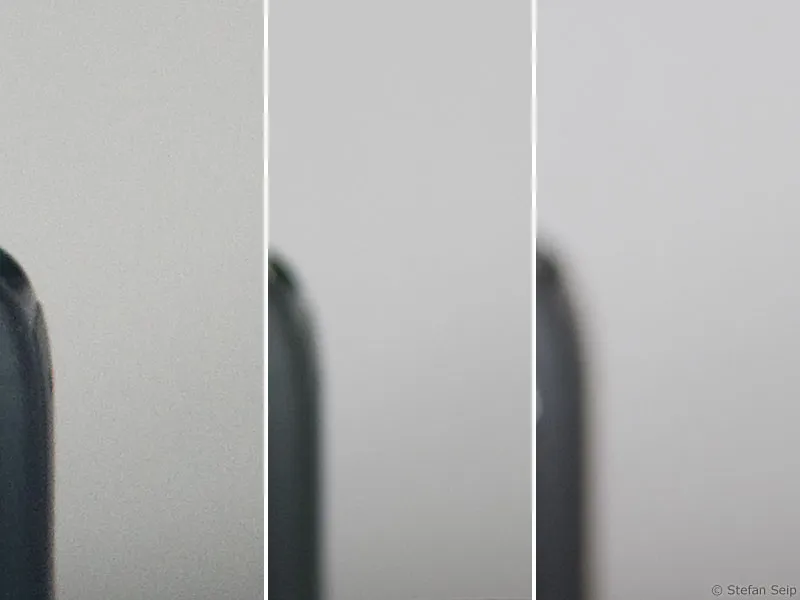
- Noise behavior of the image sensor used
A specific parameter that depends on the properties of this electronic component. Sensors in current camera models often perform better in this discipline than older models due to technical advances in sensor development.
- Readout noise
The readout electronics, which convert the (incidentally analog) signals from the sensor into digital image data, are also responsible for a certain amount of additional image noise.
- Noise suppression that cannot be switched off by the camera firmware
Some cameras or camera manufacturers use software that is intended to improve the noise behavior and cannot be switched off completely. This is rather disadvantageous for astrophotography because tiny stars are incorrectly interpreted as noise and then "calculated away".
2. variable influencing variables (to be influenced by the photographer)
- Exposure time
If the exposure time is increased, the absolute noise component of a digital photo also increases. The main cause of this is "dark current noise" (see also number 15 of the tutorial series "Astro and sky photography").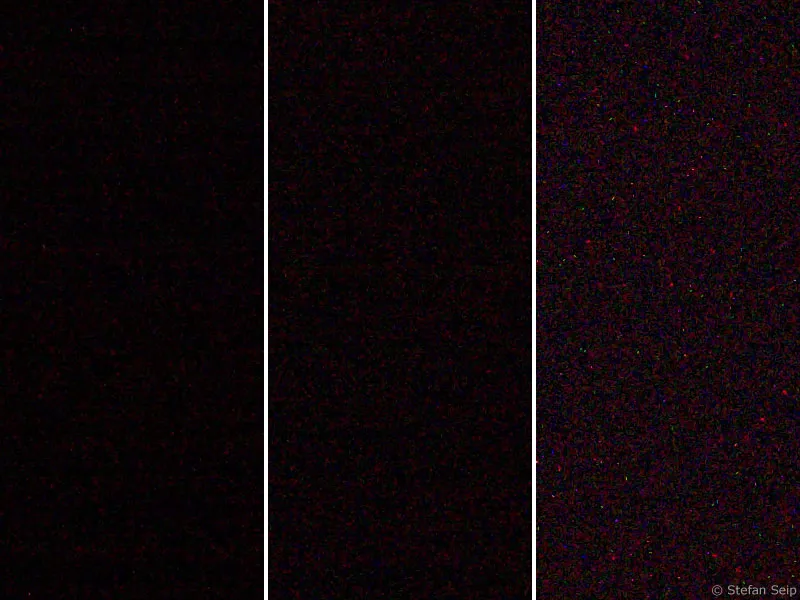
Excerpts from test shots taken with a Canon EOS 450D at ISO 1600. Left: one second exposure time. Center: 30 seconds. Right: 300 seconds. The longer the exposure time, the greater the noise.
- ISO value
Higher ISO values lead to more noise in the image than lower ones. The reason for this is that it is not actually possible to set different "sensitivities" on an image sensor, but with high ISO values the received signal is simply amplified accordingly. This signal amplification results in the noise that can be observed.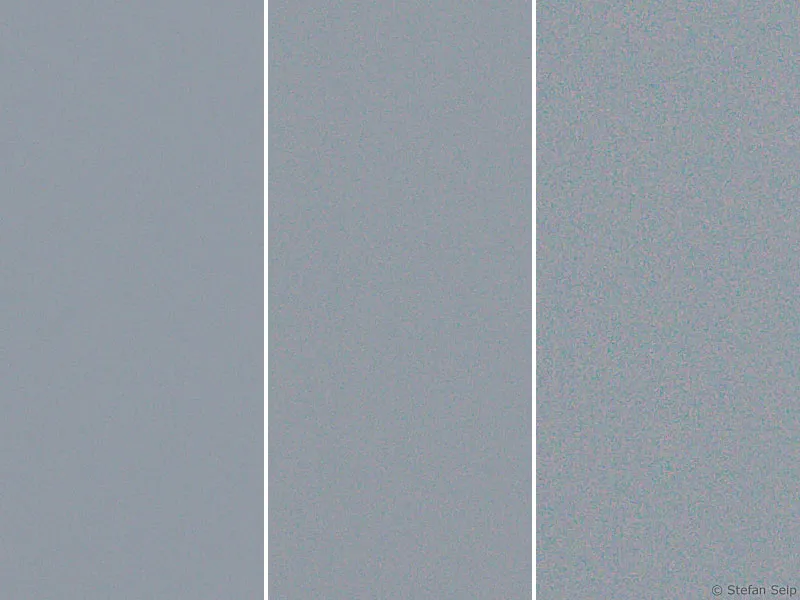
Excerpts from test shots at different ISO values, taken with a Canon EOS 450D. Left: ISO 100. center: ISO 400. right: ISO 1600. High ISO values lead to an increase in noise.
- Temperature
The dark current noise of a sensor depends on its temperature. High temperatures lead to greater image noise. This correlation can be clearly observed by comparing a long exposure taken at very low outside temperatures (winter) with one taken at high outside temperatures (summer). Despite the same settings, the "winter shot" has a lower noise level.
Photographing with low noise
If we concentrate on the parameters that can be influenced when taking photos, we are left with exposure time, ISO value and temperature.
The temperature of the image sensor cannot really be controlled if the camera used does not allow the sensor to be cooled. Only special astro CCD cameras have sensor cooling to reduce noise. Each reduction of the sensor temperature by around six to seven degrees halves the amount of noise. Astro CCD cameras for amateurs use thermoelectric cooling elements (Peltier elements, sometimes supported by water cooling) to reduce the sensor temperature by up to 30 or 40 degrees compared to the outside temperature! Cooling by around 40 degrees therefore means that the original noise level is reduced to one sixty-fourth (2 to the power of 6).
In a standard digital camera, the sensor cannot be cooled, so sooner or later it will assume the value of the outside temperature. Nevertheless, the photographer can do something: The sensor heats up noticeably during a long exposure (up to around ten degrees was measured). If another long exposure immediately follows, there is of course no further increase of ten degrees, but the temperature remains at this high level. If you want to minimize the temperature-dependent noise, but have no way of cooling the sensor, you should take short breaks between individual long exposures, during which the sensor can cool down to the outside temperature. Then the following exposure will at least start again with a relatively "cool" sensor, which will naturally warm up again during the exposure.
The influence of exposure time and ISO value is significantly more important in practice. A simple rule applies when setting the ISO value:
As high as necessary and as low as possible.
This means that low ISO values should be preferred as long as this is possible. In some situations, a low ISO value is simply not possible, for example if a landscape including the starry sky is to be photographed with a fixed camera (see number 1 of the tutorial series "Astro and sky photography"). If the ISO value is too low, the exposure would have to be longer to compensate for this and the stars would not be depicted as dots but as lines. In this case, the use of a higher ISO value is a forced necessity, so to speak. Even with images taken with a tracking camera (see number 10 of the tutorial series "Astro and sky photography"), the exposure time cannot always be extended arbitrarily in favor of a low ISO value.
On the one hand, there is not always enough observation time available for an object; on the other hand, the longest possible exposure time is often capped by the tracking technology used. If, for example, the alignment of the mount (see number 9 of the tutorial series "Astrophotography and Sky Photography") is suboptimal, the tracking accuracy of the mount is a problem or the tracking control (see number 12 of the tutorial series "Astrophotography and Sky Photography") causes problems, a high ISO value is preferable. The resulting image noise is then the lesser of two evils compared to stars depicted in a line pattern.
There is also a clear recommendation for choosing the "optimum" exposure time:
As long as possible without bright subject areas reaching full saturation.
Fully saturated pixels assume the value for "white" and no longer contain any information, i.e. even subsequent image processing can no longer reconstruct any subject structures in such areas. If only the centers of bright stars are affected, this may still be acceptable. However, if the brighter central areas of gas nebulae or galaxies are "eroded" in this way, the results are unattractive.
The maximum possible exposure time is best determined by evaluating the histogram of a photograph. While the shape of the histogram "data mountain" depends on the nature of the subject, its horizontal position can be altered by changing the exposure time. Longer exposure times move the data mountain to the right, shorter ones to the left.
The maximum sensible exposure time is therefore reached when the data mountain of the histogram is far to the right, but without "hitting" the right side. You can find more information about the histogram and its control on the camera in part 5 of the "Astrophotography and sky photography" tutorial series.
Correctly exposed astrophotograph of the North American Nebula. The superimposed histogram shows that the "data mountain" is shifted to the right and far away from the left stop of the histogram. At the same time, only a few pixels of some bright stars have reached full saturation, as can be seen from the small peak at the right stop: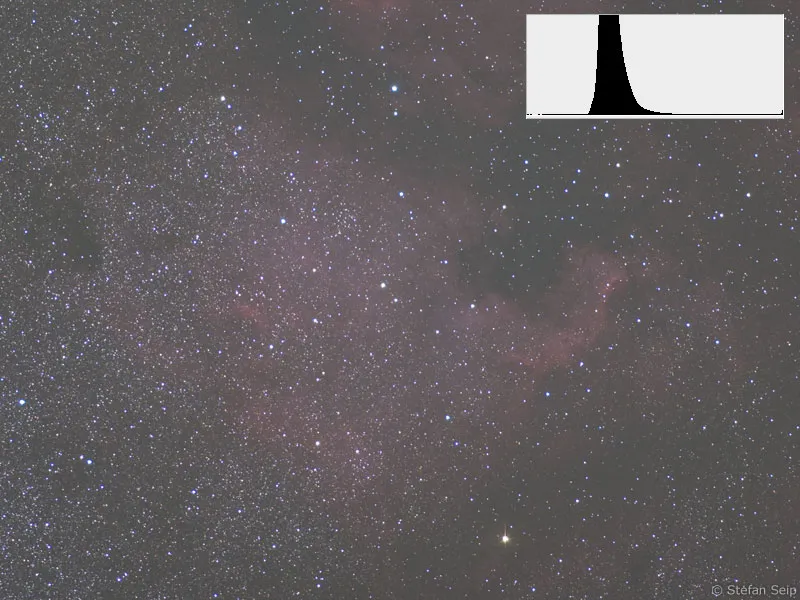
By cropping the histogram and adjusting the gradation curves, a respectable, very low-noise result can be achieved from the photo above.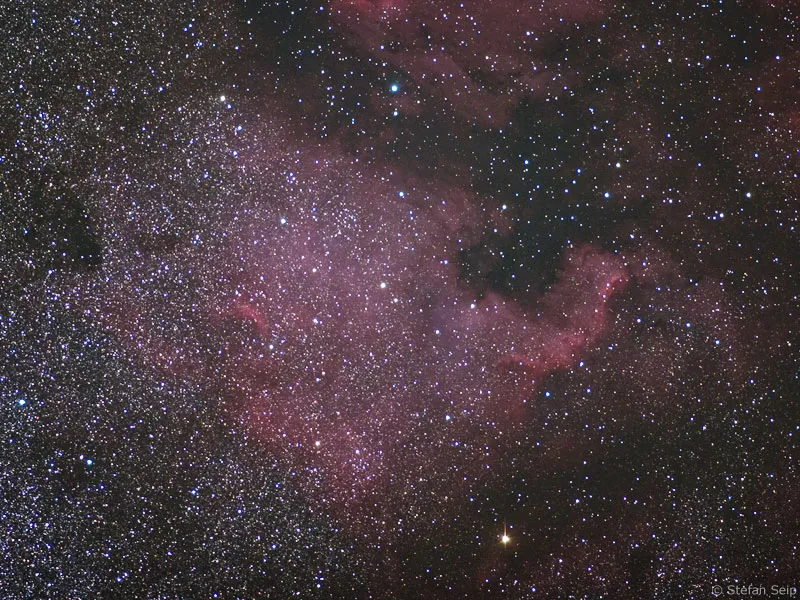
Overexposed image of the Andromeda galaxy. The histogram is on the right (red arrow), which indicates that large parts of the image are fully saturated and have taken on the value for the color "white".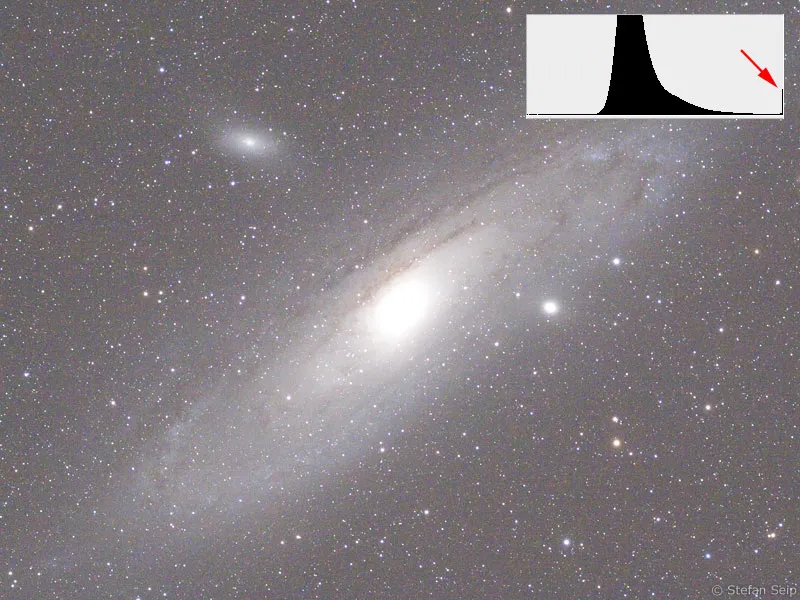
Although a better result can still be achieved by cropping the histogram from the following image, the structures in the center of the galaxy are lost due to the overexposure and can no longer be reconstructed.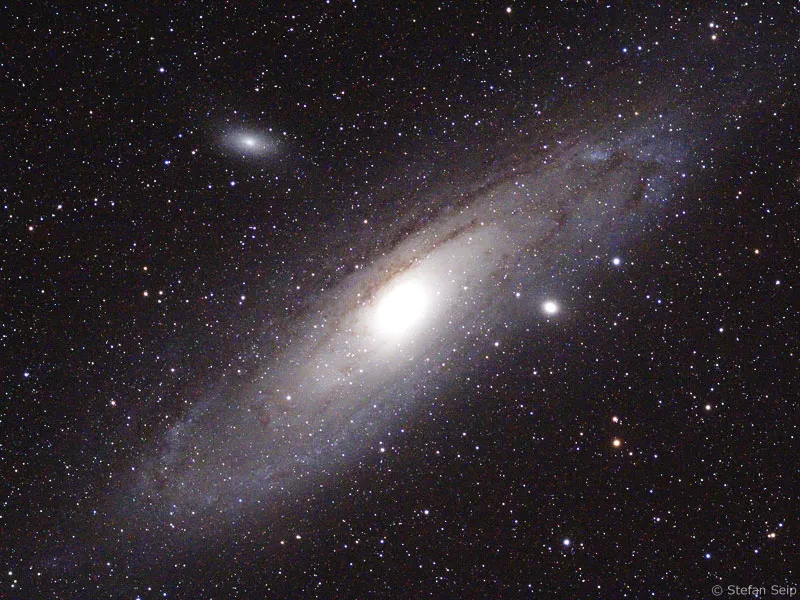
This leaves the question of the shortest exposure time that makes sense. This question is not easy to answer. On the one hand, it must be long enough for an object to leave a recognizable signal on the sensor. In principle, this is sufficient to detect it. However, if we want to take a good-looking photo of it, the requirements are higher. Then we need a good signal-to-noise ratio, because the signal from the celestial object should be as distinct as possible from the noise signal so that a "beautiful", low-noise image can be created. The signal-to-noise ratio in turn improves when the exposure time is extended. Consequently, the mountain of data in the histogram moves to the right and is thus separated from the noise that occurs in the dark tonal value ranges, i.e. in the leftmost part of the histogram.
In practice, this means that the part of the histogram that represents the captured celestial object should not "stick" to the left stop of the histogram, but should at least move to the right until it has left about a third of the entire width of the histogram behind it. Then the "distance" of the signal to the noise is already so clear that a relatively low-noise image can be expected.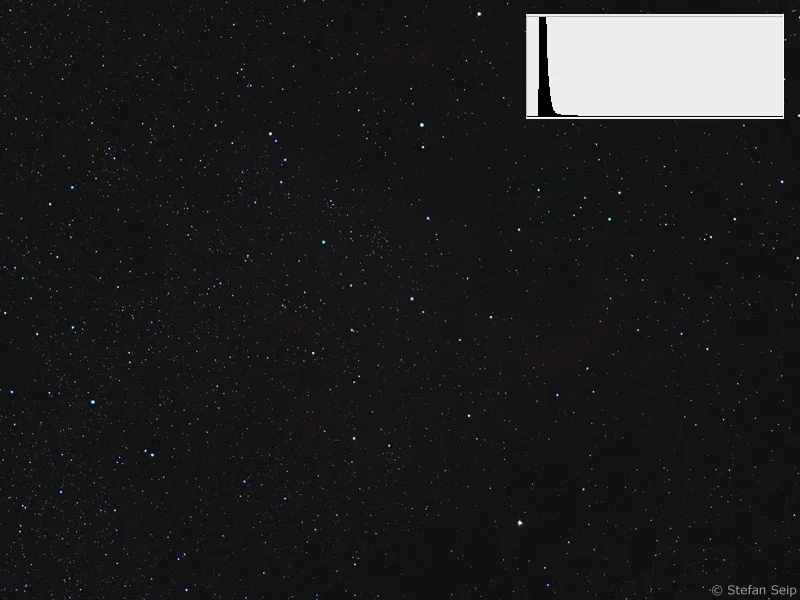
Under-exposed photo of the North American Nebula. The "data mountain" of the histogram is very far to the left, but this is exactly where the image noise occurs!
Result from the above image after heavy histogram and gradation curve processing. Although the signal of the nebula is contained in the image, the noise is noticeably stronger compared to the correct exposure (see above).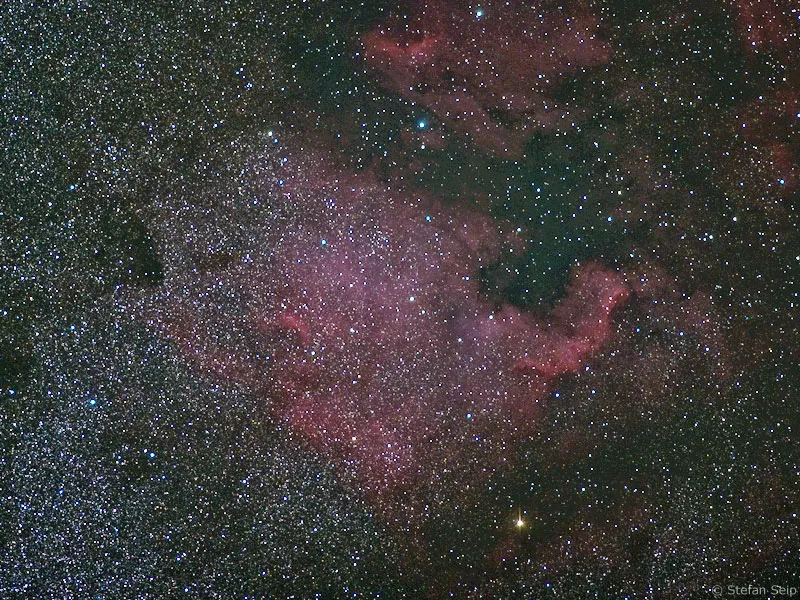
If the subject being photographed is a low-light object, it may not be possible to achieve this goal because the exposure time would have to be extended so much that tracking problems would spoil the result. Again, a more noisy but sharp image is then preferable to a longer exposure with slightly streaky stars.
As you can see from these examples, it is not always easy to find the optimum exposure time and thus a good compromise between the sometimes conflicting influencing factors.
Internal camera methods for noise reduction
Almost all digital cameras offer one, sometimes even several settings in the menu for suppressing image noise. It is not always advisable to make use of these functions, as the following two examples show. As the success of such settings can vary with different camera models, you should take test shots to clarify whether a setting is useful or not.
For example, I have not had good experiences with the High ISO noise reduction setting (newer Canon EOS models) and therefore always leave it switched off. When switched on, the camera software (firmware) reduces the image noise after taking the picture. I am of the opinion that subsequent "denoising" through the use of software does not have to be done in the camera, but should be done later on the PC using image processing programs, if it is necessary at all. In this way, there are also more options for controlling this process.
I do not make use of the "High ISO Noise Reduction" of the Canon EOS 40D.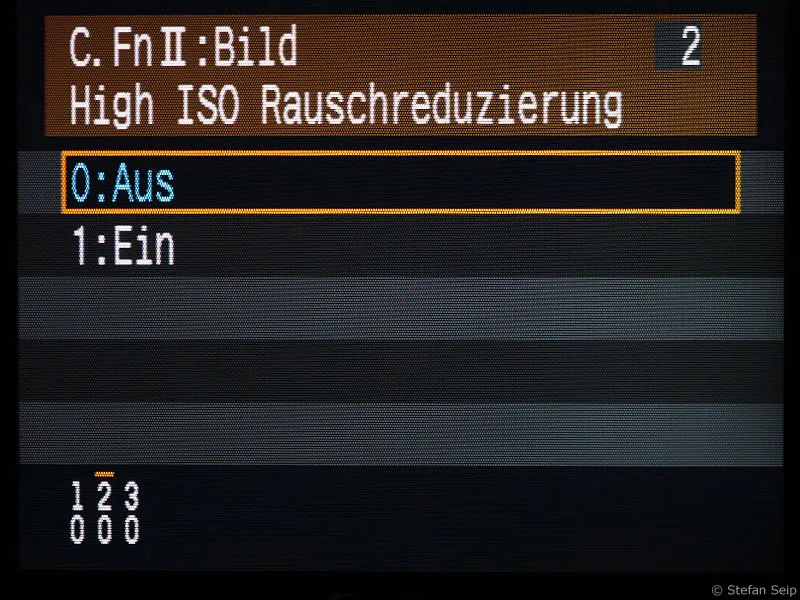
The noise reduction setting for long exposures causes the camera to take a dark picture with the same "exposure time" after each shot with a longer exposure time (from one second). This means that after a 20-second exposure, the camera is blocked for a further 20 seconds while it takes the dark picture.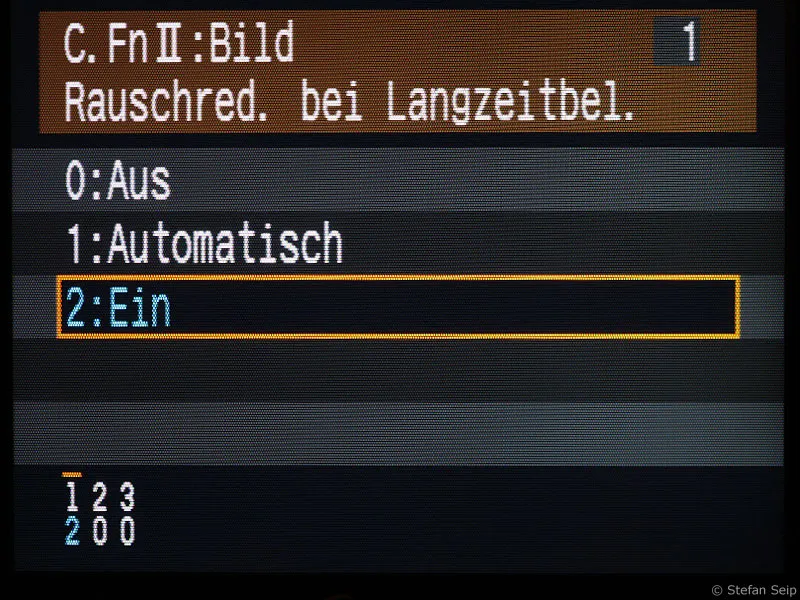
Switching on noise reduction for long exposures, here using the example of a Canon EOS 40D.
Without question, this function leads to an improvement in the signal-to-noise ratio because the dark frame captures all the "dark current noise" and subtracts it from the actual shot. However, you don't always have the time or patience to waste half of your observation time on this. If you want to take a few photos with an exposure time of no longer than around one minute, using the "Noise reduction for long exposures" function is certainly a good recommendation. However, you should also test your camera by taking comparison shots to find out what effect this function has on an image.
For a series of shots with a relatively large number of photos with significantly longer exposures, I would advise you not to activate the function and to take separate dark pictures instead. The subtraction of dark images can significantly reduce image noise! You can find out more about this in part 15 of the "Astro and sky photography" tutorial series entitled "Calibration: taking bright field and dark images".
Subsequent reduction of noise
Many image processing programs are able to combat image noise with appropriate filters. Some programs are used more or less exclusively for this purpose, for example "Neat Image"(http://www.neatimage.com) or "Noise Ninja"(http://www.picturecode.com). However, the widely used program Adobe Photoshop also offers a filter that can be used to reduce noise. This can also achieve good results, even if the special programs mentioned usually work a little more successfully.
If the raw file of a digital SLR camera is opened with Photoshop, the Adobe Camera RAW module appears first. Measures can already be taken there to suppress the brightness noise (luminance) and the color noise (red arrows).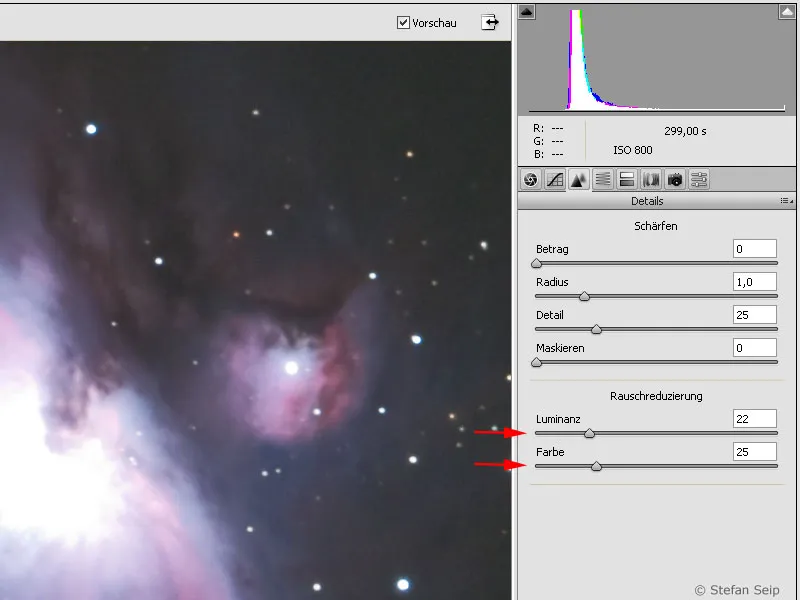
Photoshop dialog box after calling up the Filter>Noise Filter>Reduce Noise... Depending on the nature of the image, the parameters must be set carefully in order to achieve an optimal result.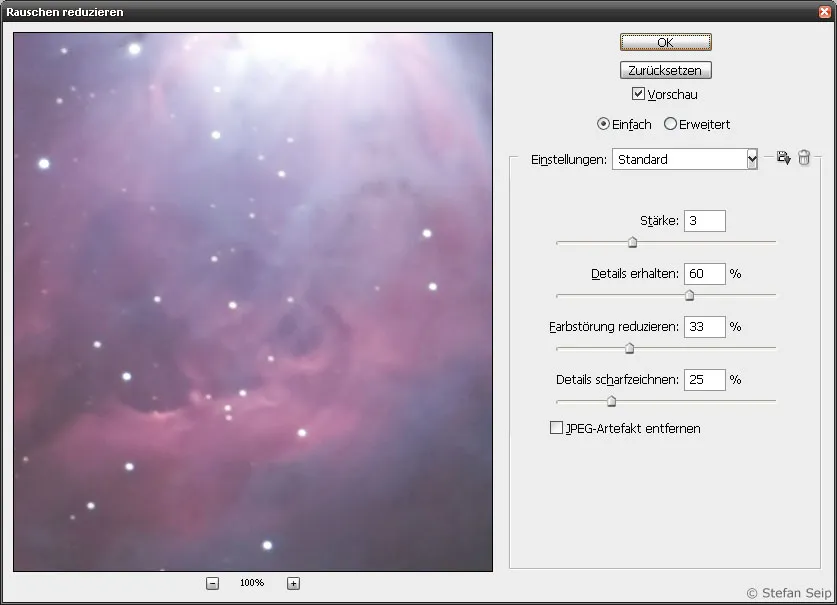
It is important to handle these parameters with care, as excessive denoising can lead to unattractive, "ironed out" results. Some visible noise is a better choice than a "soft-brushed" image.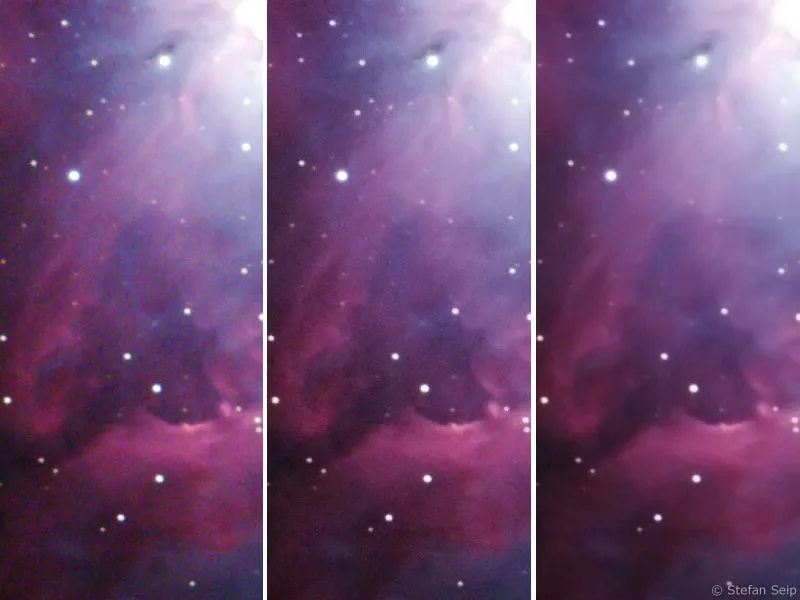
Comparison of an unprocessed raw image (left) with an image moderately denoised using the Photoshop command Filter>Noise Filter>Reduce Noise... (center). The section on the right shows what happens if you overshoot the target: The image then appears "ironed smooth" and "soft-brushed", with even smaller structures of the subject disappearing.
It often makes sense to apply these filters only to selected areas of an image where the noise is particularly disturbing.
Noise reduction by averaging several images
For static motifs, which include the vast majority of astronomical photo motifs, there is a particularly effective method for improving the signal-to-noise ratio - i.e. for reducing noise. We are talking about the superimposition of several individual images. The noise component actually decreases when several images are precisely aligned and then "averaged". This means that the arithmetic mean of the brightness values is determined for each individual pixel of the image. It goes without saying that the images to be averaged must be different photos of the same subject.
Overlaying and averaging is a common procedure in digital astrophotography and is also known as stacking. "Stack" is an English word meaning "pile". In addition to noise reduction, there are further advantages to using this method:
- Many shorter-exposure individual shots reduce the risk of a shot being spoiled by an error or disturbance compared to one very long exposure. If, for example, an airplane flies through the field of view and leaves a trail of light, or you accidentally bump into a tripod leg and cause a lot of camera shake, only a single shot in the series will be affected. Otherwise, the entire long exposure would be affected or even ruined.
- With digital cameras, extremely long exposure times entail the risk of the noise level getting out of hand and increasingly large parts of the image becoming fully saturated, i.e. overexposed.
- The creation of separate dark images (see number 15 of the tutorial series "Astro and sky photography") is achieved more quickly if the exposure time used is shorter.
The signal-to-noise ratio of stacked photos improves with the square root function. Averaging four individual shots halves the noise, with nine shots only a third of the noise remains, with 16 shots a quarter and so on.
If we pursue the idea of averaging several individual images further, the question arises as to how this can be achieved. I would like to present two different methods. The first is done with the Adobe Photoshop software and is particularly suitable for averaging relatively few individual shots, which may be slightly shifted against each other, but should not be rotated against each other. Image field rotation can occur if the mount is not perfectly aligned. The alternative is the software "DeepSkyStacker", which is available as freeware on the Internet and can also cope with individual images that show a rotation of the image field.
Adobe Photoshop
To reproduce the procedure described above on your own computer, please download the working file "NGC1977.zip", unzip the four photos "NGC1977_1.jpg" to "NGC1977_4.jpg" contained in this archive file and save them in a folder on your hard disk. Now select the command File>Scripts>Load Files in Batch... in Photoshop and select these four files in the dialog box that appears after clicking on the Browse... button: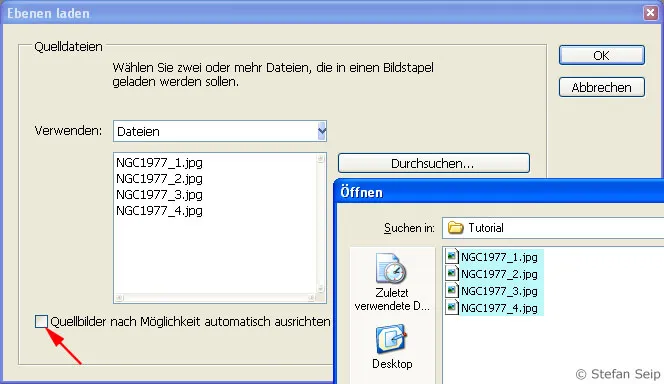
Photoshop software: dialog box after "File>Scripts>Load files to batch...". This allows all four images to be opened as layers in one file.
After confirming with OK, Photoshop creates a new file in which the four images are contained in layers on top of each other. To work with layers, show the layer palette with the "F7" key if required.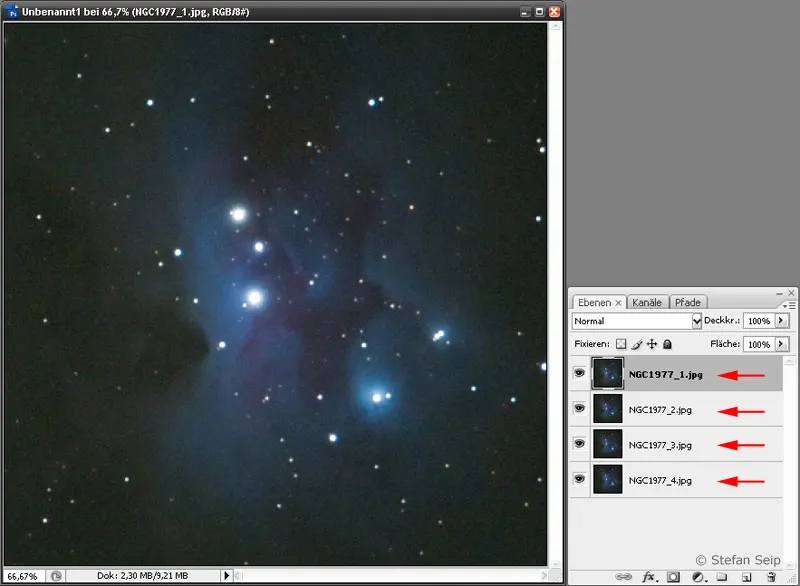
Photoshop software: The layer palette shows the four different layers (red arrows).
Before the layers can be "offset" against each other to produce a final result, it must be ensured that the subject is congruent in all four layers. In the first step, we start by aligning the second layer from the bottom ("NGC1977_3.jpg") congruently with the bottom layer ("NGC1977_4.jpg"). To do this, click on the eye symbols next to the top two layers to hide them and then click on the layer name "NGC1977_3.jpg" to activate it: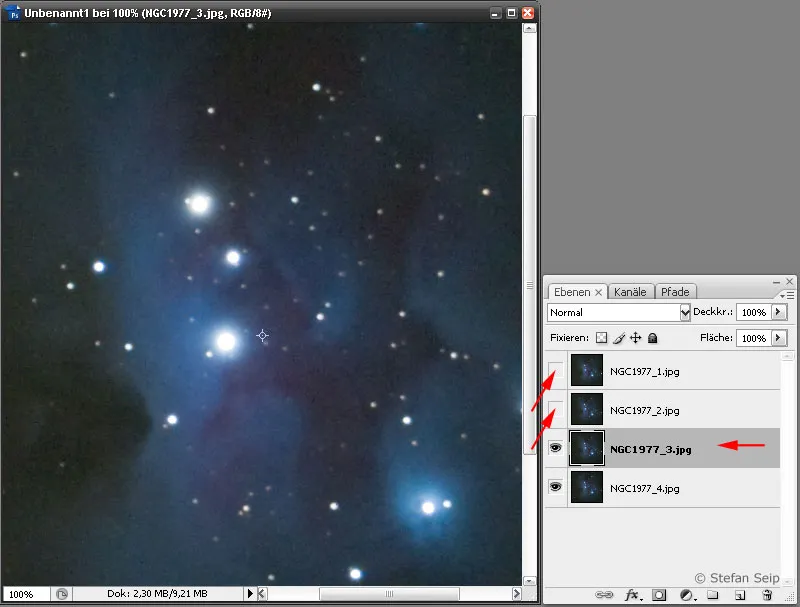
Photoshop software: the top two layers have been hidden, as indicated by the absence of the eye icon to the left of the layers (slanted arrows). The second layer from the bottom is activated for editing, which is indicated by a darker gray background (horizontal arrow).
The blending mode for this layer is now changed from Normal and Difference is selected.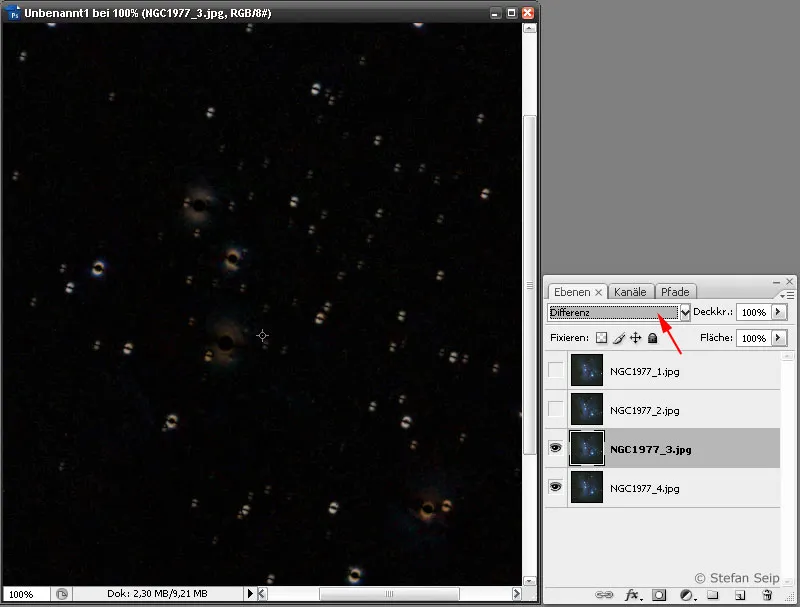
Photoshop software: The blending mode of the second layer is changed to "Difference" to see whether it is congruent with the first layer. If it is completely congruent, the image window would be black. However, the stars in the image show that this state has yet to be achieved.
Ideally, if both photos were completely identical and congruent, the image would now be black. In most cases, however, the stars are slightly shifted against each other, indicating that the two layers are not congruent. In the next step, we will create the congruence. First make sure that the image view is at full size, i.e. the zoom level is set to "100%". The View>Actual pixels command creates this state. Now press the Esc key once to end the selection of the blending mode and select the Move tool (V key).
Now use the four arrow keys on the keyboard ("cursor keys") to move the layer until the difference image appears as dark as possible.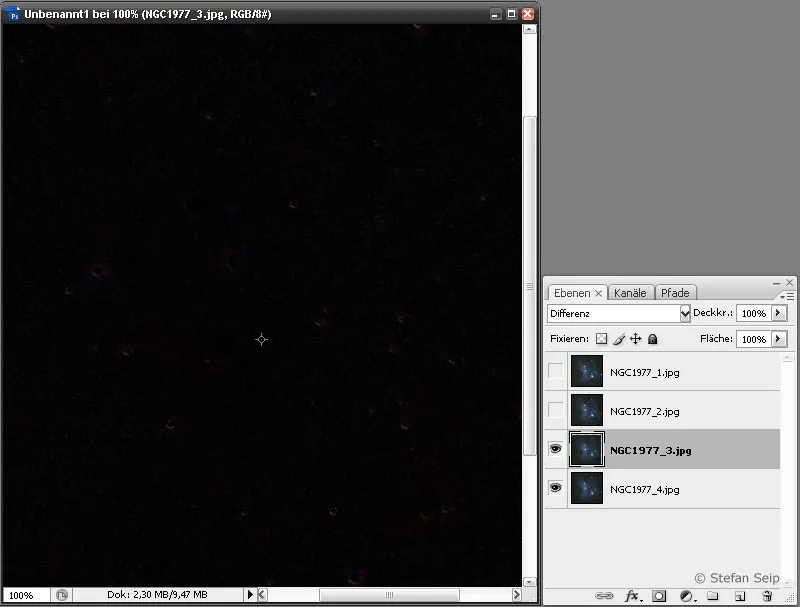
Photoshop software: After the second layer has been moved pixel by pixel, an almost black image window indicates that the "difference" between the two layers is almost zero. This means that the state of congruence has now been reached.
Once you have found the optimum point, change the blending mode back from Difference to Normal and then change the opacity to 50 percent: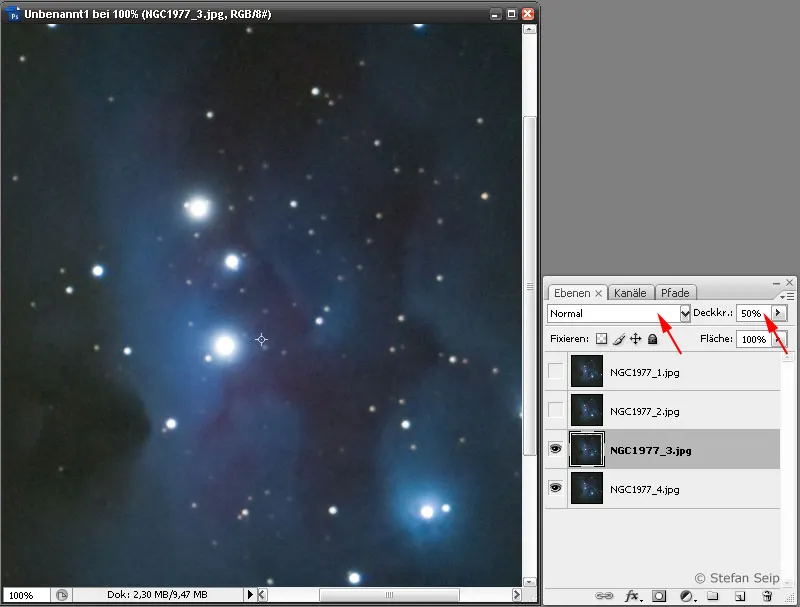
Photoshop software: set the blending mode of the second layer back to "Normal" and reduce the opacity to "50%" (red arrows). As a result, the bottom layer shines "halfway" through the second layer, so to speak, which means averaging.
Now proceed in the same way with the next layer ("NGC1977_2.jpg"), only set the opacity to 33% instead of 50% after moving it.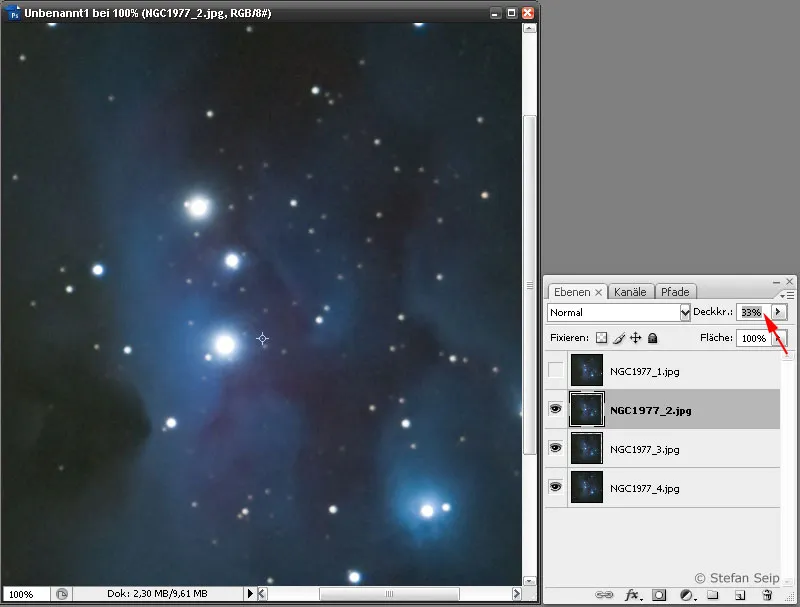
Photoshop software: The opacity of the third layer is set to 33 percent after alignment.
The top layer is also aligned congruently first, followed by setting the opacity to 25 percent.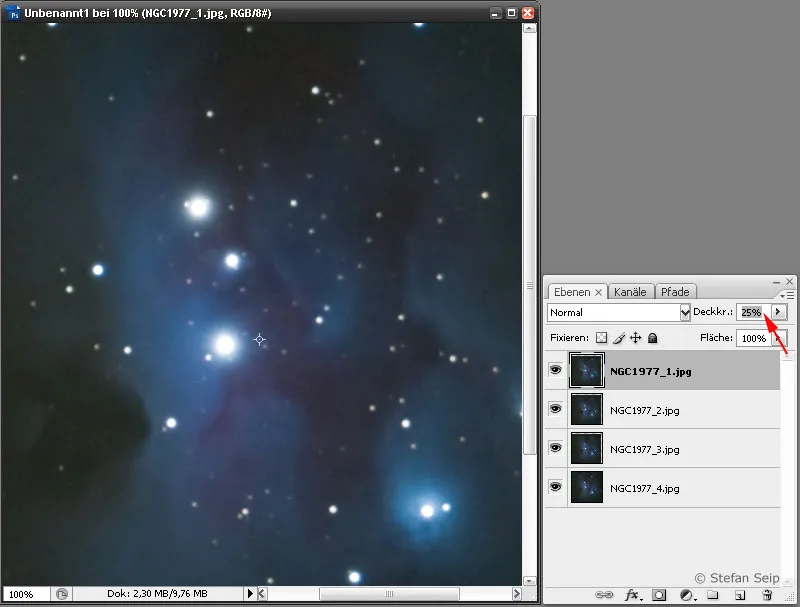
Photoshop software: The fourth layer is only given an opacity of 25 percent.
The result is a significantly reduced image noise compared to a single image.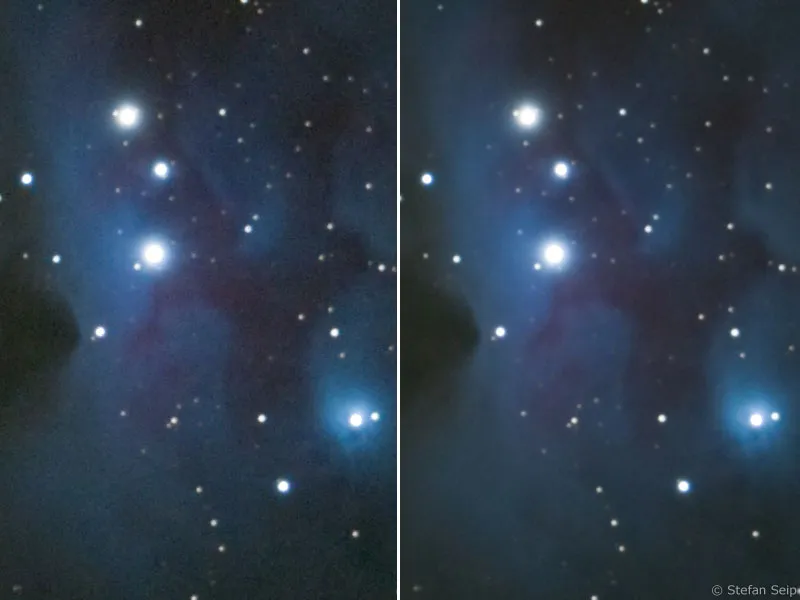
On the left a single image, on the right the average of four individual images. You can clearly see that the noise has been reduced by stacking. Incidentally, the image shows the "Running Man Nebula" in the constellation Orion with the catalog designation "NGC 1977".
You can use the command Layer>Reduce to background layer to merge the layers and then save the image.
When using several layers, the opacity to be set is as follows:
| Layer (calculated from the bottom) | Opacity to be set |
| 1 | 100% |
| 2 | 50% |
| 3 | 33% |
| 4 | 25% |
| 5 | 20% |
| 6 | 17% |
| n | 1/n% |
If more than six individual images are available, it is advisable to first divide them into several portions and process them as described. Each portion should contain the same number of individual images. The results obtained are then averaged in the same way.
DeepSkyStacker
The "DeepSkyStacker" is a software program that makes it very easy to precisely align and average several individual images of the same subject. It can be downloaded free of charge (freeware) from the website http://deepskystacker.free.fr/german/index.html. It also easily processes images that are slightly misaligned due to an imperfectly aligned mount.
After starting the program, the following screen appears: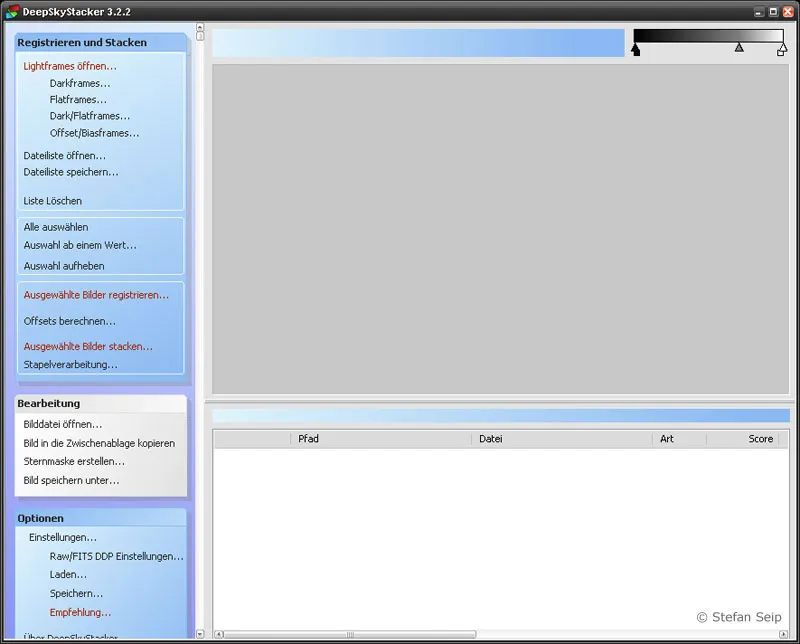
DeepSkyStacker software: Screen after starting the program.
First click on the top command in the left menu bar Open Lightframes... to select the four exercise files. To do this, you must select JPEG or DNG files in the File type field.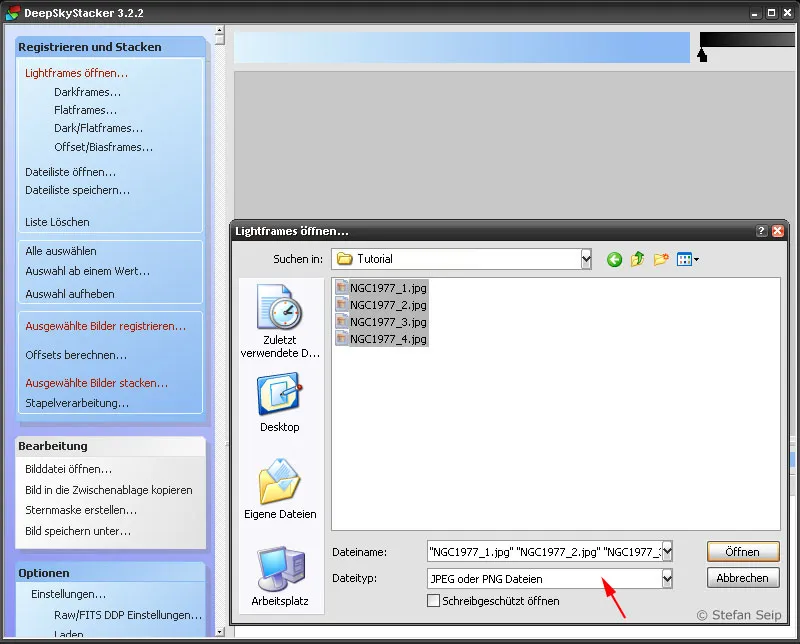
DeepSkyStacker software: Selection of the four exercise files after selecting the "Open Lightframes..." command
After clicking on Open, DeepSkyStacker displays the individual files in a list.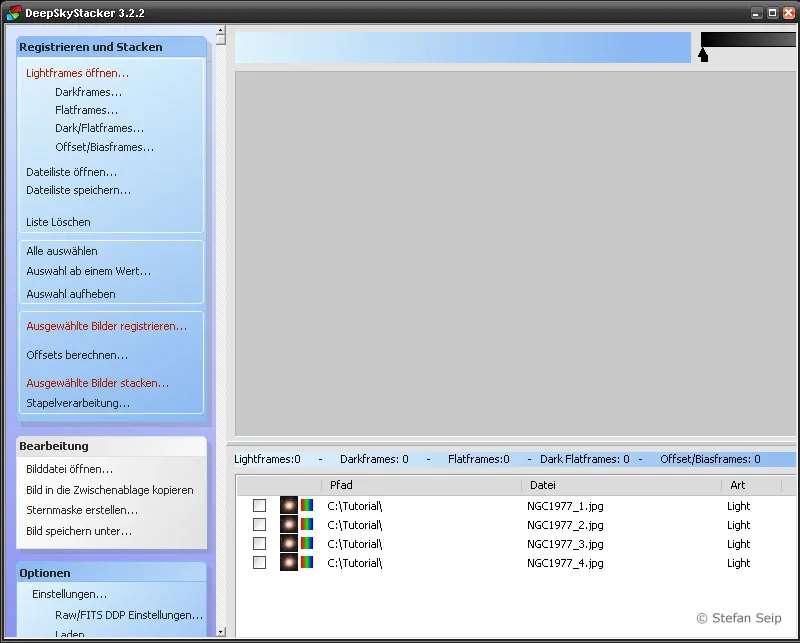
DeepSkyStacker software: A list of the files to be processed is displayed at the bottom right.
Now click on the Select all command in the left-hand menu column to select all files for further processing.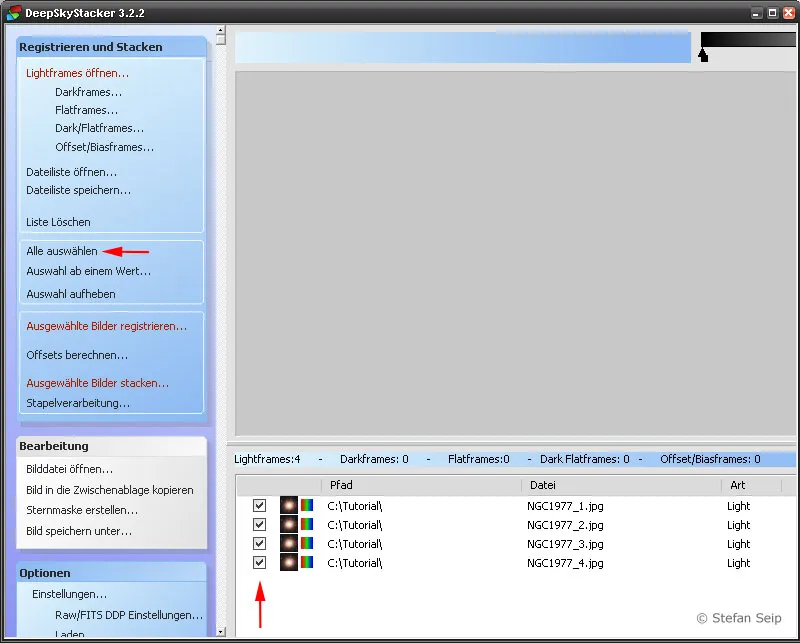
DeepSkyStacker software: The files still need to be "selected". In the menu, there is the Select all command (red arrow at the top). Success can be seen from the fact that the boxes to the left of the files are now checked (red arrow below).
The processing process is now started with the Stack selected images... command.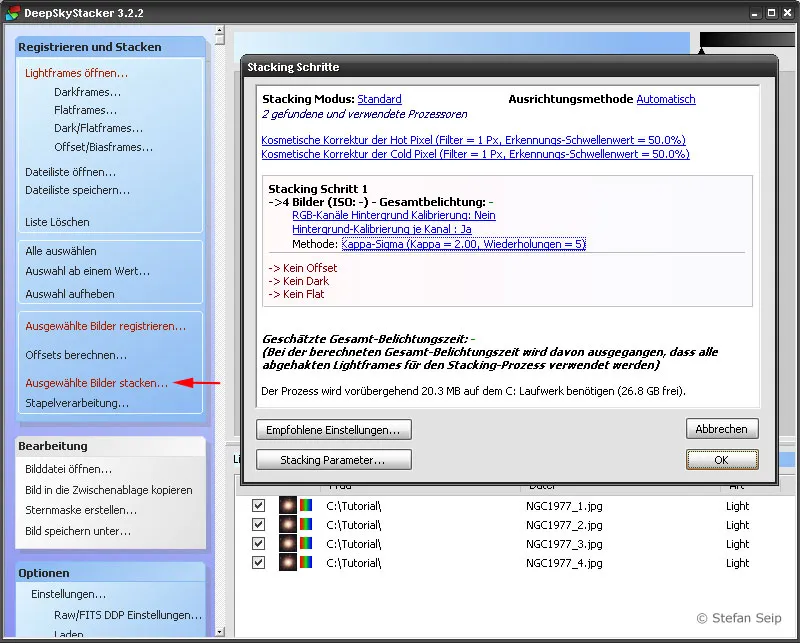
DeepSkyStacker software: Dialog box for starting the stacking procedure after calling up the "Stack selected images..." command (arrow); a summary of the planned steps appears.
Before you start, please take a look at the settings, which you can call up using the Stacking parameters... button. A dialog box appears with six tabs, which I would like to illustrate below, whereby only the important settings are explained in each case: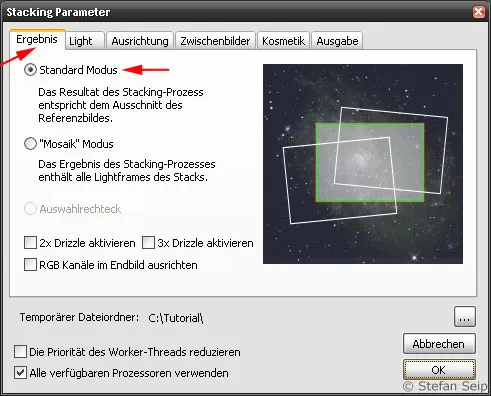
Stacking parameters of the DeepSkyStacker software, Result tab. Select the "Standard mode" here.
Stacking parameters of the DeepSkyStacker software, Light tab. Here we opt for a simple average calculation.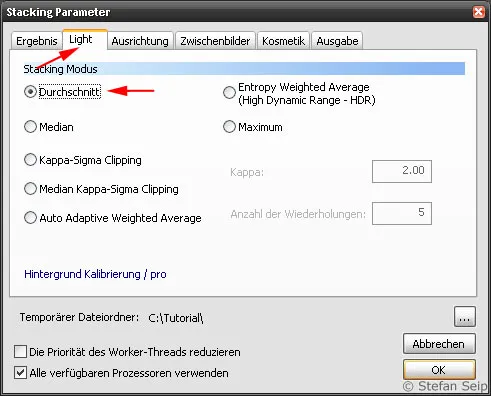
Stacking parameters of the DeepSkyStacker software, Alignment tab. The Automatic method ensures a precise overlay of the individual images, whereby stars are selected as reference points.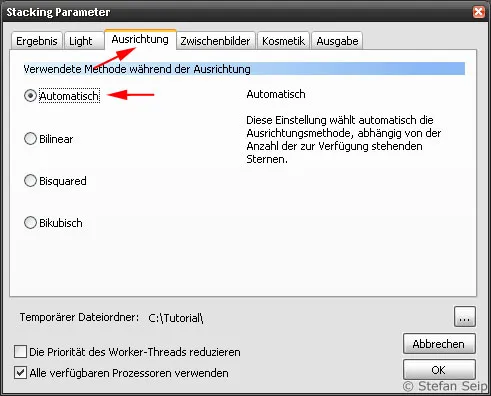
Stacking parameters of the DeepSkyStacker software, Intermediate images tab. The top two boxes can be deselected to save disk space.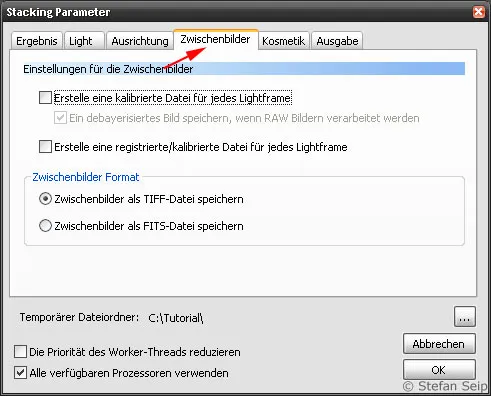
Stacking parameters of the DeepSkyStacker software, Cosmetics tab. For the exercise in this tutorial, I have disabled the detection and removal of bad pixels. However, this function is very useful, so I make use of it in many cases.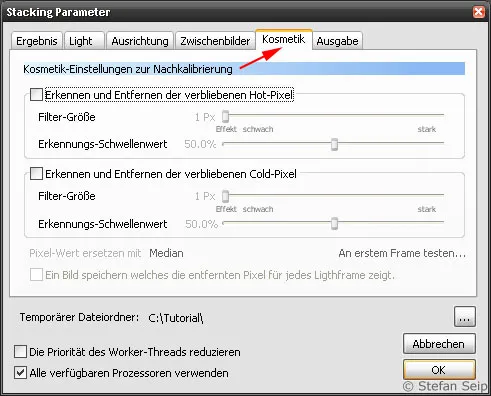
Stacking parameters of the DeepSkyStacker software, Output tab. Here you can specify what should happen to the result of the calculations. I chose to create a result file called "Autosave.tif" (arrow).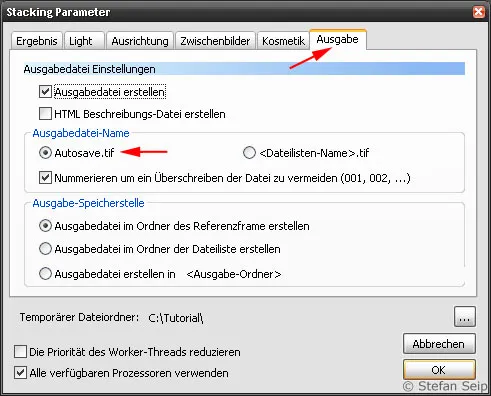
Confirming with OK takes you back to the summary.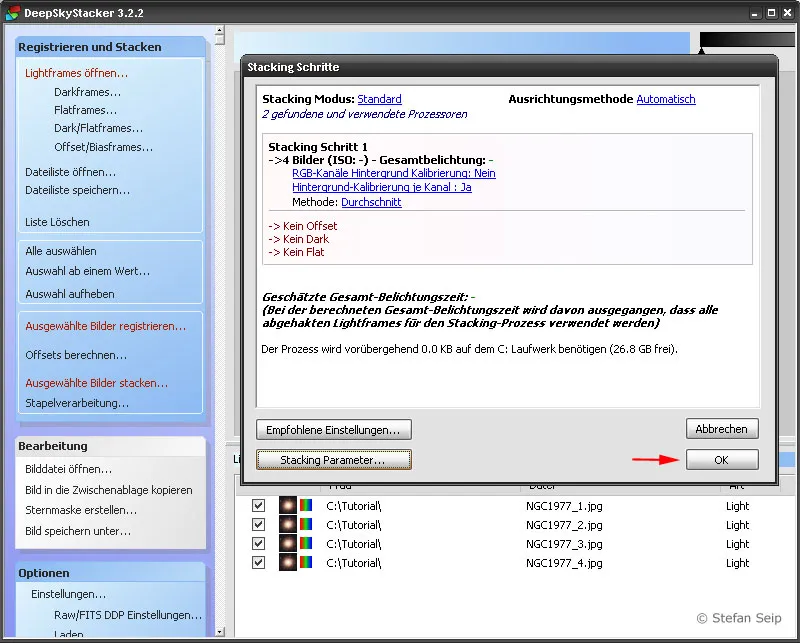
DeepSkyStacker software: The dialog box for starting the stacking procedure becomes visible again and now contains all the settings made in a summary. Click "OK" (arrow) to give the start signal.
Now click on OK to start the alignment and stacking process. This is followed by a computationally intensive phase in which a dialog box displays the progress.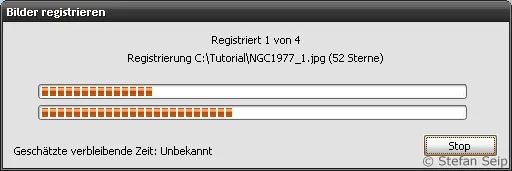
DeepSkyStacker software: Stacking can take some time. During this time, status messages are displayed.
Afterwards, DeepSkyStacker displays the result of the calculations and simultaneously creates the file "Autosave.tif" in the folder where the output files are saved. This is a file in TIFF format with 32-bit color depth.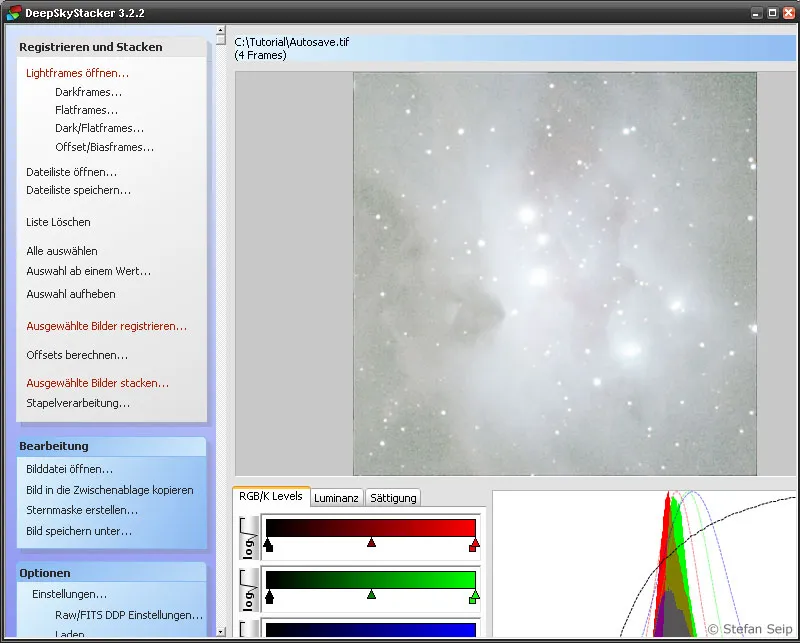
DeepSkyStacker software: Display of the resulting image after stacking.
To simplify further processing, you can create the file again in 16-bit TIFF format by clicking on the Save image as... command in DeepSkyStacker.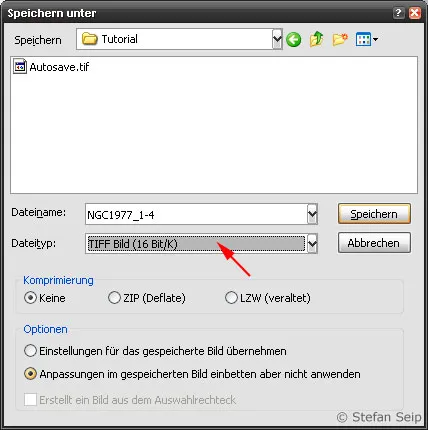
DeepSkyStacker software: The "Save as..." dialog box allows you to select the file format, in this case a TIF format with 16 bits per pixel and colour channel (arrow).
The result of the DeepSkyStacker software (left) is practically no different from the method described above in Photoshop (right). However, with many individual images and the risk of image field rotation, working with DeepSkyStacker is much more convenient.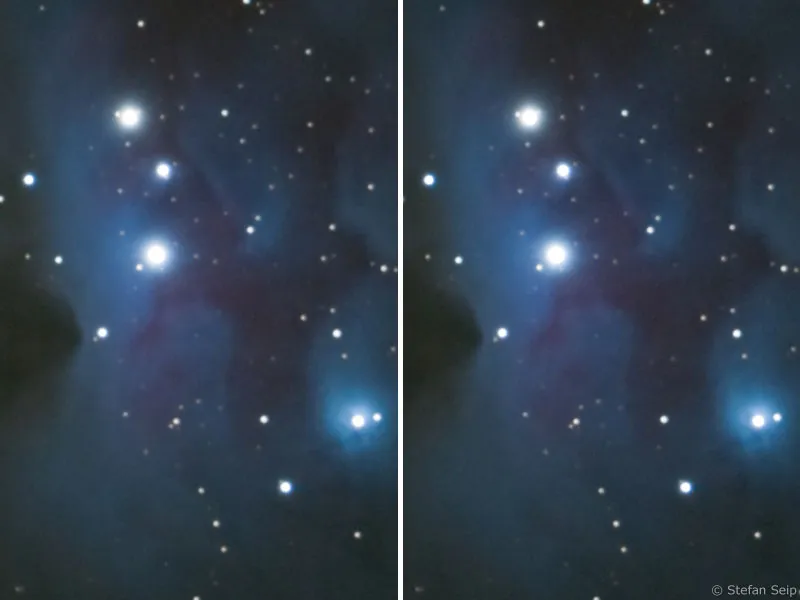
Conclusion
Superimposing different images of the same subject is a very effective way of reducing the amount of noise in digital photos. What was demonstrated here as an example with just four individual images and already resulted in a significant improvement in the signal-to-noise ratio can be increased even further with a larger number of individual images. The more images are included in the average value calculation, the greater the desired effect will be, whereby the greater the number of images, the lower the gain to be achieved per individual image.
Example: Compared to a single image, you can halve the noise component by using three additional photos. If you have taken 16 individual photos, the noise can be halved again, i.e. reduced to a quarter. In order to halve the noise again from this level to one eighth, a further 48 images would be required in addition to the 16 individual images, bringing the total number to 64 (square root of 64 = 8)!
In the exercise example shown here, photos in JPG format were used. The reason for this is simply the small file size for downloading the exercise files! In practice, formats without data compression are of course preferable, i.e. raw format for digital SLR cameras.
Note: The methods described for superimposing individual shots cannot be used for photos that show both the landscape and the starry sky, because the stars continue to move in relation to the landscape. Therefore, such images cannot be precisely aligned. However, you can use the methods for photos that have nothing to do with astrophotography. You just have to make sure that no moving objects in the individual images make overlaying difficult or impossible. Even the leaves of a tree in the wind can throw a spanner in the works.
