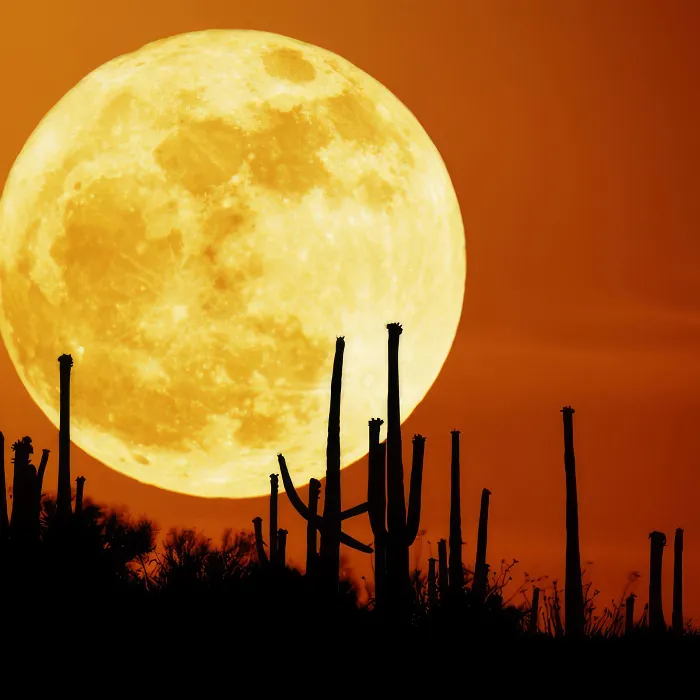
The sun is by no means flawless, as was expected of a "divine star" in antiquity and the Middle Ages. In fact, sunspots appear on its surface.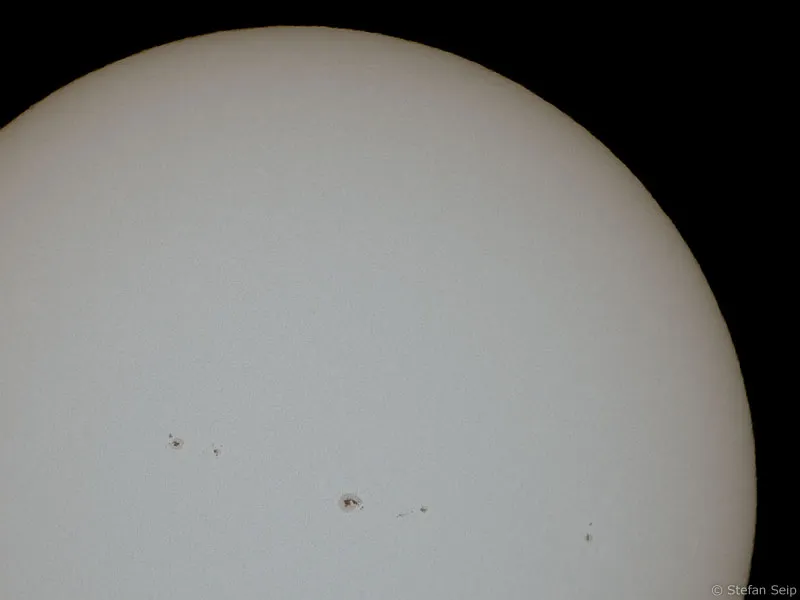
Part 6: Be careful with photos of the sun
+++ CAUTION! +++ WARNING! +++ CAUTION! +++ WARNING! +++
As soon as you point an optical device at the sun, there is a fundamental risk that the intensity of the radiation will destroy the device or irreparably damage your eyesight! It is therefore essential that you take all the precautions contained in this tutorial to heart BEFORE taking your own photos of the sun. Thank you.
+++ CAUTION! +++ WARNING! +++ CAUTION! +++ WARNING! +++
The sun
The sun plays a major role even for those people who are not interested in what is happening in space and in the sky, because it provides the light and warmth without which life on earth would not be possible. Even the state of mind of some of our contemporaries depends on whether the sun shines brightly in the firmament on a friendly, cloudless day or whether clouds block our view of the sun.
If we look at the sun as an astronomical object, its special position at the center of our solar system should be mentioned first. In terms of both its diameter and its mass, it clearly surpasses the planets. Unlike the planets, the sun itself is luminous, as nuclear fusion takes place inside its gaseous body at a temperature of 15 million degrees, converting hydrogen into helium and releasing enormous amounts of energy. According to the well-known Einstein equation E=m-c² (energy = mass times the speed of light squared), mass is converted into energy during this process. As a result, our sun loses 4,000,000 tons of mass every single second! Fortunately, this is only a tiny fraction of its total mass, as it has been producing this energy for almost five billion years and is only in the middle of its life.
Cosmic nuclear reactors of this size are by no means rare in the universe: All the stars that can be seen in the night sky are objects similar in structure to the sun. Conversely, this means that the sun is a star that only plays a special role for us due to its relatively small distance from the earth. In absolute terms, the sun is in many respects an average star which, together with a hundred billion other stars, forms a spiral system that we call the Milky Way. An enormous number of other Milky Way systems, also known as galaxies, are now known.
The diameter of the sun is around 1.4 million kilometers, and you would have to line up 109 globes to cover this distance. The earth orbits the sun on an elliptical path over the course of a year. The average distance is around 150 million kilometers - a distance to which other astronomical distances are often compared and which is therefore also referred to as the "astronomical unit". Light needs 8 minutes and 20 seconds to cover this distance. The Earth reaches its closest point to the sun at the beginning of January and its furthest point from the sun at the beginning of July. This means that the seasons are not caused by the Earth's fluctuating distance from the sun. This is due to the Earth's axis of rotation, which is inclined at an angle of 23.5 degrees and causes the northern hemisphere to face the sun at one point and the southern hemisphere to face the sun six months later.
The fact that the sun rises in the east and sets in the west is only true on two days of the year, namely at the beginning of spring and the beginning of fall. After the beginning of spring, its rising and setting points shift towards the north-east and north-west with a maximum on the day of the summer solstice (beginning of summer). After the beginning of autumn, however, sunrises shift to the southeast and sunsets to the southwest, while the extreme position is reached on the day of the winter solstice. In summer, the "diurnal arc", i.e. the apparent path of the sun above the horizon during the course of the day, is correspondingly larger than in winter, which has a direct effect on the length of the day, as everyone knows.
If you know the latitude of your observation point, you can use simple formulas to calculate the maximum height of the sun at noon in the south, at least for the beginning of each season. If phi is the geographical latitude in degrees (e.g. 50° for Frankfurt/M.), then the following applies:
Highest position of the sun on 21.3. and 23.9. = 90° -phi (e.g. Frankfurt/M.: 40°)
Highest position of the sun on 21.6. = 90° -phi + 23.5° (e.g. Frankfurt/M.: 63.5°)
Highest position of the sun on 21.12. = 90° -phi - 23.5° (e.g. Frankfurt/M.: 16.5°)
Photography of the sun
If you want to observe or photograph the sun, you must take a few precautions to avoid damaging your eyesight and/or the equipment you are using. If the light and energy of the sun is concentrated in a focal point by using an optical device, high temperatures can be generated which can have a devastating effect on eyes and equipment. A fleeting glance at the sun through small binoculars or a telephoto lens is enough to irreparably rob the eyes of their sight. No photo is worth taking such a risk. Therefore:
Sun observation ONLY with suitable sun protection filters!
Only filters that are specifically designed for solar observation and photography are "suitable". We strongly advise against all other solutions, especially the use of various "home remedies". Never use filters for solar observation:
- Soot-blackened panes
- Pieces of developed, blackened film
- "Golden rescue film" from the automotive accessories trade
- Two polarizing filters "twisted" against each other
- Black-looking infrared pass filters (for IR photography)
- Eyepiece filters (small filters that are screwed into the eyepiece of a telescope)
- Damaged solar filters
- Solar filter foils with kinks, holes or tears
Only the following protective filters are recommended:
- Special solar filters BEFORE the lens of optical devices. This prevents the energy from penetrating the device in the first place and cannot cause any damage.
- Special filter film intended for solar observation. The product "AstroSolar", for example, is of good quality and can be obtained from Baader-Planetarium(http://www.baader.planetarium.de or http://www.baader-planetarium.de/sektion/s46/s46.htm) for only EUR 20 per A4-sized sheet. The sheet can be used to make a number of small filters for various lenses yourself. Instructions are included with the sheet. Choose the film with the attenuation factor of ND 5.0 for visual purposes. ND 5.0 means a "neutral density" of 105= 100,000, which corresponds to a light attenuation of 16.6 f-stops!
- Solar protection filter made of glass for the entrance aperture of a telescope. Depending on the diameter required, a good solar filter of this type can be very expensive if it is of high quality.
The following points must be observed when fitting and using these filters:
- Educate any people present about the dangers to prevent someone removing the filter "as a joke" while observing.
- Pay particular attention to children at all times!
- Sun protection filters must be firmly and securely fastened and must not fall down due to a gust of wind or mechanical shock. Do not rely on a strip of adhesive tape that has already been used several times!
- Swivel an instrument for solar observation or photography to another region of the sky after use or during a break in observation.
- Also remember to cover viewfinder telescopes etc.
My first self-made solar filter made of "Astro-Solar" foil does not yet look very professional. But the film became smoother when you put it on the telescope aperture. Incidentally, moderate wrinkling only slightly worsens the image, while stretching should be avoided.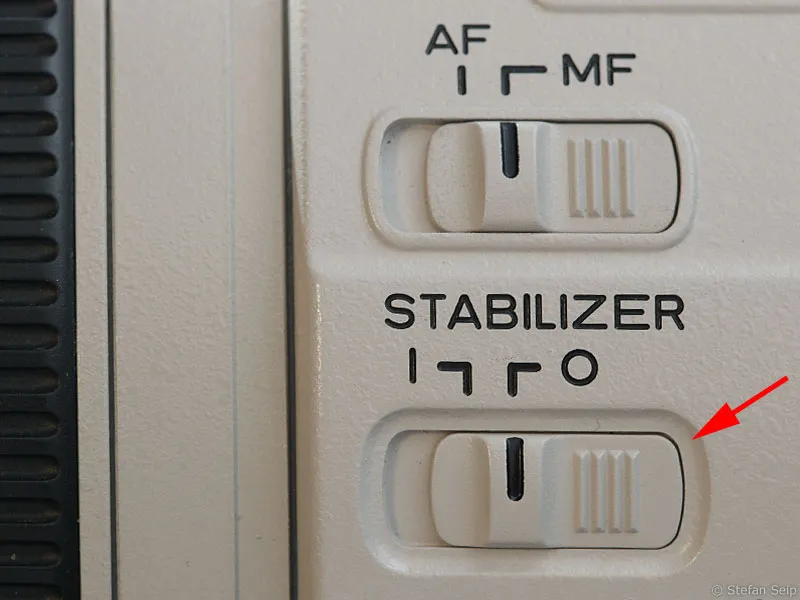
This filter for a photo lens also contains "Astro-Solar" filter foil, but it is optimally mounted in a fixed mount.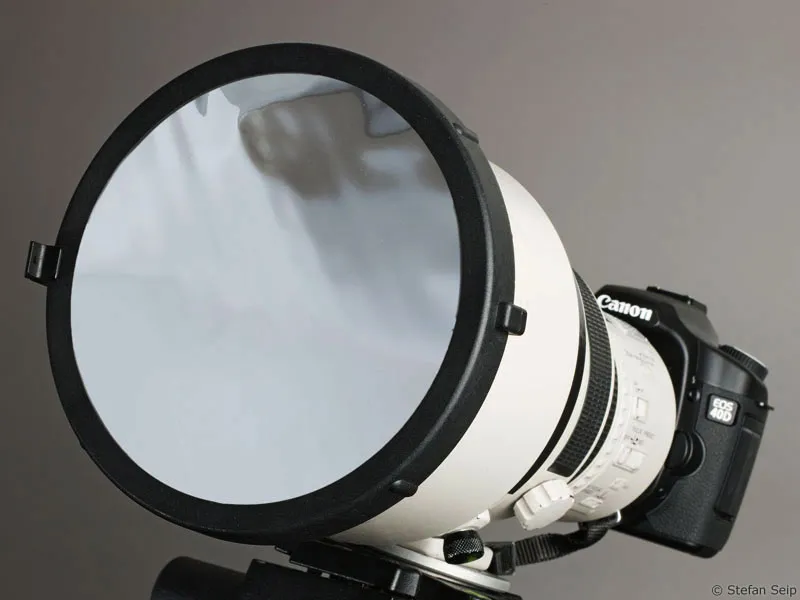
If you already have relevant experience in observing the sun, you may also consider the following aids:
- Photographic filter film (e.g. "AstroSolar") with an attenuation factor of ND 3.8. With a factor of 12.6 f-stops, this film allows significantly more of the sunlight to pass through than the visual film with an ND factor of 5.0 (see above). With the additional use of appropriate gray filters, the exposure time can be controlled even with the longest focal lengths and/or small aperture ratios so that the exposure time is still short enough to avoid blurring due to air turbulence. The additional use of an infrared/UV blocking filter is absolutely essential!
- Herschel prism, also called Herschel wedge. This optical instrument can only be used in conjunction with a refracting telescope and enables high-quality solar observations. The disadvantage is that it is attached to the eyepiece end of the telescope so that the unfiltered energy of the sun is bundled in the tube. The Herschel prism deflects 95.4% of the incident light out of the device, while the remaining 4.6% can be reduced to the desired residual brightness with additional gray filters. Highly recommended is the Herschel prism from Baader-Planetarium(http://www.baader-planetarium.de/sektion/s37/s37.htm#herschel), which does not allow the unused radiation to escape, but eliminates it by means of an elaborately constructed "light trap".
When using both methods, it must be borne in mind that the residual brightness of the sun without the use of additional gray filters is still so high that the eye can be damaged.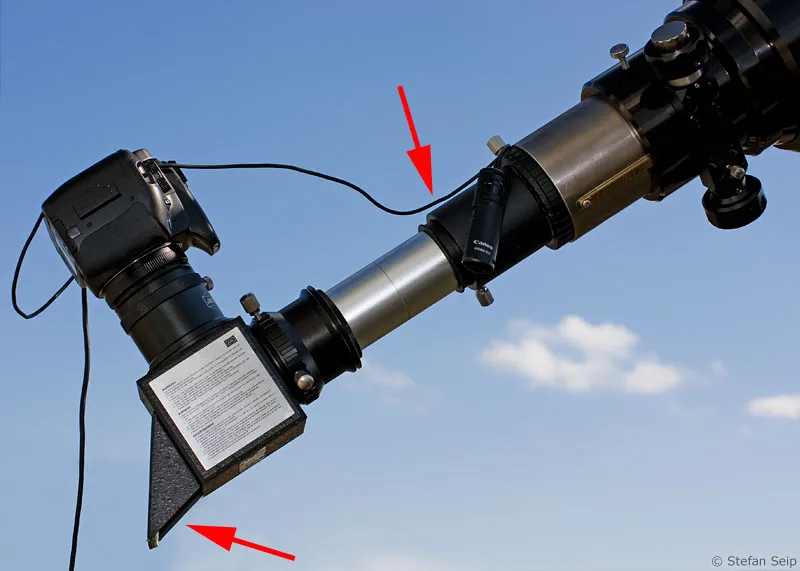
A Herschel prism in use. The left arrow points to the point where the unneeded light leaves the prism. Newer designs have a built-in "light trap" there. The right arrow points to the position of the inserted Barlow lens, which extends the effective focal length of the telescope in order to image sunspots in great detail.
With digital cameras, it is the sensor that can be destroyed when exposed to the large, unfiltered brightness and heat of the sun. A sharp, focused image of the sun on the sensor can already cause damage within a relatively short exposure time if no protective filter is used. Compact and Bridge cameras that use the image sensor to create the viewfinder image are particularly at risk, as are digital SLR cameras in "live view" mode. When using a tripod, the risk increases because the sun can then act on the same part of the sensor over a longer period of time.
A "normally" exposed landscape shot in which the sun can be seen in the picture can be taken with a digital SLR camera, but if possible without using the "Live View" function. It is also safe to use any camera system behind a lens with a solar filter attached.
What is there to see on the sun?
This tutorial deals exclusively with the sun as an astronomical subject. It excludes all shots in which the sun is merely used as a decorative accessory or as a "mood element" and in which the focus is not on reproducing details on the sun. This includes, for example, almost all photos of sunrises and sunsets.
If you look at the sun through suitable filters, which considerably attenuate the abundance of light in all spectral ranges, you will first notice the so-called sunspots . They occur individually or in groups, whereby their frequency is particularly high in an approximately eleven-year cycle and particularly low in between. At the time of publication of this tutorial (December 2008), a sunspot minimum (2008) has just passed, while the next sunspot maximum is not expected until 2013. Sunspots have been completely absent for many weeks, even months. However, an increase in the frequency of sunspots can be expected in the foreseeable future at the start of the new cycle.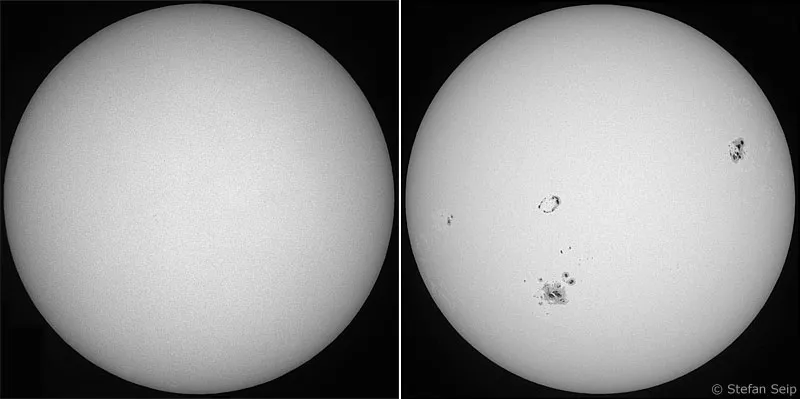
During a sunspot minimum, the sun often appears without any spots (left, September 26, 2008), whereas near the maximum it is covered with spots (right, October 27, 2003).
Sunspots occur in places where anomalies in the sun's magnetic field occur. There, the surface of the sun, which is normally about 5500° Celsius, cools down by about 1000 degrees. Viewed in isolation, a sunspot would also be bright, but it appears dark in comparison to its even brighter surroundings. The lifespan of a sunspot ranges from a few days to a few weeks, rarely more than two months. Sunspots can be used to determine the rotation period of the sun, which is slightly longer than 27 days. During this time, however, the Earth also moves a little further in its orbit around the sun, and from a stationary point a rotation period of around 25.4 days would be determined.
Large sunspots far exceed the size of the Earth. They are differentiated into a dark core zone (umbra) and a lighter courtyard (penumbra). When using glasses with appropriate protective filters, they can be recognized without optical aids, i.e. without magnification.
A daily updated situation of the sunspots can be found on the website http://www.spaceweather.com.
In addition to the sunspots, the following phenomena can be recognized:
- Edge dimming
The brightness of the solar disk is greatest in the middle and decreases towards the edge. This is due to the gaseous nature of the sun, which means that the rays at the edge have to travel a longer distance through the sun's atmosphere.
- Granulation
Like the bubbles on the surface of boiling water, the sun also "bubbles". However, the resulting structures are quite small and are called granules. The entirety is the granulation, which can be photographed with correspondingly high-resolution optics (a telescope with an aperture of 75 to 100 millimetres is the lower limit). If the resolution is not quite sufficient, a "gritty" result can be a hint of granulation and should not be misinterpreted as image noise.
- Flares
Filament-like brightenings that occur from time to time, especially in the area of the darkened edge of the sun, are called flares.
All the phenomena described so far concern the photosphere of the sun, i.e. the layer that emits the lion's share of the sun's light and energy. The so-called chromosphere , which has completely different structures, for example huge tongues of flame, the prominences, lies above it like an onion skin. In order to observe or photograph the chromosphere, very expensive special filters or telescopes are required, known as H-alpha filters or H-alpha telescopes. The complex thing about these filters is that they have to block the sunlight down to a single wavelength. The wavelength that the filter allows to pass through as narrowly as possible is 656.3 nanometres, the red light of ionized hydrogen. The view of the red sun through an H-alpha instrument is magnificent: above all, the speed with which visible changes in the structures can be detected, with which prominences form and develop, provides an incomparable "live experience" when observing the sun. Some prominences or eruptions, known as flares, change their appearance dramatically within just a few minutes.
The sun is particularly photogenic during a solar eclipse. Part 8 of the "Astrophotography and sky photography" tutorial series reports on this.
The numerous phenomena of sunlight caused by reflection and refraction should not be forgotten at this point, with the spectrum ranging from rainbows, halos and parhelia around the sun to the "green flash". An excellent website that provides information on the diversity of such phenomena is http://www.meteoros.de.
The apparent size of the sun in the sky varies only slightly due to the different distances and averages 32 arcminutes, i.e. around half a degree (1 degree = 60 arcminutes). It therefore appears to us to be the same size as the full moon. The image size of the sun on the sensor is calculated using the simple formula
Focal length [mm] divided by 107.
With a lens focal length of 400 millimetres, the sun is therefore only 3.7 millimetres in size; with a focal length of 1000 millimetres, it is 9.3 millimetres. A format-filling image in conjunction with a camera with a crop factor of 1.6, i.e. a sensor measuring around 15 x 22 millimetres, requires a focal length of 1600 millimetres, and even 2500 millimetres for a camera with a full-frame sensor!
Size comparison: The sun on the left with 400mm, on the right with 1500mm focal length. The camera used was an SLR with a 15x22mm sensor (1.6x crop). Both photos were not cropped: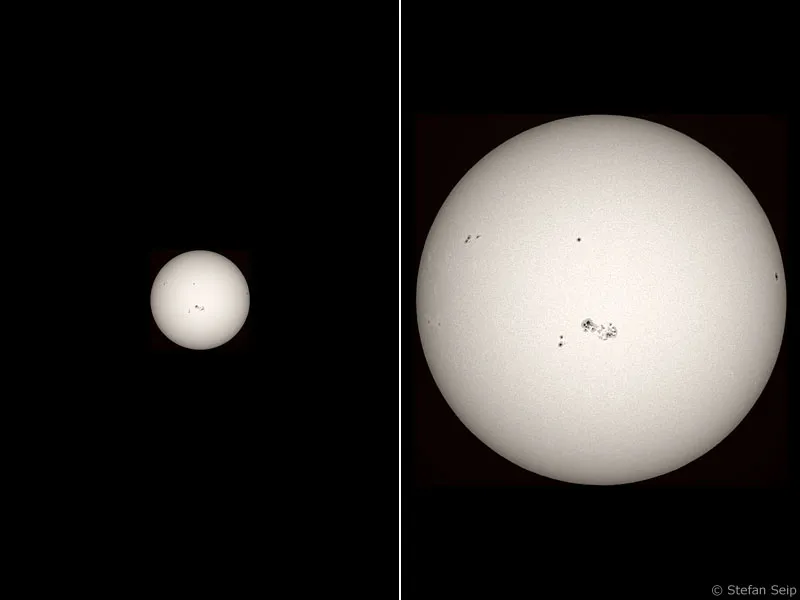
If a lens with the desired long focal length is not available, an astronomical telescope is a good alternative. If a front filter is used in front of the aperture, mirror and refracting telescopes of any type are suitable; if a Herschel prism is used, only a refracting telescope. A reflex camera can be connected to it if the telescope has an eyepiece connection with a two-inch diameter. Then you only need a so-called T2 adapter and a 2-inch connection sleeve. Both parts are purely mechanical, do not contain any optics and are therefore available at affordable prices.
The camera is attached to the telescope instead of an eyepiece, while the optics of the telescope are used as the receiving optics.
On the far left is the T2 adapter with Canon EOS bayonet, in the middle is the 2-inch connection sleeve: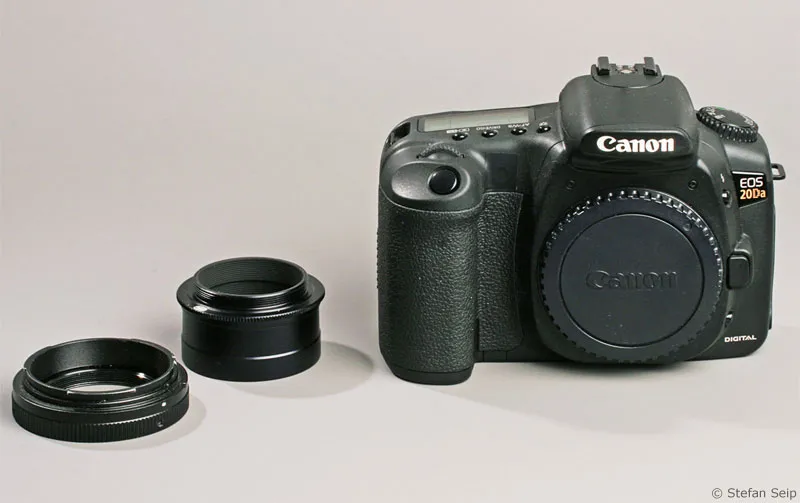
A digital SLR camera with mounted T2 adapter and screwed-in 2-inch connection sleeve. Neither part contains any lenses.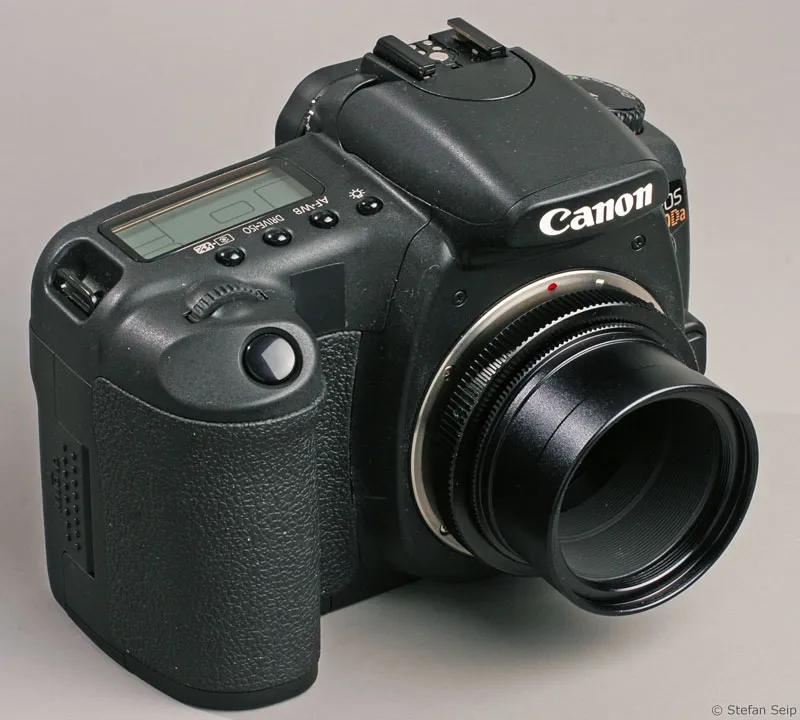
The 2-inch connection sleeve fits exactly into the focuser of most telescopes: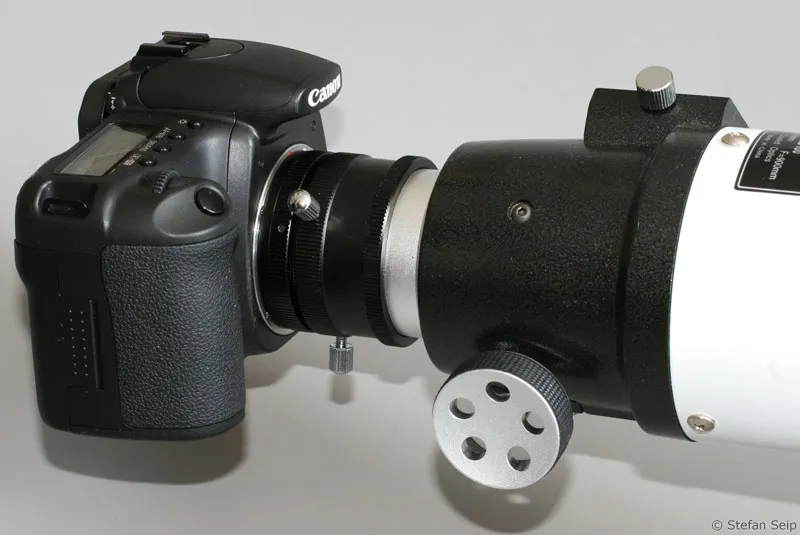
Old meets new: A 30-year-old Unitron refractor without motorized tracking with a home-made solar filter (front) and connected digital SLR camera. A photo taken with this equipment can be found at the end of the tutorial under "Sample images".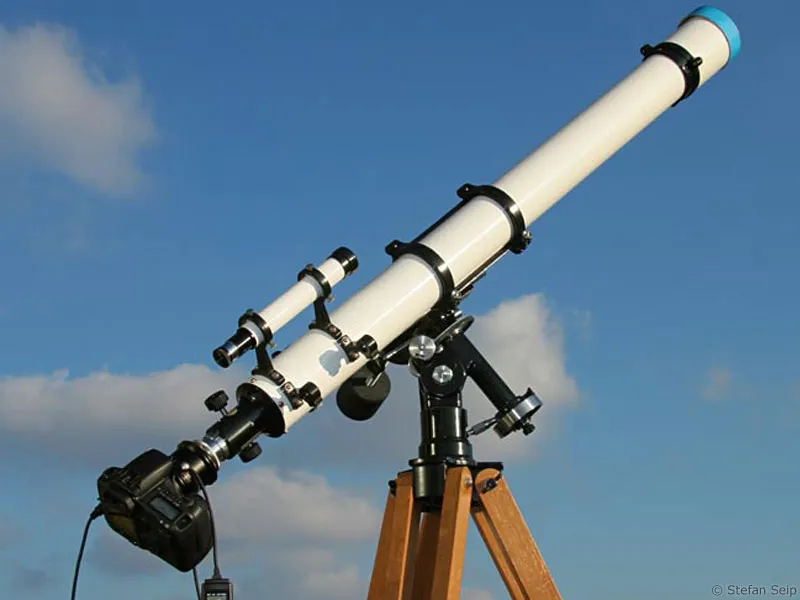
To extend the effective focal length, teleconverters can be used with lenses and "Barlow lenses" with telescopes.
Technical equipment
In addition to the digital SLR camera, a long focal length lens and a safe solar filter, the equipment consists of the following components:
- Stable tripod
The longer the focal length used, the higher the demands on the stability of the tripod in order to avoid camera shake. Astronomical telescopes should also rest on a stable mount and a sturdy tripod. Inexpensive telescopes in particular, which are purchased as complete packages, often show their greatest weakness in terms of stability.
- Cable release / Timer
Cable releases allow the camera to be released without contact in order to avoid camera shake, which is essential when working with long focal lengths. Wireless remote triggers also fulfill this purpose.
How to proceed
In the following, I would like to describe how you can photograph the sun with its spots in as much detail as possible when working with a digital SLR camera and a telephoto lens with a long focal length.
1. make basic settings
The basic settings of the camera should be preferred:
- File format
The RAW format offers the best conditions for subsequent image processing, whereby JPG files should be recorded at the same time. The JPG files make it easier to find the sharpest image from a series of shots later on.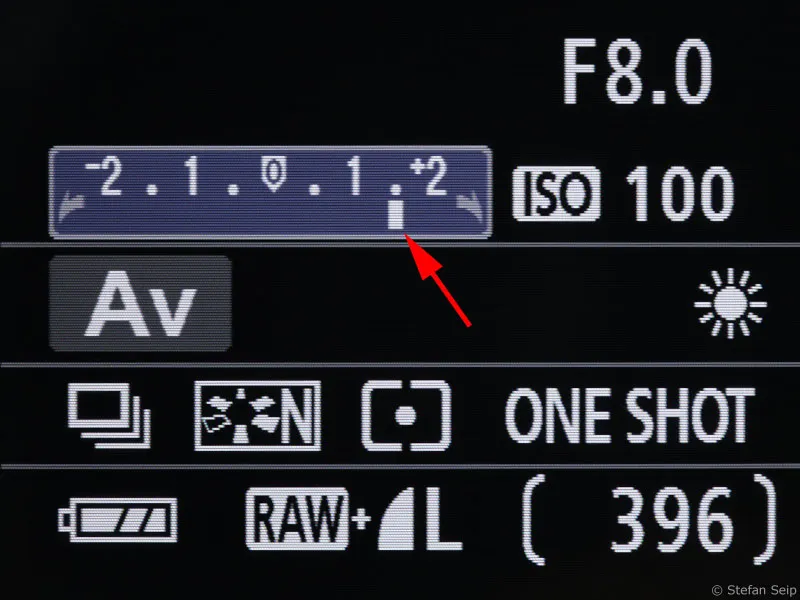
Setting the image quality on a Canon EOS 40D: The RAW format is selected here, while the photos are also saved in the best possible quality of the JPG format ("L" for "Large").
- ISO value
For the best possible image quality with the lowest electronic image noise, set the lowest ISO value (ISO 100).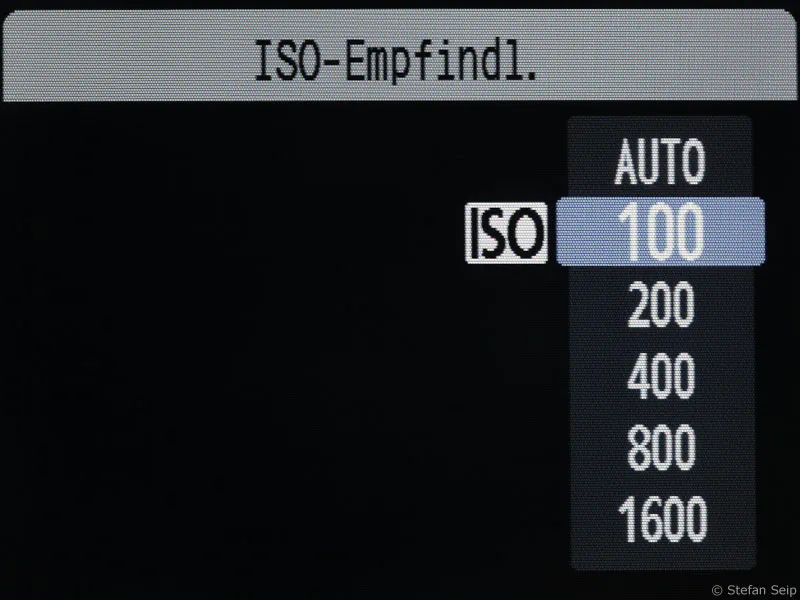
Setting the ISO value 100 for a Canon EOS 450D.
- White balance
Manual setting to a fixed value is recommended, e.g. daylight (symbol: sun). Depending on the inherent color of the sun filter used, a color cast may occur, but this can be easily eliminated during subsequent image processing.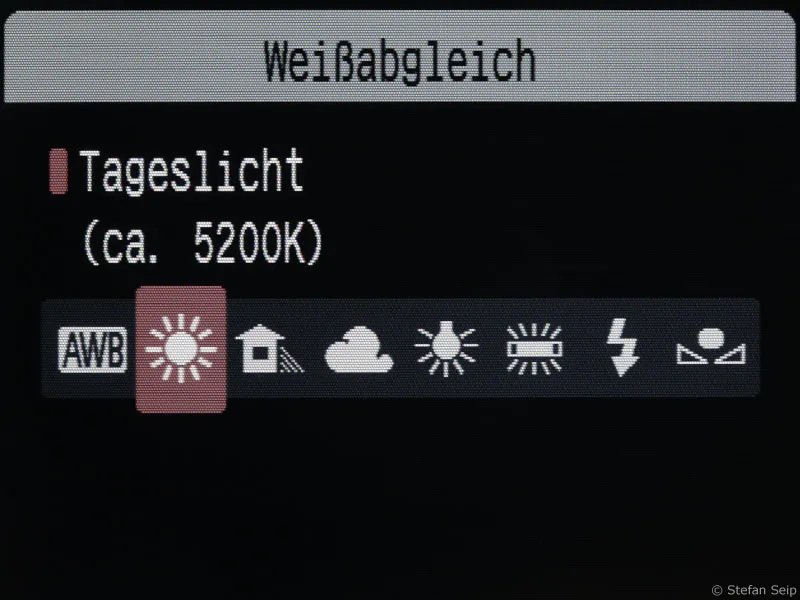
Setting the white balance on a Canon EOS 450D to daylight (5200 Kelvin).
- Exposure program
Instead of the manual setting (M ), you can also use the camera's automatic exposure mode (Av or A) if the sun is sufficiently large. We recommend spot metering as the metering method and exposure compensation of +1.5 to +2 stops: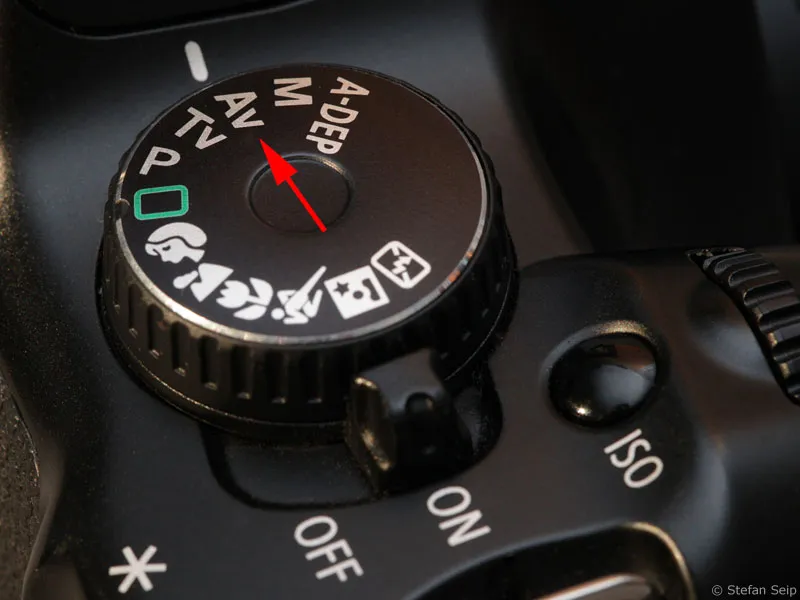
Setting the automatic aperture priority ("Av") on the setting dial of a Canon EOS 450D.
- Metering method
With spot metering (if not available: selective metering) as the metering method, you can reliably measure the sun disk in the center of the image.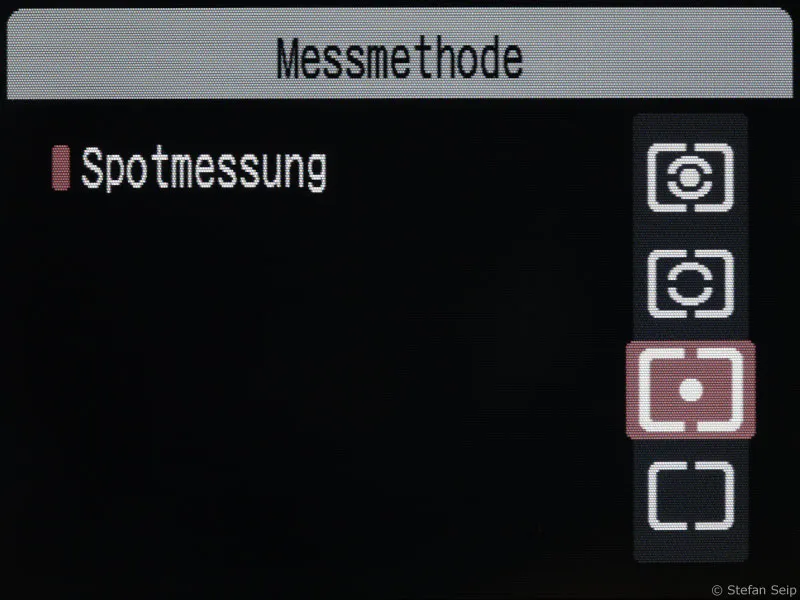
Selecting the "Spot metering" metering method on a Canon EOS 450D.
- Exposure compensation
Exposure compensation by +1.5 or +2 stops (compared to the automatic value) is necessary to avoid underexposure with spot metering.
Correction of the automatic exposure by plus one and a half stops (EOS 450D).
- Blender
Stopping down the lens by one or two stops, starting at the widest possible aperture (i.e. the smallest f-number), is not a bad idea. The reason for stopping down slightly is the fact that most lenses only reach their maximum image quality in this state. In addition, the depth of field increases slightly and makes the search for the best possible focus a little easier.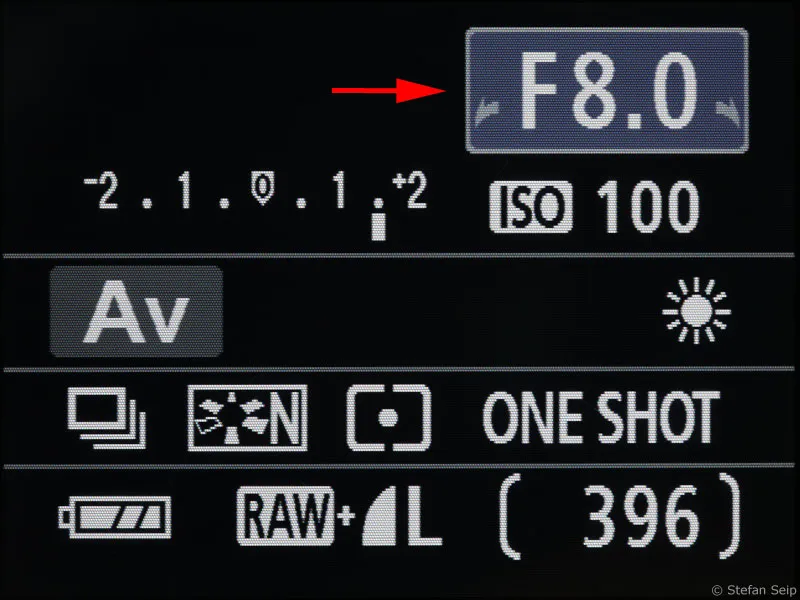
The display of the Canon EOS 450D: The arrow indicates the 1:8.0 Blender setting. Although the lens used has a "light intensity" (smallest adjustable aperture value) of 1:4.5, it has been stopped down by one and a half stops in order to increase the imaging performance.
- Mirror lock
This setting is used to prevent camera shake caused by the camera's mirror. Always make use of this setting when using long focal lengths! The first press of the shutter release button only raises the mirror. Then wait a few seconds before pressing the (cable) release button a second time to start the exposure after the vibrations have subsided.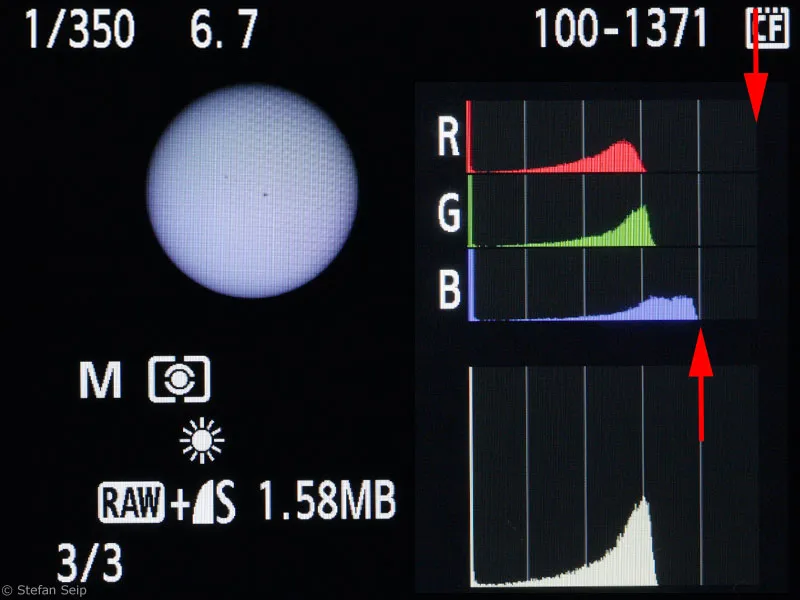
Mirror lock engaged (EOS 40D).
- Image stabilizer
It is best to switch off any existing image stabilization mechanism if you are using a tripod.
Image stabilizer switched off.
2. taking pictures
The procedure for taking photos and subsequent image processing is essentially identical to that for taking photos of the moon. Tutorial number 5 ("Photographing the moon") in the "Astrophotography and celestial photography" series deals with this in detail and should also be consulted if necessary. Here I would like to limit myself to the essential points.
Precise focusing to "infinity" is an important prerequisite for a successful photo of the sun. When using a photo lens, the autofocus should be usable because the edge of the sun or a distinct group of spots offers sufficient contrast for this. If the autofocus does not work, for example because you are using a telescope, you will have to focus manually. Do this with the greatest possible care.
The best and safest way to focus manually is to use the "Live View" function, which some SLR cameras have. For models without live view, the only option is to take a series of test shots and critically assess them individually on the camera display at maximum magnification.
The next step is to choose the right exposure, i.e. the right shutter speed. The following applies:
As ample as possible, but without overexposing the center of the sun.
If possible, configure your camera so that overexposed areas are highlighted by flashing when you look back.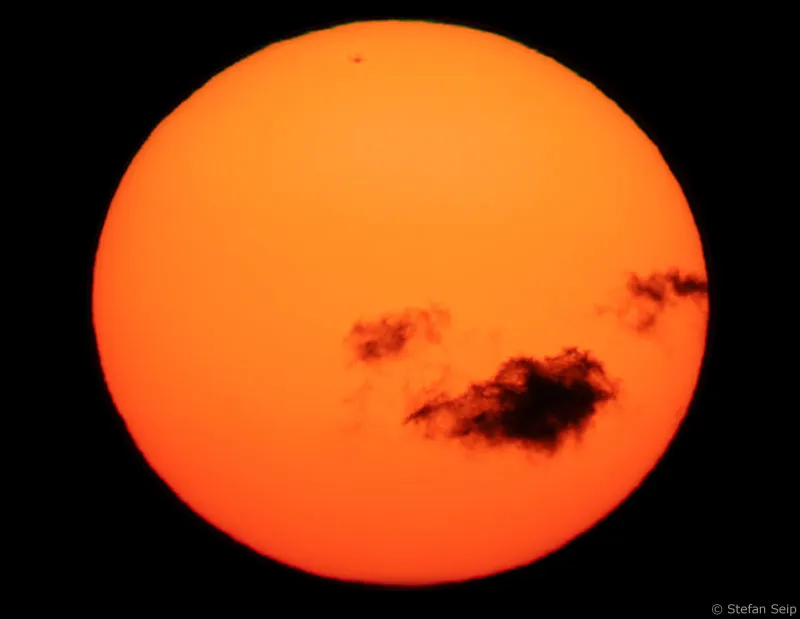
If the EOS 40D's overexposure warning is switched on, fully saturated areas of the image will flash black when you look back.
The exposure can be checked using the histogram. The "mountain of data" represented by the sun must be as far to the right as possible, but without "hitting" the right side. In the case of underexposure, the data mountains are shifted to the left, in the case of overexposure to the right.
Example of an underexposed sun photo. The "data mountains" of the histograms are shifted to the left and end (lower arrow) well before the right stop (upper arrow). Although the photo can be brightened by image processing, this also increases the image noise.
Example of an overexposed sun photo. Here the "mountains of data" hit the right side (red arrows on the right), in addition the fully saturated image area (center of the sun) flashes black (left arrow). Overexposure must be avoided at all costs.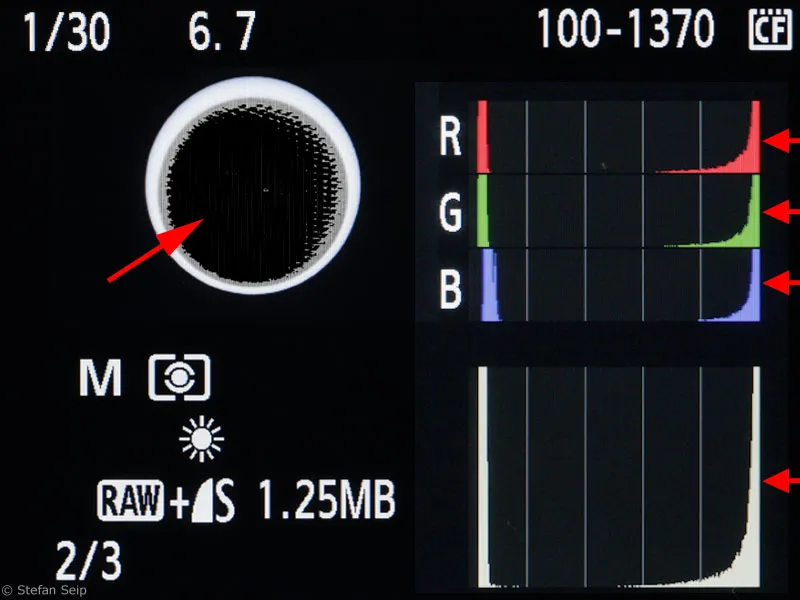
This correctly exposed image shows that the "data mountains" extend far to the right, but without reaching the maximum values of full saturation - all areas of the sun's surface then show structures. The peak on the far left of the histogram represents the black sky.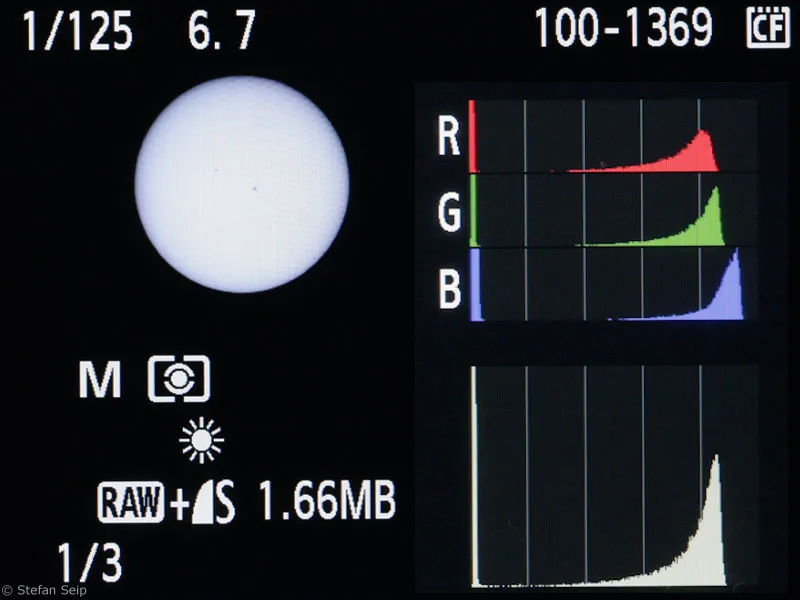
If the sharpness and exposure are right, take a whole series of pictures. With a single image, there is a high risk that you will catch a moment with poor seeing (air turbulence) and the photo will therefore not be in optimum focus. Poor seeing can sometimes already be recognized in the viewfinder if the edge of the sun looks as if it is boiling. The longer the focal length used, the greater the risk of images being spoiled by poor seeing. Particularly during the day, large air turbulence can often be observed, but this is subject to fluctuations during the course of the day. Two to three hours before and after midday are often the best times for sharp photos of the sun.
Image processing
The first step is to select the sharpest photo from the series of images. It is best to use the JPG files for this, as they are quicker to open and compare. View one file after the other in Photoshop, always assessing the sharpness in the 100% view ( View>Actual pixels command , Ctrl+Alt+0 key ).
Do not limit the assessment of the image sharpness to a small area of the image. Air turbulence (seeing) can cause partial blurring, especially with long focal lengths. It is therefore necessary to find the single shot with the best sharpness over the entire image area.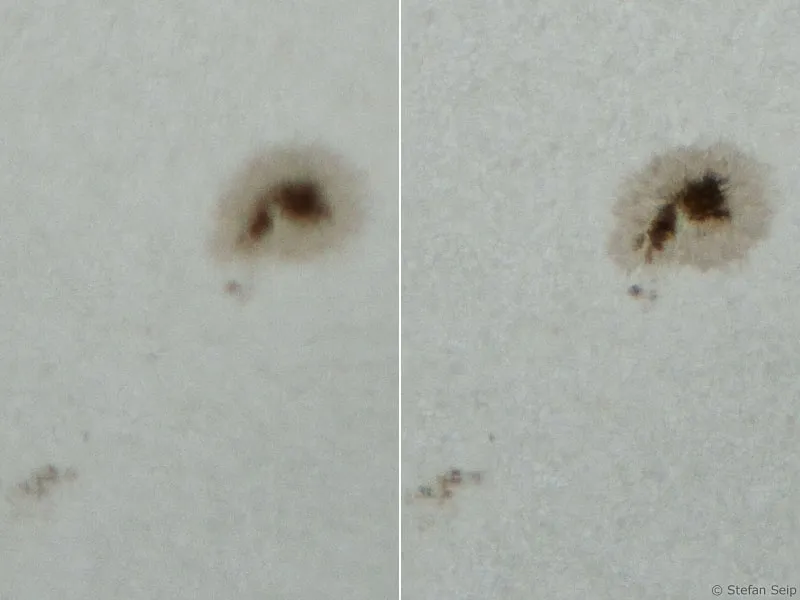
The focus setting of these two images of a sunspot is identical! On the left you can see a single image that has become blurred due to air turbulence. The photo on the right was taken during a moment of good "seeing".
After selecting the image, open the RAW file of the selected sun image in Photoshop: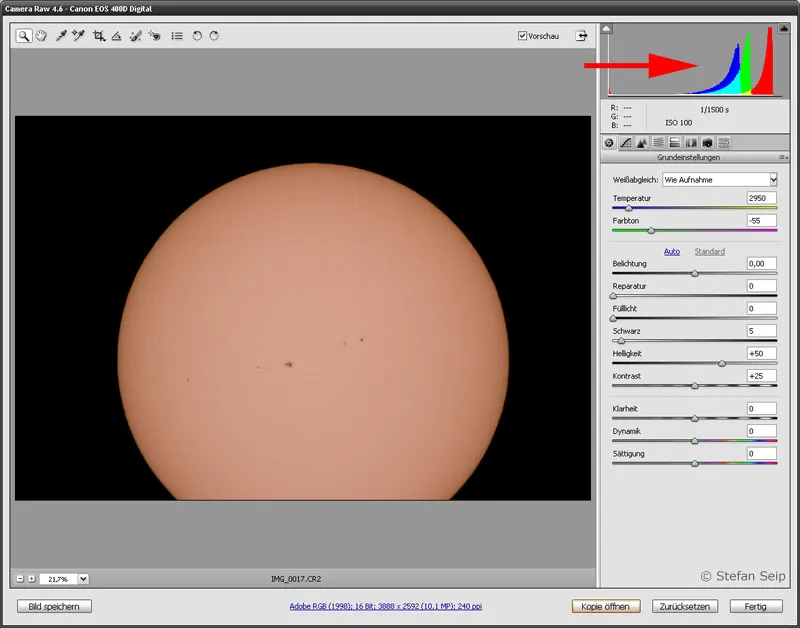
The start screen of Adobe Camera Raw: A red cast catches the eye, which can also be recognized by the RGB histogram (arrow). This is caused by the inherent color of the sun filter used.
The RAW format offers the option of adjusting the neutral color of the sun without data loss. To do this, click on the pipette (white balance tool) at the top left and then on the surface of the sun: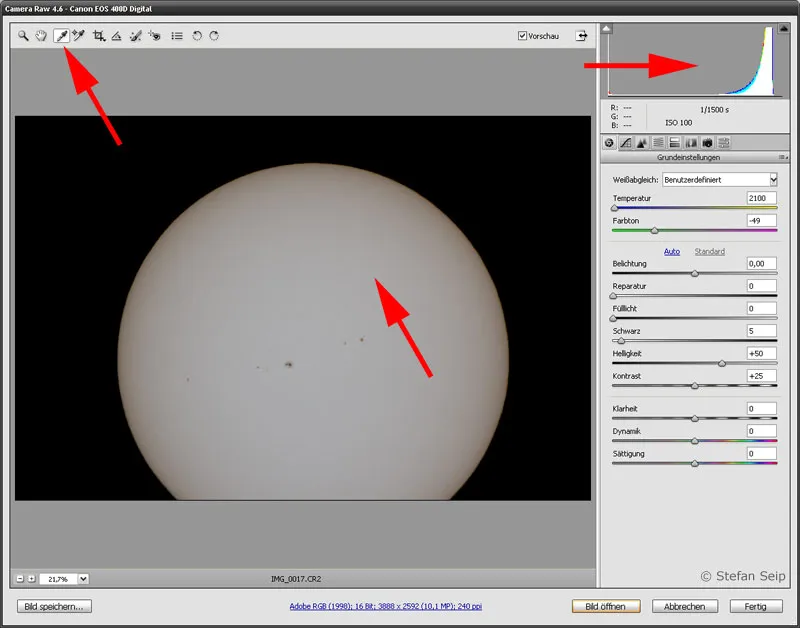
Selecting the white balance tool (left, upper arrow) and then clicking on a spot on the sun's surface (middle arrow) ensures a natural coloration. The red, green and blue components of the histogram then also show a balanced result (upper right arrow).
The last action in the RAW converter will be image sharpening. To do this, click on the third tab from the left labeled Details in the dialog box: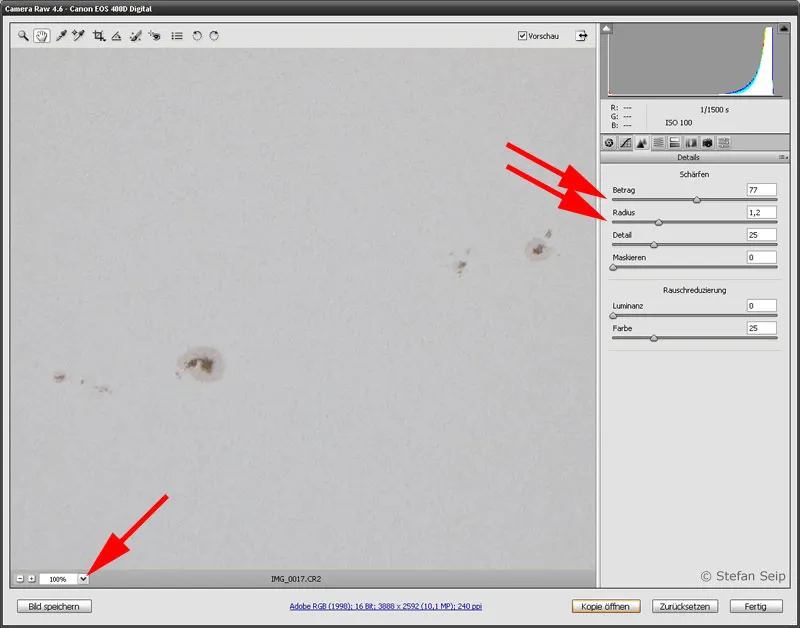
Before sharpening by moving the "Amount" and "Radius" sliders (right arrows), first zoom to 100% view (left arrow) and then move the image section to a region of interest, in this case a group of sunspots.
Then open the image with the Open image button.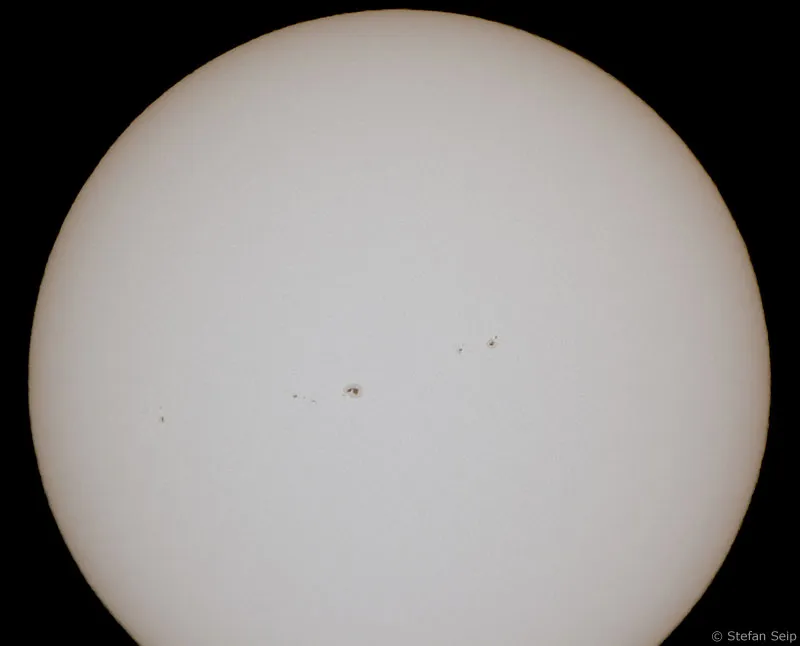
The result of the RAW conversion is already impressive.
Now you can make minor cosmetic changes, which depend on the nature of the source file. In my example, I would like to increase the contrast a little. To do this, I bend the gradation curve (command Image>Adjustments>Gradation Curves...) in the following way: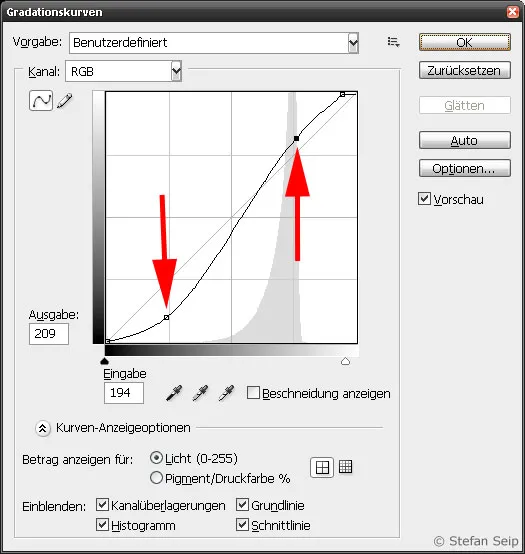
By bending the gradation curve in the shape of the letter "S", the contrast increases: the dark tonal values are lowered (left arrow) and the high tonal values are slightly raised (right arrow).
Here is the result of the increase in contrast: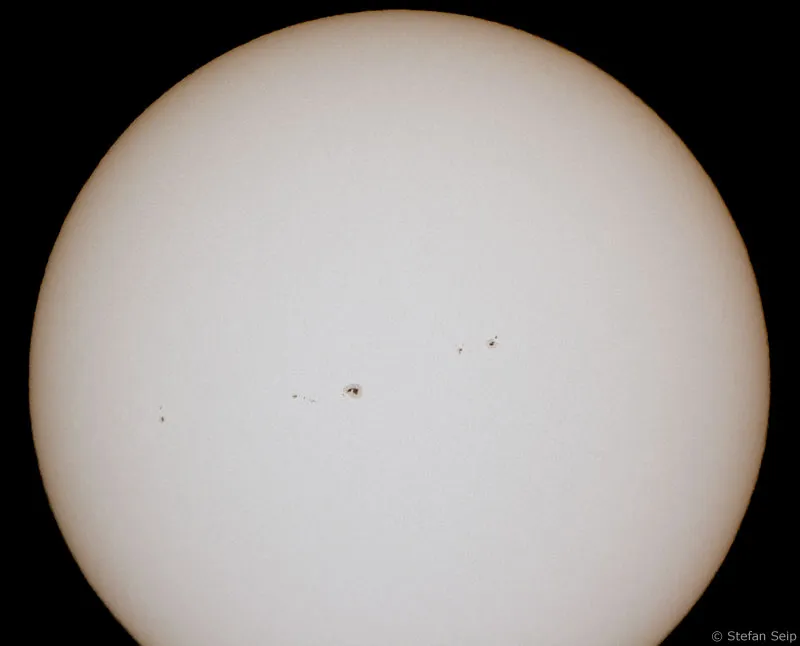
The increased image contrast makes the sunspots stand out more clearly, and the darkening of the edges of the sun can also be seen more clearly.
In the last step, I decided to remove the red cast that was still slightly present, because the color red doesn't go with the sun at all. In Photoshop I used the command Image>Adjustments>Hue>Saturation...: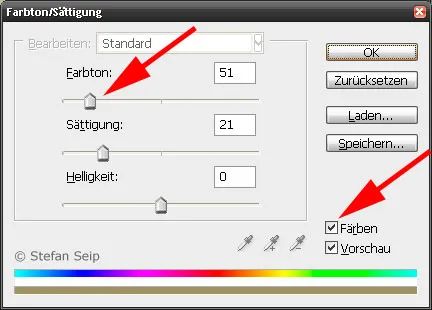
My shot benefited from a change in hue (upper arrow), with the "Colorize" box checked.
Final result after the photo was cropped. This photo of the sun was taken on March 28, 2008 with a Canon EOS 400D connected to a telescope with an effective focal length of 1650 millimetres. The exposure time at Blender 1:10 and ISO 100 was 1/1500 second. A Herschel prism was used to attenuate the light.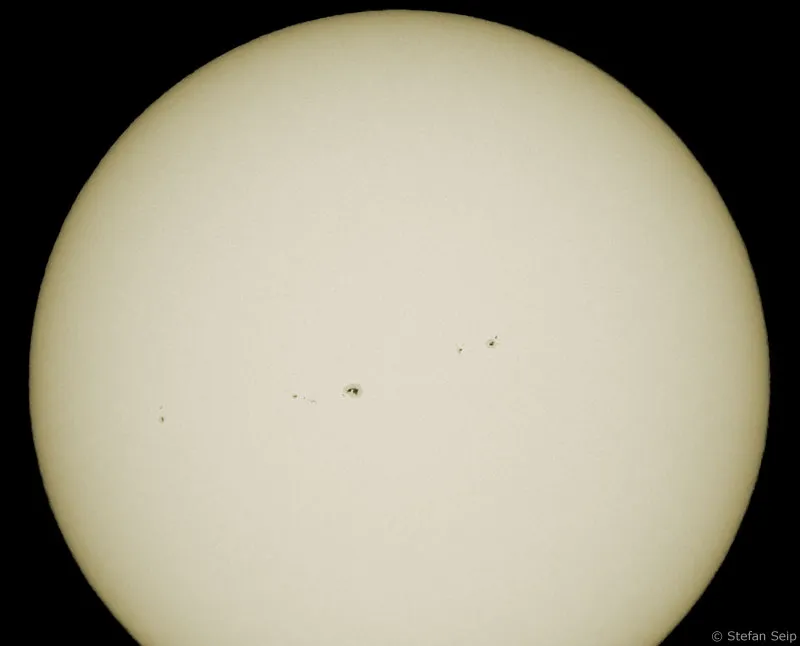
Special case of H-alpha images
Observing the sun in H-alpha light, i.e. the chromosphere, is a special treat. Specialist astronomy retailers offer special filters for this purpose, which can be fitted to an existing telescope. Alternatively, there are also complete H-alpha telescopes on offer, which are particularly safe to use because the necessary filters are permanently installed.
Here is an image of the sun taken on March 28, 2008, through an ordinary solar filter with a visible photosphere: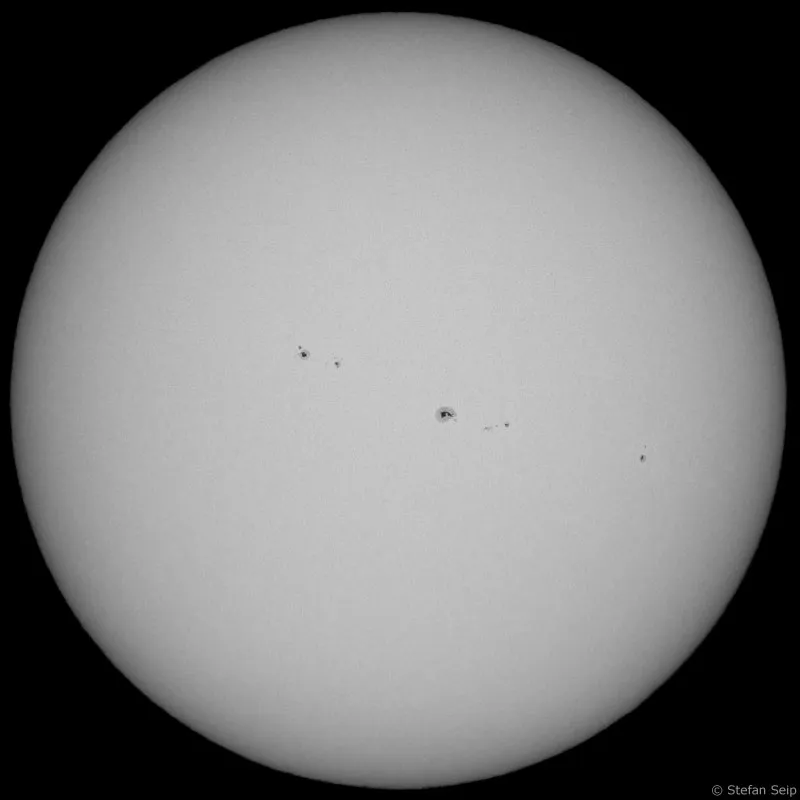
Apart from the sunspots and the edge darkening, the photosphere shows a hint of granulation, which can be seen as a "grainy" structure on the entire surface of the sun.
In comparison, a photo through an H-alpha filter, precisely aligned. The image was taken just one hour later: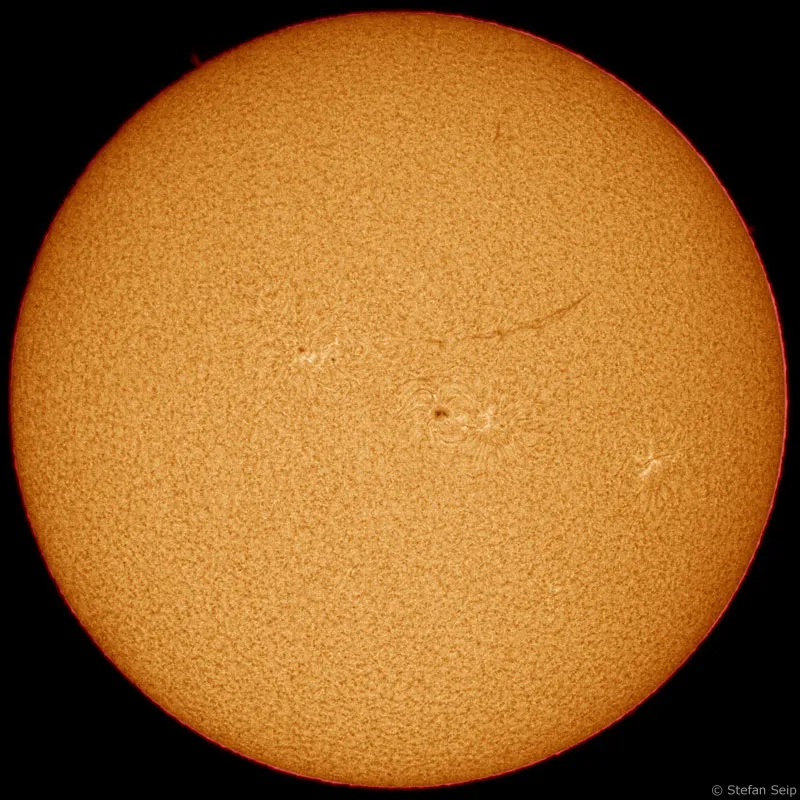
Although the largest sunspots are also visible in this image, the chromosphere has a completely different structure. While the basic structure is much coarser than the granulation, active regions, especially in the area of the spots, stand out as bright areas. Unfortunately, on this day there was only a tiny prominence at the edge of the sun (top left, at "11 o'clock", if you look at the solar disk as the face of a clock). On the right above the center of the image, a thread-like object stands out. This is a large prominence in top view, a so-called filament.
The production of H-alpha filters is extremely complex, which is why they have a high purchase price. Small compact telescopes, which are available for around 600 euros, are the entry level. At the top, the scale only ends in the five-digit range ...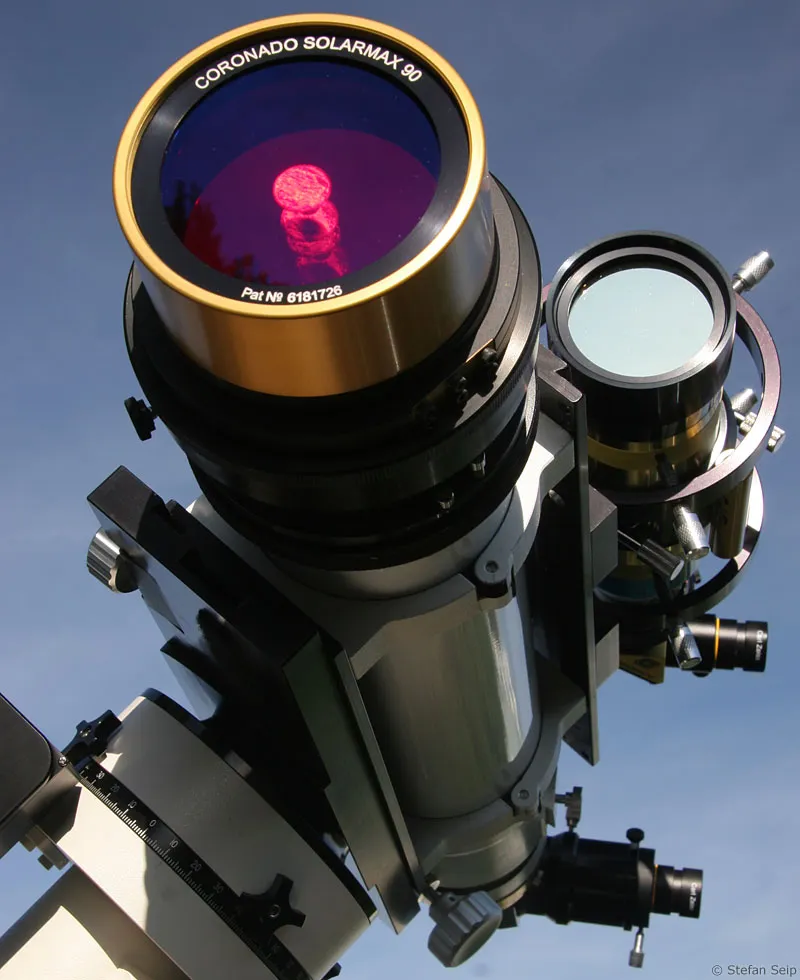
Lens telescope with attached H-alpha front filter. The filter consists of two components - a second filter is mounted on the eyepiece side.
The task of an H-alpha filter is to selectively allow the light of only a single wavelength to pass through. The resulting image is deep red and strictly monochromatic. This poses major problems for the exposure metering system and color synthesis of digital SLR cameras, as they are not designed for such extreme situations. The exposure must therefore be determined manually by trial and error. Focusing in the viewfinder is also no easy task, because our eyes are also overstrained.
When processing the image, it has proven to be a good idea to first take a black and white image from the resulting photo, which is then colored according to taste. I have published instructions on how to do this on my website at
http://www.astromeeting.de/halpha.htm
Example shots
To take this photo, I used a 30-year-old refractor with an aperture of only 75 millimeters but a focal length of 1200 millimeters. A self-made solar filter made of AstroSolar filter foil is attached to the front, a Canon EOS 20Da to the back. The exposure time was 1/125 second at ISO 100. The silhouette of the telescope, which has no motorized tracking, is shown at the top left. At the top right is an enlarged view of the sunspot group with its designation: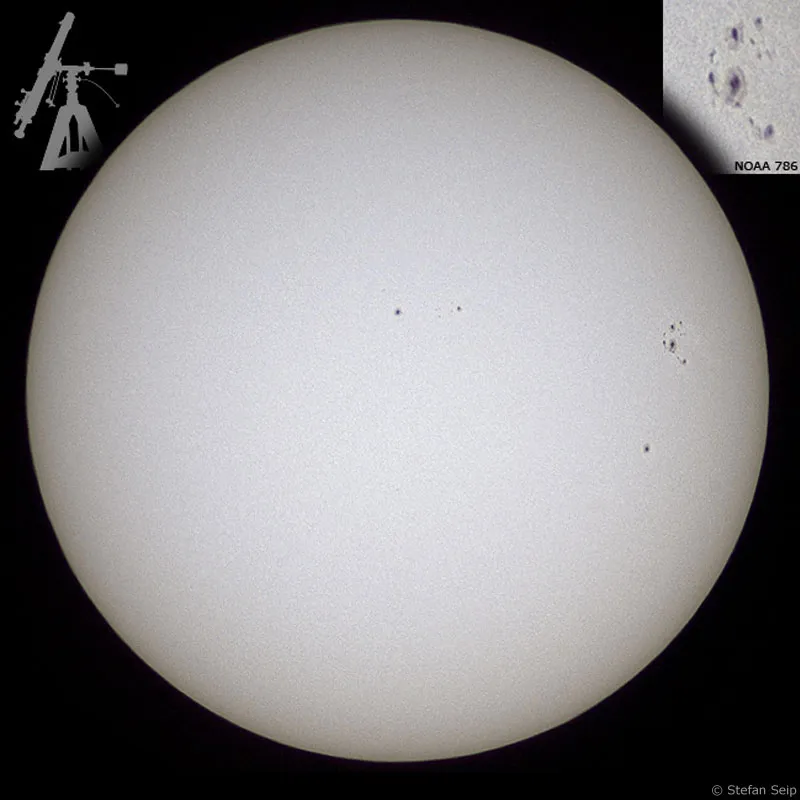
A small but modern telescope (Skywatcher ED 80) with 80 millimeter aperture and 600 millimeter focal length was used to obtain this image on July 9, 2005. A Herschel prism served as a solar filter, while a 2x Barlow lens was used to double the focal length. The Canon EOS 20D was set to ISO 100, with an exposure time of 1/350 of a second. In addition to the now familiar phenomena, clear flare areas (brightenings) are visible at the right edge.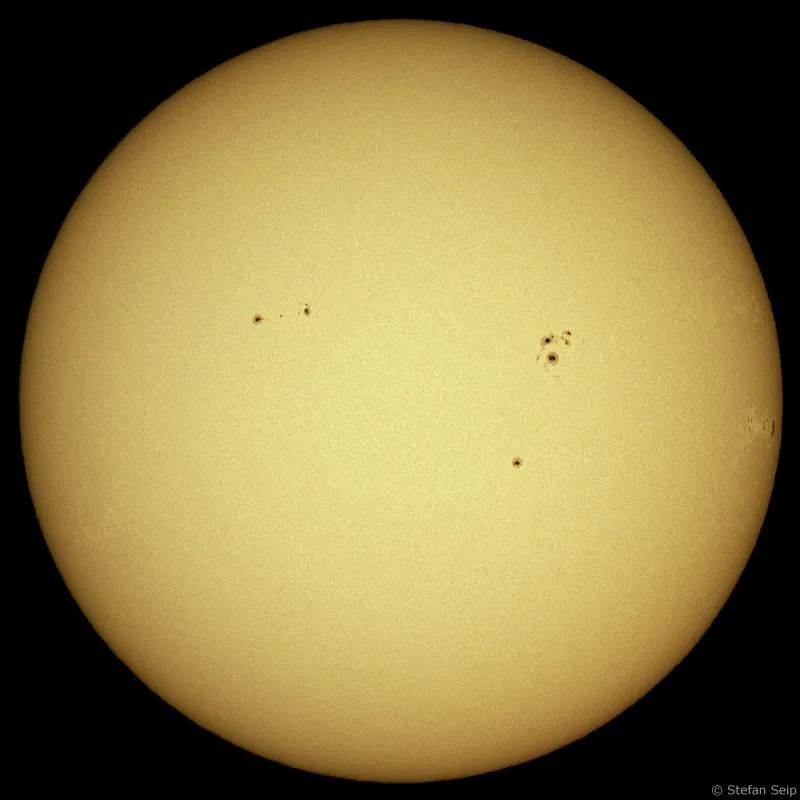
This is an enlarged section of the last image. The granulation of the sun is clearly visible, even with such a small instrument.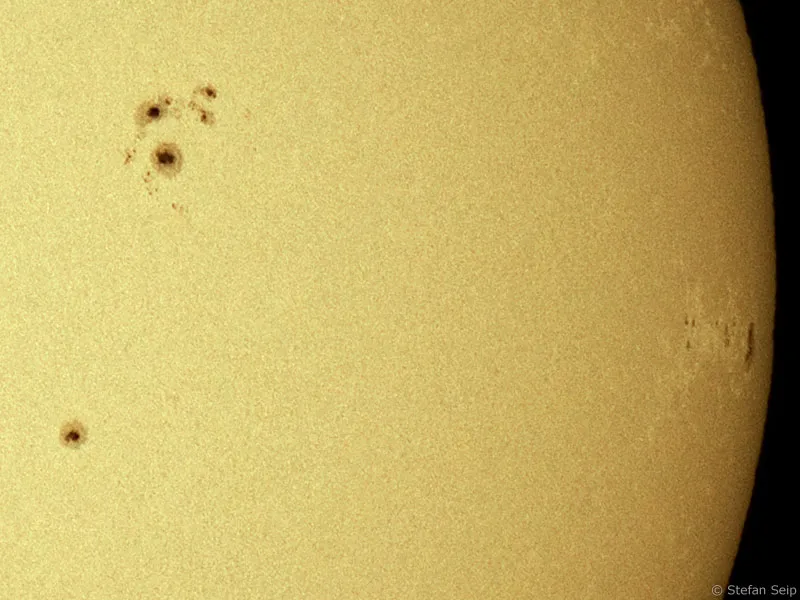
For this detailed image of a large group of spots, a large refracting telescope was used with an aperture of 155 millimetres and a focal length increased to 5 meters by a special Barlow lens. In addition, a Herschel prism and a Canon 20D at ISO 100 were used. The photo was taken on July 13, 2005, when the large sunspot "NOAA 786" was visible for the last time on the western edge of the sun before it disappeared due to the sun's rotation. The spot is significantly larger than the Earth. The dark core of the smaller spot visible at the right-hand edge of the image is about the size of the Earth.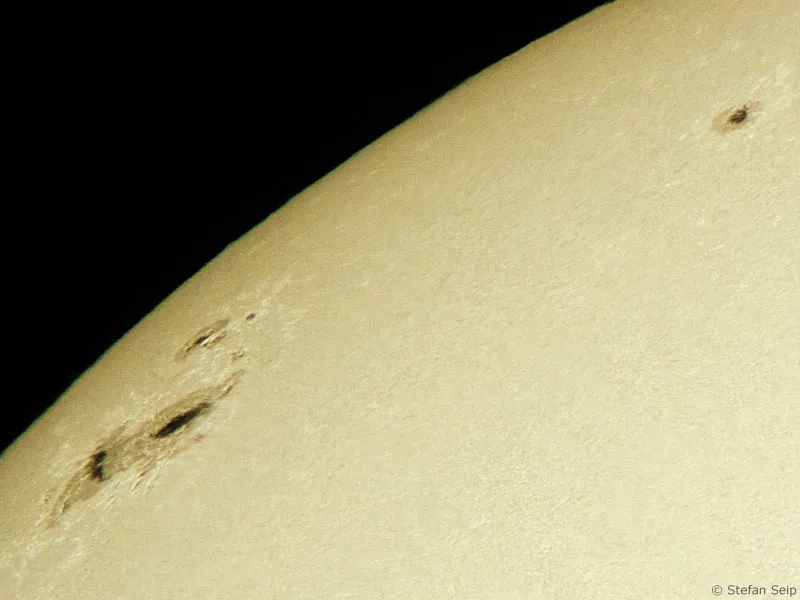
It's not the clouds that fascinate me about this picture, although they almost give the setting sun a face. It is a large sunspot that is visible near the top of the sun and was even visible to the naked eye. The brightness of the sun was reduced so much by its position close to the horizon that it was safe to look into it without using a filter, at least for a short time. This photo is an enlargement of an image taken with a telephoto lens with an effective focal length of 600 millimetres.
Note on our own behalf: All the image examples used were taken in the manner described in the tutorial.
Continue with part 7: "Photographing lunar eclipses".
