Moon (bottom right) and Venus (top left). The exposure time was 3 seconds with a 60 mm lens, Blender 1:5.6 at ISO 200: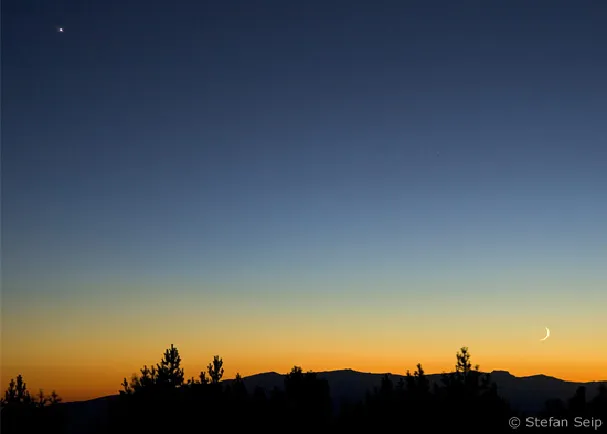
1. atmospheric shots at dusk
Photography means "taking pictures with light", i.e. creating images with the help of light. This is common knowledge, which is why many cameras disappear into their pockets at the end of the day when the light fades and dusk falls.
This overlooks the fact that good photos can also be taken at low light levels, as every camera can add up the available light by using correspondingly long exposure times for as long as necessary to produce a correctly exposed photo.
In some cases, this can be several seconds or even minutes. In this respect, a camera is far superior to our eyes, which is why it is still worth hunting for a motif even when we can no longer see much due to the darkness.
To make matters worse, our eyes have a peculiarity of only seeing shades of grey at low brightness, but no more colors. The reason for this is that the eyes switch to "scotopic vision" (night vision) in the dark and use a second visual apparatus for this, namely rod-shaped photoreceptors instead of cone cells during the day.
The rods can actually only distinguish brightness values, which is reflected in the popular saying "All cats are gray at night". At the same time, we lose the ability to see with high resolution, i.e. sharply, in the dark.
Simulation of scotopic vision: above in daylight, below in advanced twilight. Colors and image sharpness are lost to the human eye.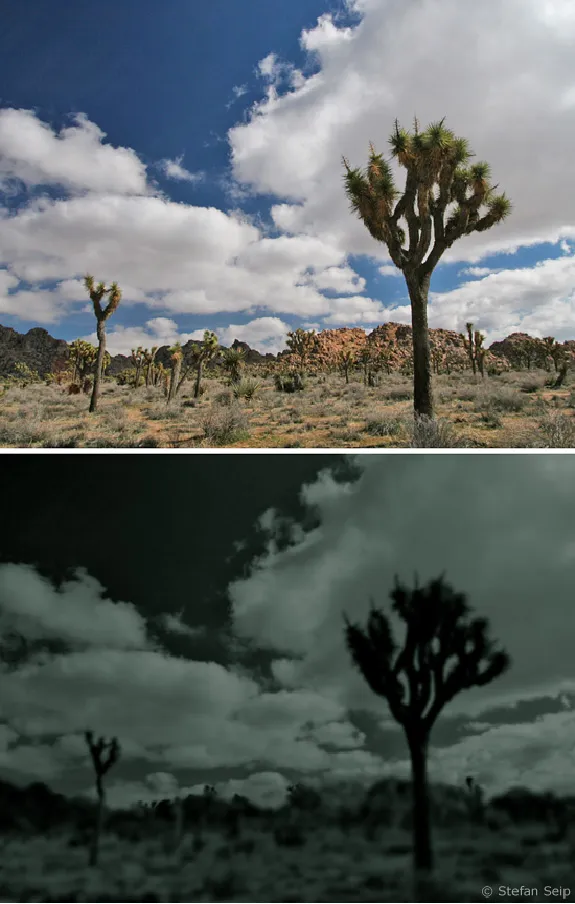
A camera is not affected by these limitations. It can still produce sharp and colorful photos long after sunset, when reading a newspaper outdoors without additional light has long since become impossible.
This means that abstraction, intuition and some experience are needed to find subjects in the dark, because we don't see them as they may look in the later photo. At the same time, there are technical challenges to overcome, as the operation of some cameras causes problems in the dark; be it the poor legibility of controls or the failure of functions such as autofocus or exposure metering.
These difficulties should not deter us from photographing in low light or even in advanced darkness, because the reward for our efforts can be quite extraordinary results.
Simulation of the visual impression (above). In contrast, the camera perceives colors and makes a subject appear brighter with the appropriate exposure.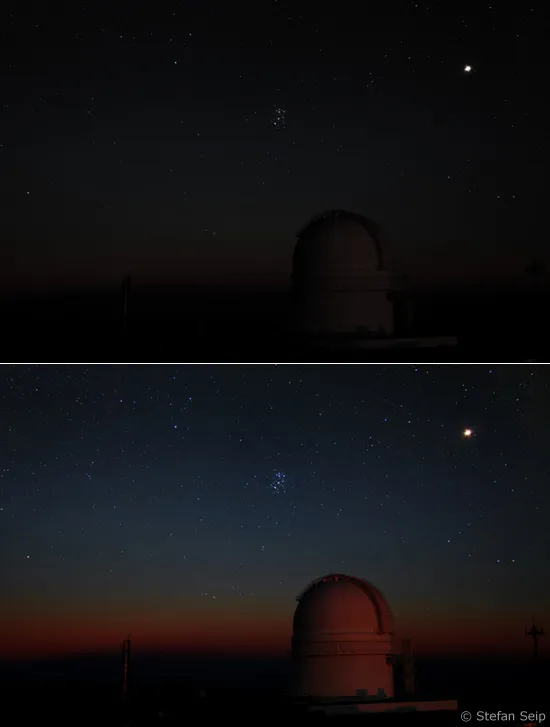
This tutorial series is about "astrophotography and celestial photography", i.e. a subject area that is usually of interest when the sun is not above the horizon. Then the moon, stars, planets, the Milky Way and other objects in the universe and phenomena in the earth's atmosphere serve as the main motif or at least as a backdrop.
You don't necessarily need expensive special equipment, such as a telescope and an astronomical mount, to take impressive photos of celestial objects. Quite the opposite: thanks to the capabilities of modern digital SLR cameras, photo lenses are sufficient in many situations to take photos that are well worth seeing.
Of course, you can't do without accessories. Necessary, but already available in many kits, are
- Stable tripod
This is used to prevent camera shake during long exposure times. It should be stable enough to carry a camera safely, even with a heavy telephoto lens, and to withstand a gust of wind. Nothing is more annoying than a tripod that ultimately fails to fulfill its purpose. Tripod heads that make it quick and easy to switch from landscape to portrait format are very practical.
- Cable release
It is used in conjunction with the tripod to release the camera without having to touch it. On the one hand, pressing the shutter release button directly would entail the risk of camera shake; on the other hand, for long exposures, the shutter release button must remain pressed for the duration of the exposure, which is much more convenient with a cable release. Some cable releases are equipped with additional control functions, such as a programmable interval for continuous shooting or the option of presetting the exposure time for long exposures. Some of these additional functions are definitely of interest for astrophotography and celestial photography.
Two cable releases: The upper one is a simple model that can only be used to trigger the camera, with a locking function for long exposures. The lower model allows programmable interval shots and long exposures with a presettable exposure time.
It is important that the connection of the cable release fits your camera, as the connection sockets are not standardized.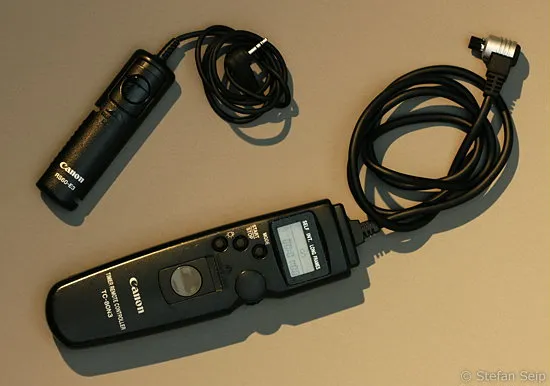
It can also be helpful:
- A fast lens with a fixed focal length
For photos taken at dusk, in which both terrestrial objects and celestial objects are captured, the exposure time must be limited in order to prevent the apparent rotation of the sky caused by the rotation of the earth from leading to blurred images of the celestial objects. As a rule, fixed focal length lenses are faster than zoom lenses, so the objective is easier to achieve with fixed focal length lenses. In addition, fixed focal length lenses generally have a better image quality.
- Lens hood
This is also known as a lens hood or lens hood and should always be used. It not only protects against lateral light incidence (e.g. from a street lamp), but also against mechanical damage and dew on the front lens. A matching, individually shaped lens hood is available for every lens.
- Soft-focus filters
prevent stars and planets from being imaged as too small a dot and therefore barely visible in the photo. They not only lead to a larger image of the bright stars and planets, but also make their inherent color more visible and largely preserve the impression of a visual observer. More on this in Tutorial #3 of this series ("Photographing constellations").
- Astronomical yearbook
The view of the sky changes continuously from hour to hour, from day to day and over the course of a year. If you plan to include celestial objects such as the moon in your photos, you should know when the celestial bodies rise and set on certain days so that you can plan your shots carefully. Close encounters between the narrow crescent moon and one or even several bright planets are particularly attractive, for example. An astronomical yearbook provides reliable data, namely on which day such a constellation will be visible. The "Sky Year" from the Kosmos publishing house, which is published every year, is already a classic. An astronomical yearbook can be supplemented by planetarium software that can calculate and display the view of the sky for any location at any time. The "Cartes du Ciel" program is available free of charge and can be downloaded as freeware from http://www.stargazing.net/astropc/. Important information is even available online, for example on the website http://www.calsky.de, where you only need to enter your observation location to create a personalized sky calendar. The advantage of a printed book, however, is that you can always have it with you when you take your photos.
- Flashlight
It has two functions. On the one hand, it allows you to adjust camera functions in the dark or find a lens cap that has fallen into the grass at night. On the other hand, a flashlight can be used during a long exposure to illuminate foreground objects such as trees and buildings. They then show structures, whereas without the use of the flashlight they might only be depicted as a deep black silhouette.
- Stopwatch
A stopwatch is required if the cable release does not allow programmable long exposures and the exposure is made using the camera's "BULB function". In this case, the shutter of the camera remains open as long as the shutter release button is pressed. The exposure time can be regulated using a stopwatch.
- Flash unit
This is useful when foreground objects need to be brightened up. The power of the flash should be reduced so that the twilight or night-time character of a shot is retained.
Procedure
1. preparation
Good planning and preparation are essential when taking twilight photos of celestial bodies. In the simplest case, the narrow, waxing crescent moon in the evening sky after sunset can be chosen as an impressive addition to a landscape shot. Even more impressive is the encounter of the moon with the planet Venus, which is the third brightest star after the sun and moon and cannot be overlooked. Periodically it is the "evening star", months later it is the "morning star" again. Every month there is an evening or morning when the moon is close to Venus. The astronomical yearbook then reads: "Moon near Venus", whereby the smallest distance varies in each case. If you want to take such pictures systematically, you will need to familiarize yourself with the basics of astronomy.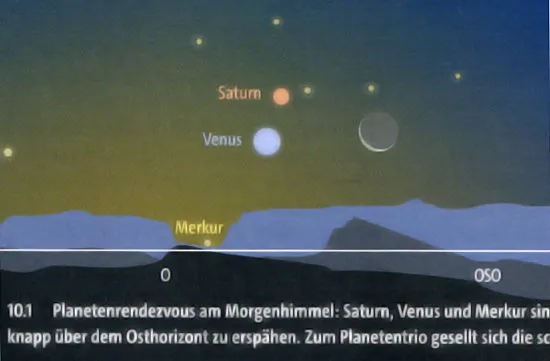
Excerpt from the astronomical yearbook "Das Himmelsjahr 2008", Kosmos Verlag, ISBN 978-3440110218). A meeting of the crescent moon with the planets Venus and Saturn is announced.
Let's assume that Venus is currently the evening star and receives a "visit" from the moon on a certain day, which is noted in the astronomical yearbook. Then it is a good idea to look for a suitable location the evening before, from which not only the rendezvous of the two celestial bodies can be seen, but also an interesting foreground that leads to a successful image composition. Whether this is a particularly impressive tree, a historic building or a landscape worth seeing is of course up to you.
After sunset, turn your gaze to the west, where the sun has set, and take your bearings from the bright Venus, which looks like a bright star. You may already be able to see the crescent moon, but it will still be a long way from Venus, as it will not come close to Venus until the following day. Venus will be in practically the same place at the same time one day later, so you can take test shots to find a suitable focal length.
On the day of the upcoming celestial event "Moon at Venus", prepare your photo excursion: Fully charge the camera's battery and, if available, also take the spare battery or batteries with you. Long exposures can drive up the camera's power consumption quite a bit. Also make sure you have a memory card with sufficient capacity. Don't forget to pack a tripod and cable release as well as the other accessories.
2. make the basic settings
Get to your chosen location in good time, preferably before sunset, so that you can set up your equipment in daylight without being under time pressure.
One difficulty is finding the best focus at "infinity" because most autofocus lenses can be focused beyond the infinity mark. As long as it is still light, you can use a distant horizon and use autofocus. Once it is dark, you can try the moon, but never star-shaped objects, as in many cases the autofocus cannot cope with them. After focusing, switch the lens to manual focus, i.e. from "AF" to "MF", to prevent the camera from trying to focus again after every photo. It's good for those who have an SLR camera with "Live View", where the image is shown on the camera display.
Then use the highest magnification level of the display to set the best focus manually.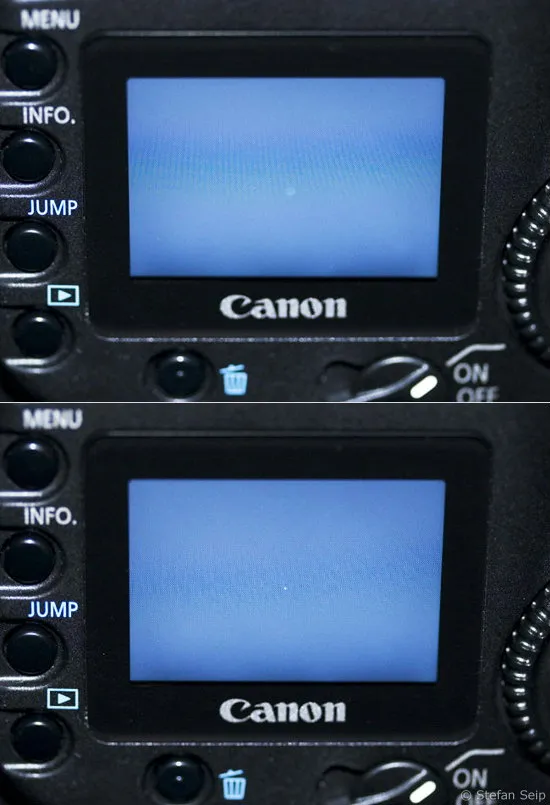
Focusing on a bright star with the "Live View" function of a Canon EOS 20Da. In the top image the star is still out of focus, in the lower image it is in focus.
The following camera settings are recommended:
File format
Please always take pictures of this type in RAW format. After all, the aim is to capture motifs with a sometimes enormous range of contrast (dynamic range) and the reserves for subsequent image processing. A file in RAW format contains considerably more data than a photo in JPG format. If you are not yet familiar with the further processing of RAW files, set your camera to save RAW and JPG files simultaneously. You can then deal with the RAW files at a later date. I myself always save JPGs in the lowest quality alongside the RAWs. This makes it easier for me to select the best shots later on the PC, because JPGs are easier to preview and can be opened more quickly.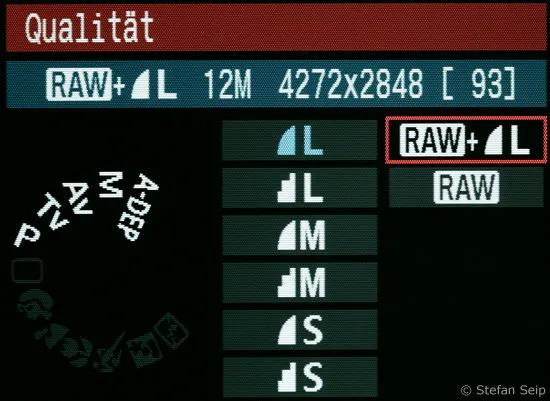
Setting the image quality on a Canon EOS 450D: The RAW format is selected here, while the photo is also saved in JPG format.
ISO value
Start your series of shots with ISO 100, i.e. the lowest level, to keep image noise to a minimum.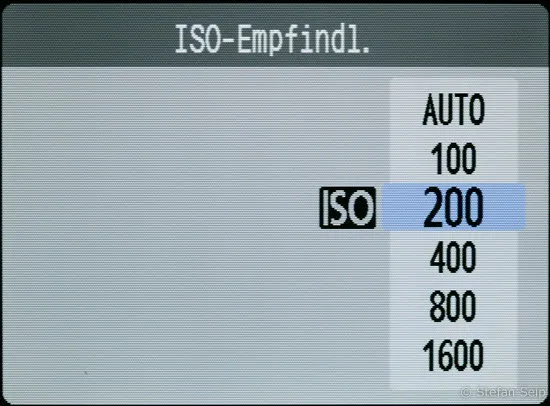
Setting the ISO value on a Canon EOS 450D.
White balance
A twilight sky can have a pronounced inherent color that causes problems for the camera's automatic white balance. Therefore, a setting of "Daylight" (symbol: "Sun") is the best choice.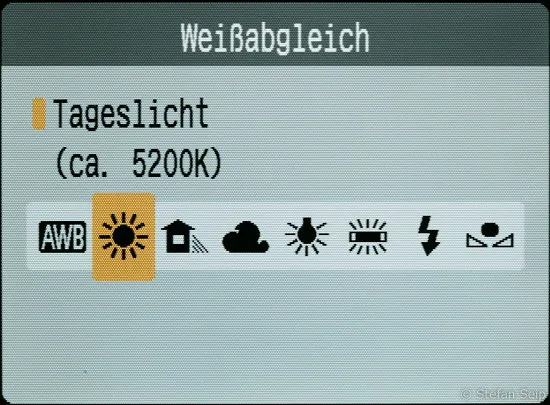
Setting the white balance on a Canon EOS 450D to daylight (5200 Kelvin).
Noise reduction
If your camera has the "Noise reduction for long exposures" setting, this should be switched on. Be prepared, however, that the camera will take a dark picture with the same "exposure time" after each shot with a longer exposure time (from one second) and that no further shots will be possible during this time. This means that after a 5-second exposure, for example, the camera is blocked for a further 5 seconds. However, I have not had good experiences with the "High ISO noise reduction" setting (newer Canon EOS models) and therefore always leave it switched off.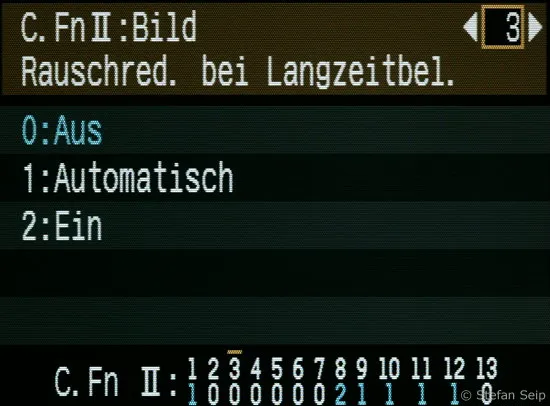
Setting the noise reduction for long exposures with a Canon EOS 450D. Select the setting "On" and not "Automatic".
Exposure program
Start in the still bright twilight with the automatic exposure program (setting "A" or "Av"), where you can preselect the Blender, while the camera determines and controls the appropriate exposure time through exposure metering.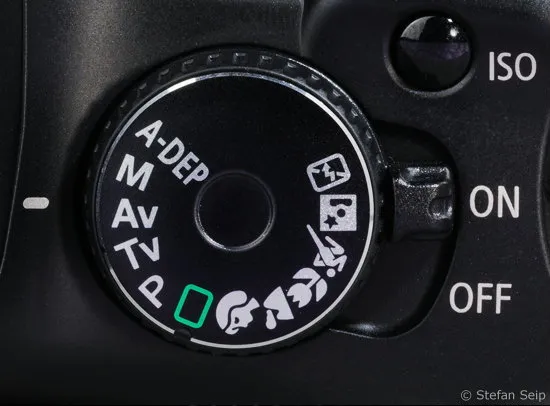
Setting the aperture priority (Av, Blender priority) on the setting dial of a Canon EOS 450D.
Metering method
Multi-segment metering generally delivers good results.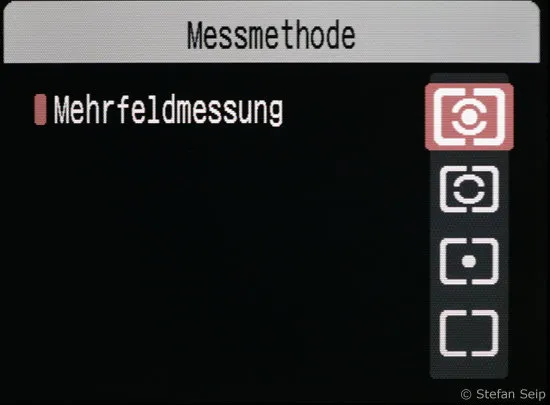
Selecting multi-segment metering as the exposure metering method on a Canon EOS 450D.
Aperture
When using aperture priority, do not initially choose a fully open aperture (smallest aperture value), but stop down the lens by one or better two stops, which benefits the image quality.
3. take pictures
Now observe what happens after sunset and take the first shots as soon as the celestial objects to be photographed become visible to the naked eye. As long as it is still reasonably bright, you can rely on the automatic exposure settings.
Nevertheless, it is worthwhile to use exposure bracketing in which you deliberately underexpose (set to values "-2" and "-1") or overexpose (values "+1" and "+2") using manual exposure compensation.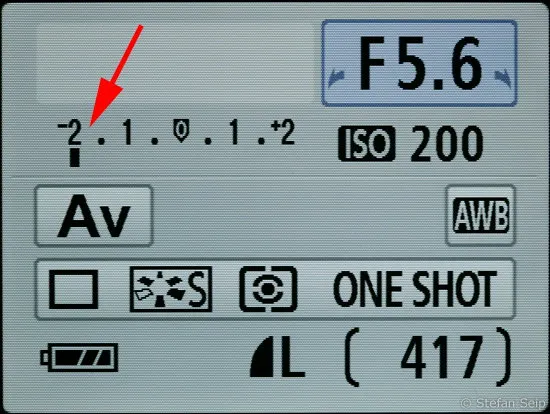
Example Canon EOS 450D: Manual exposure compensation has been set to "-2", which means deliberate underexposure by two stops compared to the automatic value.
With increasing darkness, it can happen that even a manual exposure compensation of plus/minus two stops is not sufficient to ensure optimum exposure.
The camera must then be switched to manual mode ("M"), in which the Blender and exposure time can be freely selected.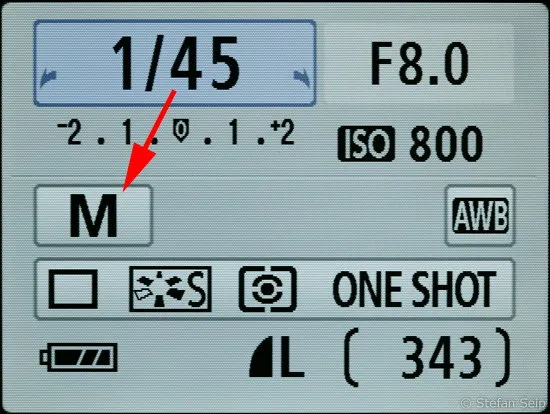
Manual exposure setting ("M") of a Canon EOS 450D.
Be sure to take repeated shots, as the advancing twilight offers a constantly changing relationship between the brightness of the sky on one side and the residual light for illuminating the foreground on the other. It is important to find the point in time when the brightness of both parts is in a balanced relationship to each other so that both the sky and the foreground can be correctly exposed in one shot. The time window for this optimum status is sometimes only ten minutes, which you should not miss.
The photos look best when the sky still has a residual brightness and even appears bluish. You should also take into account that historical buildings or a church may be illuminated at a certain time. This can be problematic if this lighting is so bright that overexposure can hardly be avoided if you want to image astronomical objects at the same time. Sometimes, however, this additional light can also add to the appeal of a shot.
If foreground objects are within reach of a flashlight or flash, they can be illuminated during the exposure to prevent them from appearing too dark or only as a silhouette in the photo.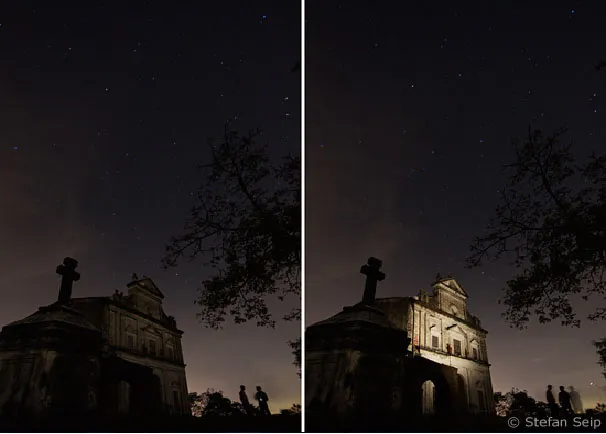
The picture on the left was taken without additional lighting, in the example on the right the church façade was brightened with a flash unit during the exposure time.
Increasing darkness will require longer and longer exposure times. This increases the risk of celestial objects becoming blurred due to the earth's rotation and stars appearing as small lines.
To avoid this, please ensure that you do not exceed the following exposure times:
| Focal length [mm] | Exposure time [s] |
| 10 | 14 |
| 15 | 9 |
| 20 | 7 |
| 24 | 6 |
| 28 | 5 |
| 35 | 4 |
| 50 | 3 |
| 85 | 2 |
| 100 | 1 |
Table 1: This table provides a reference value for the maximum permissible exposure time with which stars can still be imaged as dots and not as lines. The calculation is actually quite complicated: It takes into account not only the focal length used, but also the pixel size of the imaging chip and the region of the sky photographed. To simplify matters, the table contains the worst case, i.e. it was created under the assumption that the pixel size is only 0.01 mm (10 µm), a region of the sky is photographed in which the rotation of the sky is the fastest and the star moves by an amount less than two pixels. In practice, these values can often be doubled or even tripled without a line-shaped image of stars being noticed. The fact remains, however, that with a 100-millimeter lens, for example, star lines will appear after just a few seconds of exposure time when viewed critically.
If you reach the limit of the maximum permissible exposure time, the ISO value must be increased and the Blender opened to its maximum value. The increased image noise caused by higher ISO values and the impairment of the general image quality caused by the open aperture are in any case preferable to a line-shaped star image.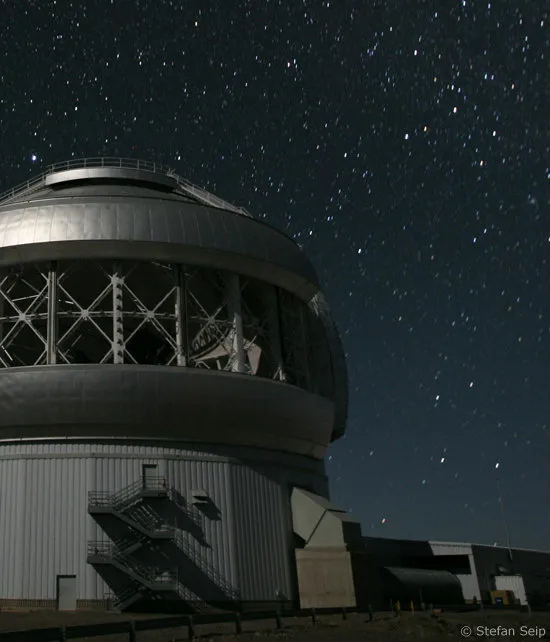
This section of the image shows slightly dashed stars, even though a slightly wide-angle lens was used. The reason for this is the excessively long exposure time of 60 seconds.
As night falls, the outside temperatures also drop. Depending on the lens used, this can lead to a shift in focus. It is therefore advisable to check the best possible focus point from time to time.
4. image processing
Twilight images generally do not require any special procedure and can be processed using the same workflow as you are used to with normal daylight images. When "developing" RAW files, you can perform a slight denoising. On the other hand, I don't like to use sharpening, as this often gives the stars an unnatural appearance.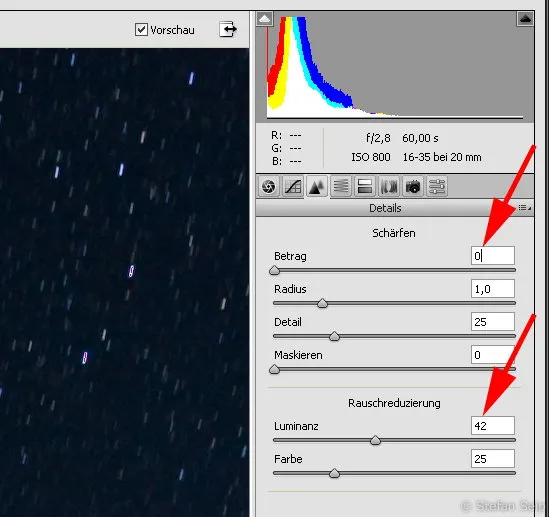
This excerpt from the "Adobe Camera Raw" module, which can be used to "develop" RAW files from digital cameras in "Photoshop" and "Photoshop Elements", shows two positions: Turning off post-sharpening (red arrow above) and using noise reduction (red arrow below). The best setting for the noise reduction sliders varies depending on the camera used and its settings. It is best to switch on the "Preview" and enlarge a relevant section of the image to 100 percent.
5. example shots
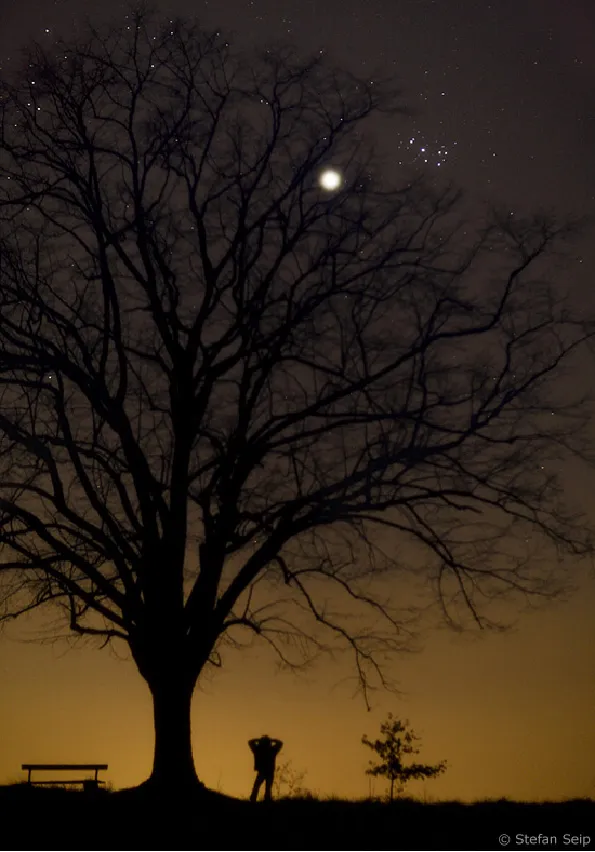
The bright Venus (clearly visible in the branches of the tree) passes by the Pleiades star cluster ("Pleiades", to the right above Venus). Such a constellation is worth seeing several evenings in a row, because Venus moves only slowly in relation to the stars. A fast 85 mm lens was used at Blender 1:1.8, ISO 1000 and the exposure time was three seconds.
Starry sky over the "Solitude" castle near Stuttgart. The illumination of the castle at night made this picture possible. The focal length was 20mm. The exposure time was 10 seconds at Blender 1:3.5 and ISO 800.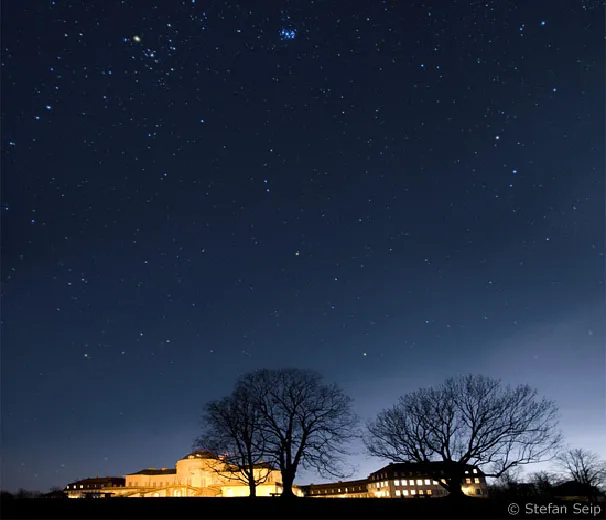
The constellation Orion and the brightest fixed star Sirius were photographed with a 35mm wide-angle lens. Exposed for 10 seconds at ISO 1000 and Blender 1:2.0: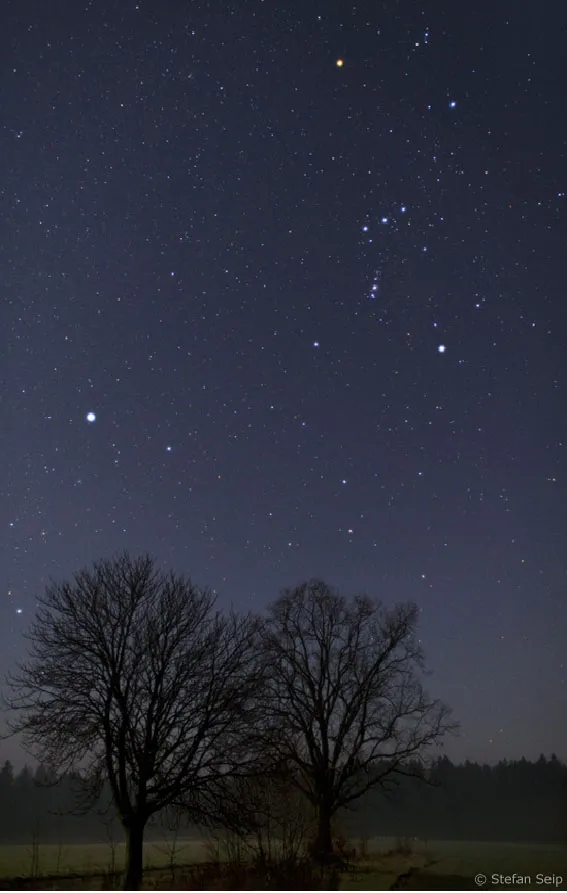
A 35mm lens was also used for this photo. The Blender was set to 1:2.8, the ISO value to 1000 and the exposure time was 10 seconds.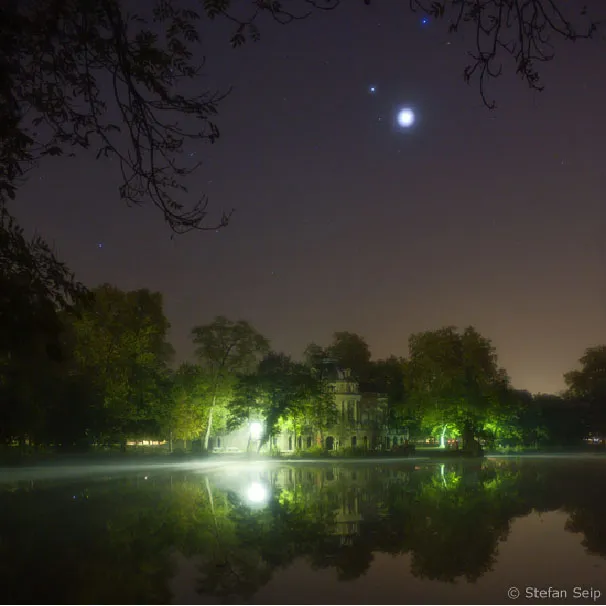
The narrow crescent moon rises on the horizon; the two other celestial bodies are not stars, but the planets Venus (left) and Jupiter. 135 mm lens, Blender 1:2.8, ISO 400, 3 second exposure time.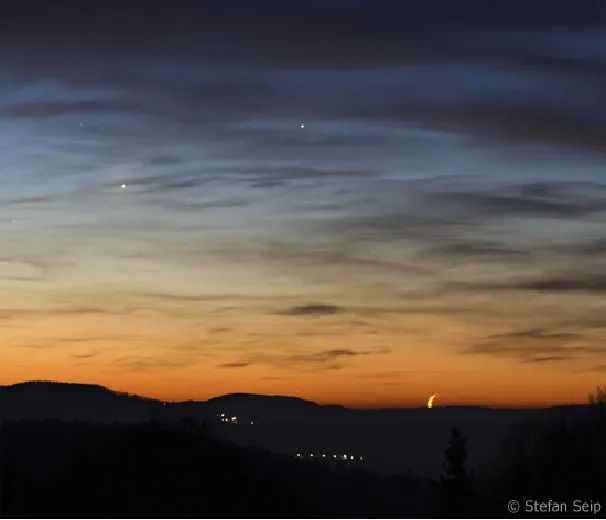
The bright Venus can be seen at the top left, while the moon is in the immediate vicinity of the star cluster "Pleiades". 200mm focal length, ISO 800, 2 seconds exposure time at Blender 1:3.5.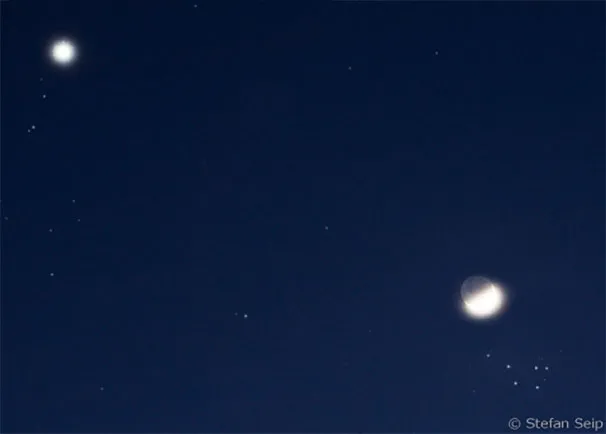
This image shows the narrow crescent moon and - very close to the horizon - the planet Mercury, which is difficult to observe. With a focal length of 420mm, the exposure time at ISO 800 and f/5.6 was only one second. Long enough to show the "ashen light" of the moon, i.e. its dark side. The cause of the ashen light is sunlight reflected back from the earth onto the moon.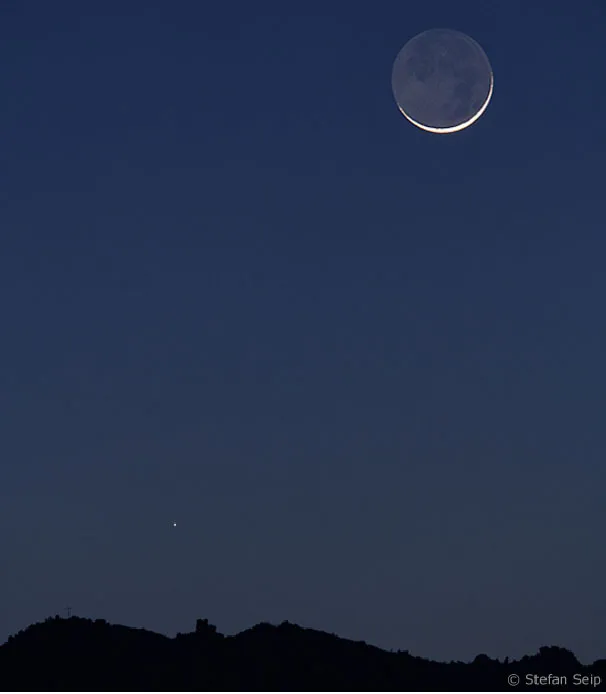
Note on our own behalf: All the image examples used are not photomontages, but are the result of a single exposure.
Continue with part 2: "Line-trace images of stars"
