The constellation Leo with connecting lines drawn in and a figurative representation superimposed. This cover image is a montage: the landscape and the twilight sky are taken from another photo or were generated using Photoshop.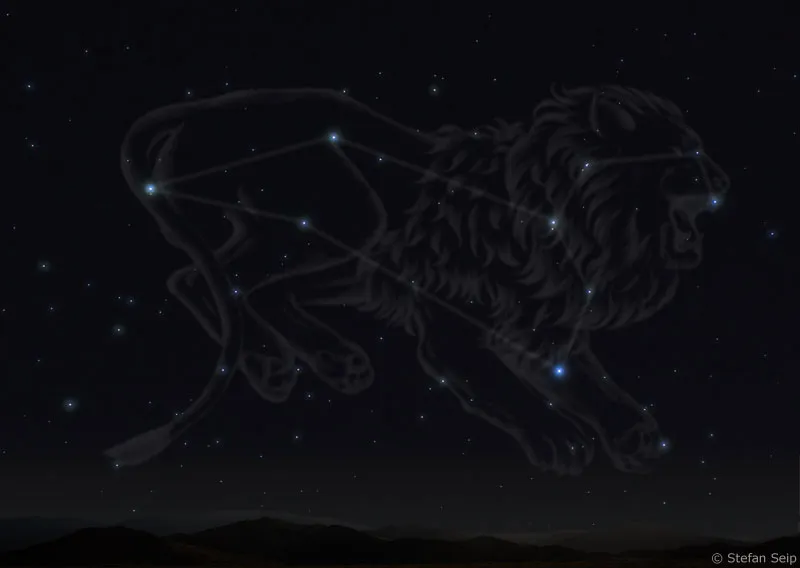
Part 3: Photographing constellations
Everyone knows at least some of the constellations. The Big Dipper and Orion are very well known. And even if not from personal observation, most people are familiar with the constellations of the zodiac, at least by name.
A constellation is a group of stars that form a more or less conspicuous or easy-to-remember geometric arrangement due to their position in relation to each other. It is important to note that this arrangement is purely random. This means that the stars of a constellation have no astrophysical connection, but were created by humans using a good dose of imagination in order to better orient themselves in the night sky and bring order to the starry night sky on a clear night.
Constellations remain practically constant over the course of a human lifetime, even over many generations, i.e. they can always be observed in the same constellation. Because this relative arrangement of the stars appears to remain unchanged, all stars are referred to as "fixed stars", which distinguishes them from the five planets visible to the naked eye, which change their position within the fixed stars over the course of days and weeks.
However, the stars also show a movement of their own, albeit a very leisurely one. The direction of movement of the individual stars is not identical, so that the view of the sky does change over longer periods of time and the term "fixed stars" would no longer be justified. If we had the opportunity to look at the night sky 50,000 or 50,000 years ago, practically none of the constellations we are familiar with today would be recognizable.
This and the fact that we are looking into a three-dimensional space, in the depths of which the stars of a constellation are staggered, i.e. do not show any similarities in terms of their distance, makes the arbitrary nature of the constellations clear. From another point in the universe, many light years away from Earth, the constellations we are familiar with would also dissolve.
This also applies to the constellations of the zodiac, through which the sun moves in the course of the year. Assigning certain human traits to them and attributing an influence on the fate of the earth to them is always a futile endeavor in astrology. In contrast, the science of astronomy regards the constellations merely as what they are - namely an orientation aid.
While there have historically been cultural differences in the naming and grouping of stars into constellations, since 1925 there has been international agreement on 88 different constellations, only some of which are visible from Germany. Many constellations in the southern sky, such as the prominent "Southern Cross", never rise above the horizon in this country.
Some constellations form a very conspicuous shape and it takes little imagination to associate the figure with its name. With others, it is difficult or even impossible to recognize anything figurative. A good example of the former is the large chariot, which consists of seven stars that clearly form the outline of a chariot with a drawbar. However, how a dog is supposed to be recognizable in the two (!) stars of the constellation "Little Dog" remains a mystery.
Not every constellation contains one or more bright stars; some are made up of faint stars so that they can only be seen at all under a dark night sky. Orion, with its bright stars, can still be recognized even in a lit city, while the largely unknown constellation "Fox" consists only of faint stars that are invisible to the naked eye when the sky is illuminated by artificial light.
There are also major differences in the size of the constellations, i.e. the size they appear and the area they cover. The constellation of the Water Snake stretches from its head to its tail over almost 100 angular degrees. The constellation Dolphin, on the other hand, has an apparent elongation of only six degrees.
Technically speaking, it is not a great challenge to take photographs of the constellations. However, the prerequisites must be or become in place:
Determine the cardinal points
The first step in finding your way around the night sky is to know the cardinal points. Part 2 of the tutorial ("Taking line-trace photographs of stars") contains instructions on how to do this, which you can refer to if necessary.
Recognizing the constellations
If you want to photograph constellations, you must of course be able to recognize and find them. There is a certain similarity with orientation in a foreign city; there, too, it takes a while to find your way around. Unlike on star charts, the connecting lines or figures in the sky are of course not visible! Just compare the following image with the cover picture of this tutorial: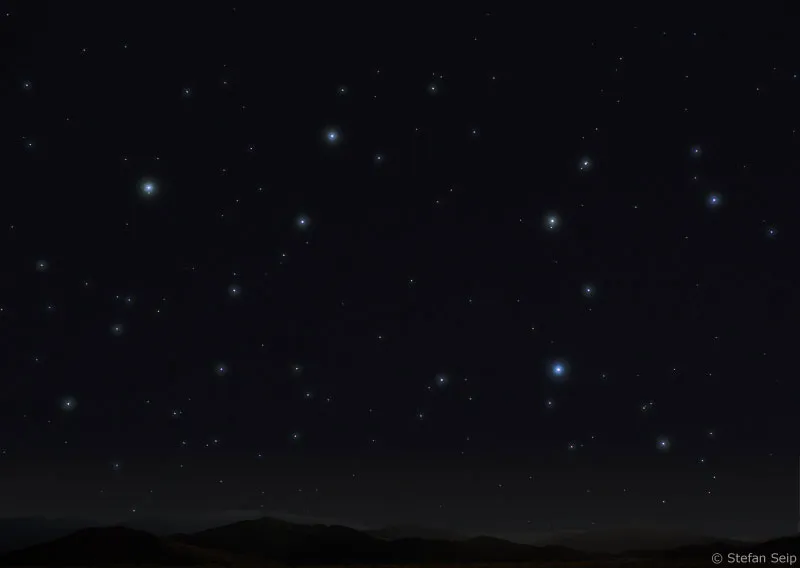
The constellation Leo as it looks in the sky. Without the guide lines, it is much more difficult to identify it.
In reality, an additional difficulty is that the apparent size of a constellation in the sky is difficult to estimate, at least for beginners, and there are of course other stars in its immediate vicinity that distract from the pattern you are looking for. The good news is that once you have found a constellation and identified it beyond doubt, you won't forget it so quickly that you can find it again after a short time on another night, even if it is in a completely different part of the sky.
The annual cycle of the stars
Many constellations are only visible at certain times of the year because the earth orbits the sun. This means that seen from Earth, the sun moves through the constellations of the zodiac over the course of a year. For example, if the sun is in the constellation Taurus, this constellation can no longer be seen in the night sky, as it is then - together with the sun - in the daytime sky. However, the constellation exactly opposite, Scorpius, can be easily observed at the same time.
Because the rhythm repeats itself every year, there are regular spring, summer, fall and winter constellations. Scorpio is a classic summer constellation, Leo one of the spring sky and Taurus is in the winter sky.
However, this differentiation should not be seen quite so strictly, as this classification only applies if you always observe the evening sky at around 10 pm. If you look at the starry sky earlier, you will still see the constellations of the previous season in the sky, which will then set in the west in the coming hours. And you can get a "preview" of the starry sky for the coming season if you stay on the ball until well into the second half of the night.
So the key question is which constellations are where in the sky at what time. A very useful tool for answering this question is the "rotatable star chart". It can be used to set the date and time of observation and then you can see which constellations can be seen in which direction at that time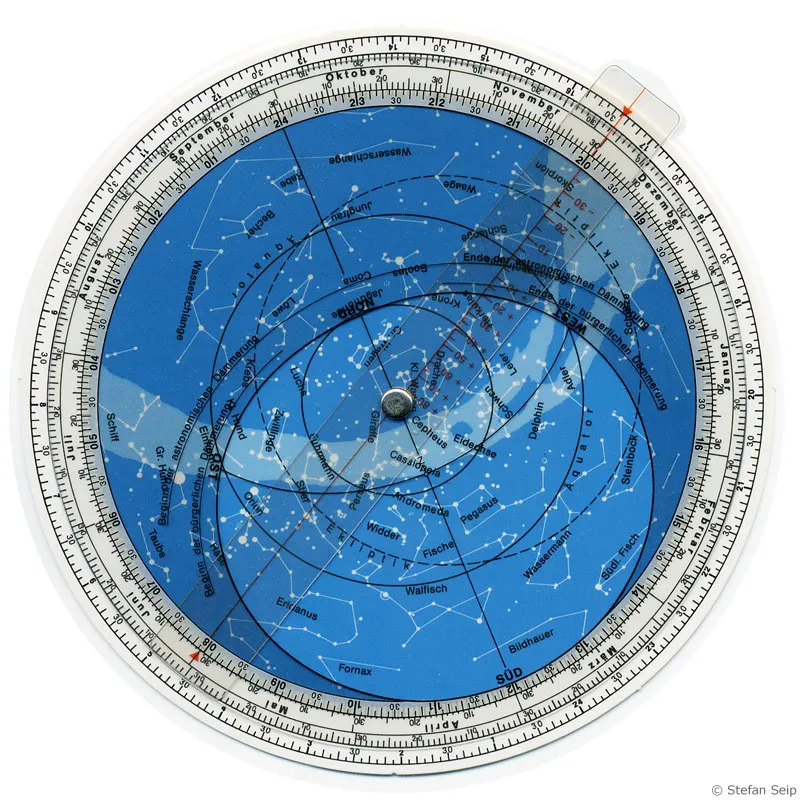
The rotating star chart shows the currently visible sky in the brighter oval after the date has been aligned with the current time.
Observation location
The best place is away from disturbing light sources (street lamps, floodlights, billboards) with a good all-round view at least to the east, south and west. The chosen location should be easily accessible and within a reasonable time so that you can react to a suddenly clearing sky. A moonless night (i.e. the days around the new moon) is ideal for recognizing and photographing the constellations.
Technical equipment
You do not need any astronomical equipment to create your own catalog of constellations. You are best equipped with a digital SLR camera and a selection of focal lengths from wide-angle to telephoto lenses to capture the constellations of different sizes in full format. Fast lenses with a fixed focal length have an advantage over the usually slower zooms.
What else you should have:
- Stable tripod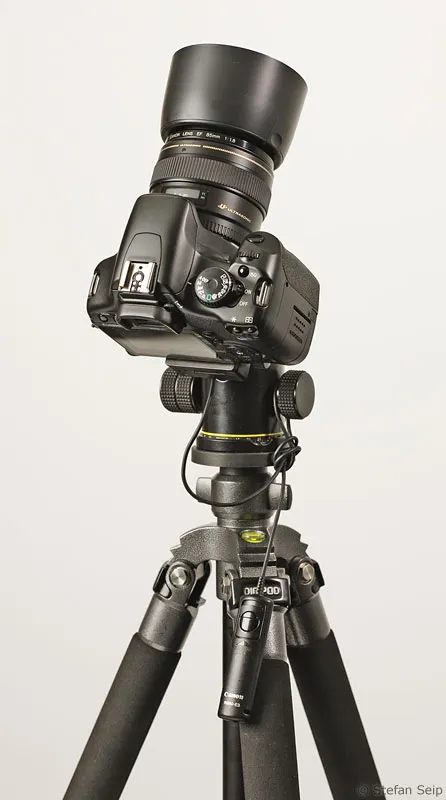
A good tripod and a tripod head, in the example shown a ball head, are essential for sharp, steady shots.
- Cable release/timer
Cable releases enable the camera to be released without contact in order to avoid camera shake. Wireless remote triggers are also available.
- Lens hood (= backlight, lens hood or sun visor)
Keeps out extraneous light coming in from the side and delays possible fogging of the front lens on humid nights.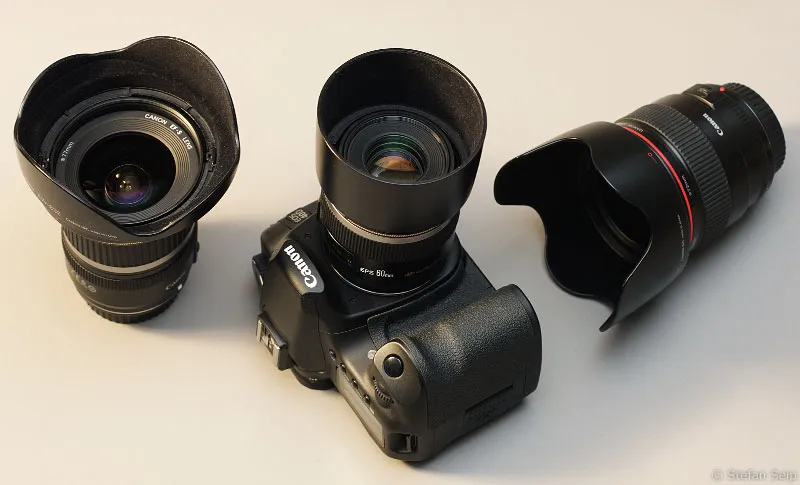
There is a suitable lens hood for every lens.
- Soft focus filter
If you have ever taken line-trace photographs (see part 2 of this tutorial), you will have noticed that many stars emit an orange, reddish light, while others emit a blue light.
Stars are extremely tiny dots of light. If you take a sharp image of them with a good lens, the light from a star is focused on just a few pixels of the image sensor. In this area of the image, bright stars become fully saturated in all three color channels (red, green and blue) after a short exposure time. The star then appears white and any inherent color disappears.
Even more serious is the fact that even fainter stars reach this state if the exposure time is long enough. Then the brightest stars in the photo look no different from less bright ones, making the constellation to be photographed difficult to recognize.
Both problems are solved with a suitable soft-focus filter in front of the camera lens. It ensures that although a sharp core image is created, this is overlaid by a blurred image. This means that some of the light from a star is distributed to neighboring pixels. In the area surrounding the star, the pixels are not saturated in this way, i.e. the star's inherent color is retained. In addition, the bright stars appear larger in the photo than the less bright ones, which corresponds to the visual impression. In fact, today's star charts are structured in this way: Bright stars are shown with a large diameter, faint stars with a small diameter.
Soft-focus filters are available in various designs for portrait photography. However, not all types are suitable for the intended purpose in the night sky. For photos of constellations, filters from the manufacturer "Cokin" have proven to be the best, namely the filters with the designations "P820", "P830" and "P840" with an ascending soft-focus effect. The "P830" is particularly recommended.
The Cokin P830 soft-focus filter is actually intended for portrait photography, but also performs well when photographing the starry sky.
Camera with Cokin filter holder and Cokin P830 soft-focus filter inserted.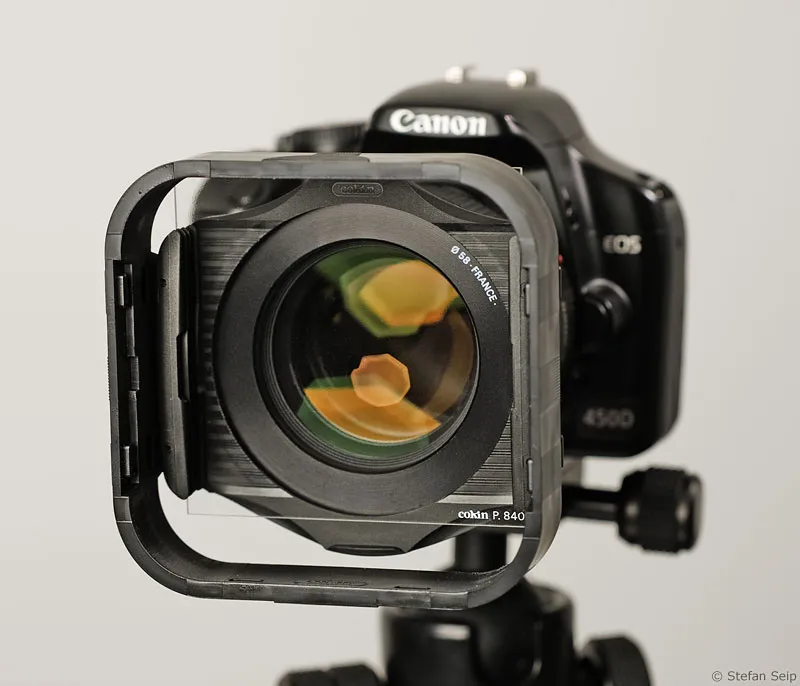
The Orion constellation without (left) and with Cokin P830 soft-focus filter (right). The two photos show exactly the same section of the sky and were taken one immediately after the other.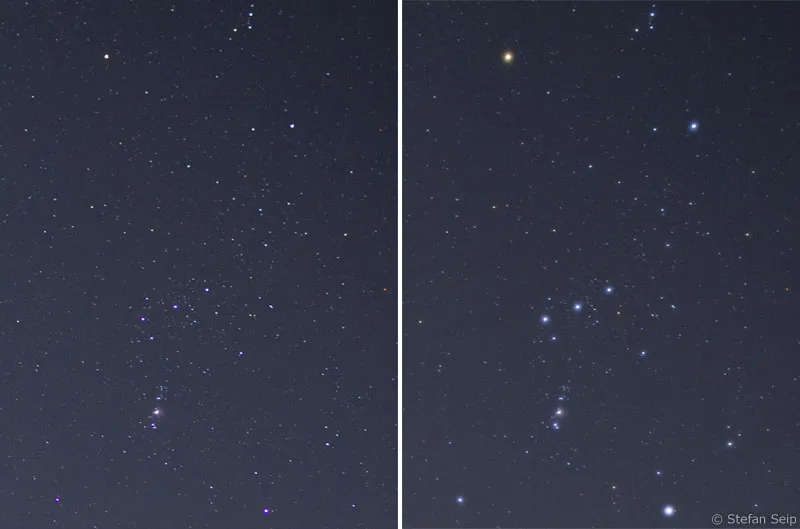
How to proceed
It is best to wait for a clear, moonless night. You can find the phases of the moon in almost any calendar; the time around new moon is preferable.
Then it depends on the time of year which constellations are suitable as a motif. The following table contains all the constellations that can be photographed from Germany, listed in alphabetical order. The "M" column indicates the months from 1 (January) to 12 (December) in which a constellation is best visible in the first half of the night after complete darkness has fallen.
Once you have decided on a particular constellation, it is important to choose a suitable focal length based on the size of the constellation to be photographed. The "f/VF" column in the table indicates the focal length required to capture the constellation full frame if you are using a "full-frame camera", i.e. one with a sensor measuring 24x36 millimeters. A second column "f/crop" refers to the optimum focal length of a camera with a sensor smaller by a (crop) factor of 1.6, i.e. one with an edge length of around 15x22 millimeters (e.g. Canon EOS 1000D, 400D, 450D, 30D, 40D, ...).
It is best to start with the most attractive constellations before moving on to the less conspicuous ones. A photographic rating "B" of attractiveness from + (= very attractive) to o (= mediocre) to - (= rather inconspicuous) is also part of the table:
| Constellation | f/VF | f/crop | M | B | Remarks |
| Aft ship | 50 | 30 | 2 | - | Only partially visible from Germany |
| Eagle | 50 | 30 | 7-9 | + | Contains the bright star "Atair" |
| Andromeda | 50 | 30 | 10-12 | + | |
| Bear keeper (Bootes) | 50 | 30 | 5-6 | + | Contains the bright star "Arcturus" |
| cup | 85 | 50 | 4 | o | |
| Sculptor | 50 | 30 | 10 | - | Extremely close to the horizon |
| Dolphin | 200 | 135 | 8-9 | + | |
| Dragon | 28 | 17 | 5-7 | o | |
| Triangle | 135 | 85 | 10-12 | o | |
| Lizard | 85 | 50 | 8-10 | - | |
| Unicorn | 50 | 30 | 1-2 | - | |
| Eridanus | 35 | 20 | 12 | - | Only partially visible from Germany |
| Fish | 35 | 20 | 10-11 | o | |
| Fox | 50 | 30 | 7-8 | - | |
| Carter | 50 | 30 | 12-2 | + | Contains the bright star "Capella" |
| Giraffe | 50 | 30 | 11-2 | - | |
| Big bear/wagon | 35/50 | 20/30 | 3-5 | + | The Big Dipper is part of the Big Bear |
| Big Dog | 50 | 30 | 1-2 | + | Contains the brightest fixed star "Sirius" |
| Hair of Berenice | 85 | 50 | 4-5 | - | |
| Hare | 85 | 50 | 1 | o | |
| Hercules | 35 | 20 | 6-7 | + | |
| Hunting dogs | 135 | 85 | 4-6 | - | Consists of only two stars |
| Virgo | 35 | 20 | 4-5 | + | Contains the bright star "Spica" |
| Cassiopeia | 85 | 50 | 9-12 | + | The "celestial W" |
| Cepheus | 50 | 30 | 8-10 | o | |
| Small bear/wagon | 85 | 50 | 4-7 | + | Contains the polar star |
| Small dog | 135 | 85 | 1-2 | o | Contains the bright star "Prokyon" |
| Leo Minor | 85 | 50 | 3-4 | - | |
| Small horse | 135 | 85 | 9-10 | - | |
| Crab | 50 | 30 | 2-4 | - | |
| Lyre | 135 | 85 | 7-8 | + | Contains the bright star "Vega" |
| Leo | 50 | 30 | 3-4 | + | Contains the bright star "Regulus" |
| Lynx | 35 | 20 | 2-3 | - | |
| Northern crown | 135 | 85 | 5-7 | + | Contains the bright star "Gemma" |
| Northern water snake | 20 | 20 | 4 | o | |
| Orion | 50 | 30 | 12-1 | + | Contains the stars "Rigel" and "Betelgeuse" |
| Pegasus | 35 | 20 | 9-10 | + | The "fall square" |
| Perseus | 50 | 30 | 11-12 | + | |
| Arrow | 200 | 135 | 7-9 | - | |
| Raven | 85 | 50 | 4 | o | |
| Ship's compass | 135 | 85 | 3 | - | Extremely close to the horizon |
| Shield | 85 | 50 | 7-8 | - | |
| Snake | 28 | 17 | 7 | o | |
| Serpent bearer | 28 | 17 | 6-7 | o | |
| Sagittarius | 35 | 20 | 8 | + | Near horizon |
| Swan | 35 | 20 | 7-9 | + | Contains the bright star "Deneb" |
| Sextant | 85 | 50 | 3-4 | - | |
| Scorpio | 35 | 20 | 6 | o | With the star "Antares", very close to the horizon! |
| Capricorn | 50 | 30 | 9 | - | |
| Taurus | 50 | 30 | 3-4 | + | Contains the bright star "Aldebaran" |
| Southern fish | 85 | 50 | 9 | - | Contains the bright star "Fomalhaut" |
| Libra | 50 | 30 | 7 | - | |
| Whale | 35 | 20 | 11 | - | |
| Aquarius | 35 | 20 | 9-10 | o | |
| Aries | 85 | 50 | 10-12 | o | |
| Gemini | 50 | 30 | 1-2 | + | Contains the bright stars "Castor" and "Pollux" |
Preparation
Set off with all your accessories, making sure you have fully charged batteries and empty memory cards. Don't forget to take a flashlight, which will serve you well in complete darkness.
Making the basic settings
Configure the camera as follows:
File format
The RAW format is the first choice for taking pictures of constellations and is highly recommended. You should therefore set your camera to "RAW" or "RAW+JPG".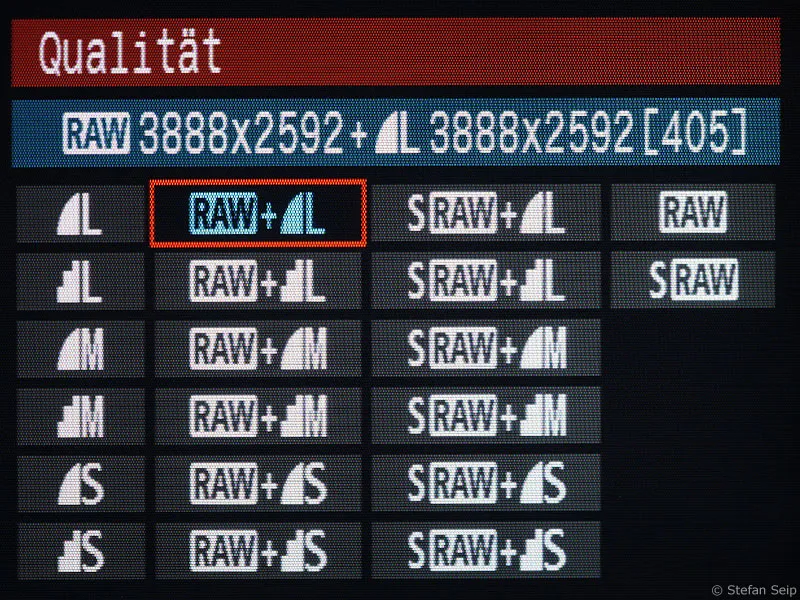
Setting the image quality on a Canon EOS 40D: The RAW format is selected here, while the photos are also saved in JPG format at the same time. The JPG files are useful for quickly preselecting the best shots.
ISO value
As the camera is fixed on a tripod and the required exposure times will be several seconds, a high ISO value must be set. The increasing image noise must be accepted. So set the highest ISO value at which your camera still delivers acceptable results.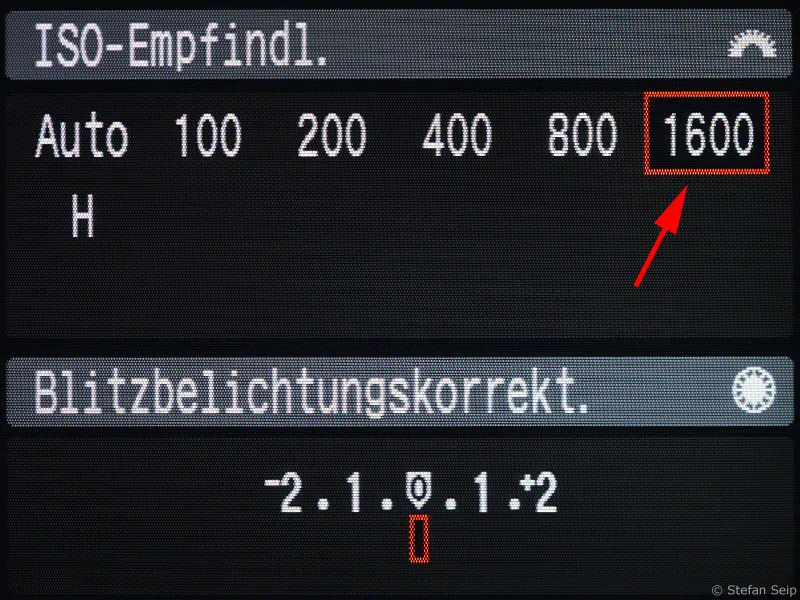
Setting the ISO value to 1600 on a Canon EOS 40D. The camera's image noise is acceptable even at such a high value.
White balance
Manual setting to "Daylight" (symbol: "Sun") is best.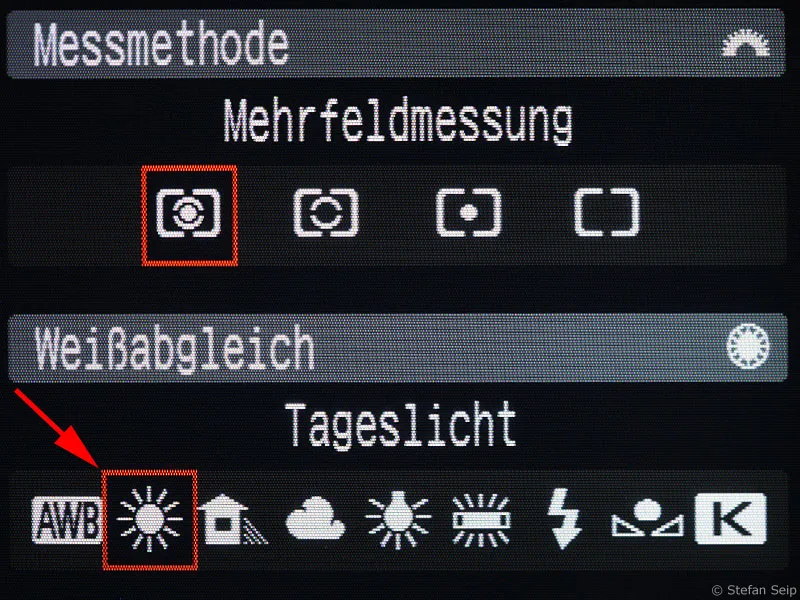
Setting the white balance on a Canon EOS 40D to daylight (5200 Kelvin).
Noise reduction
The noise reduction setting for long exposures should be switched on. The camera will then take a dark picture with the same "exposure time" after each shot with a longer exposure time (from one second). This means that after a 5-second exposure, the camera is blocked for a further 5 seconds.
Switching on noise reduction for long exposures, here using the example of a Canon EOS 40D.
I have not had good experiences with the High ISO noise reduction setting (newer Canon EOS models) and therefore always leave it switched off.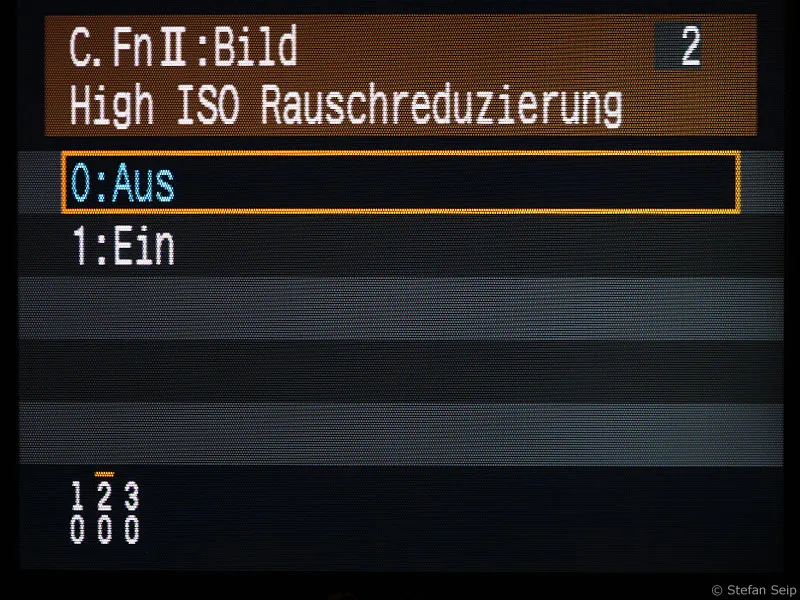
The "High ISO noise reduction" remains switched off.
Exposure program
Only the manual setting ("M") comes into question.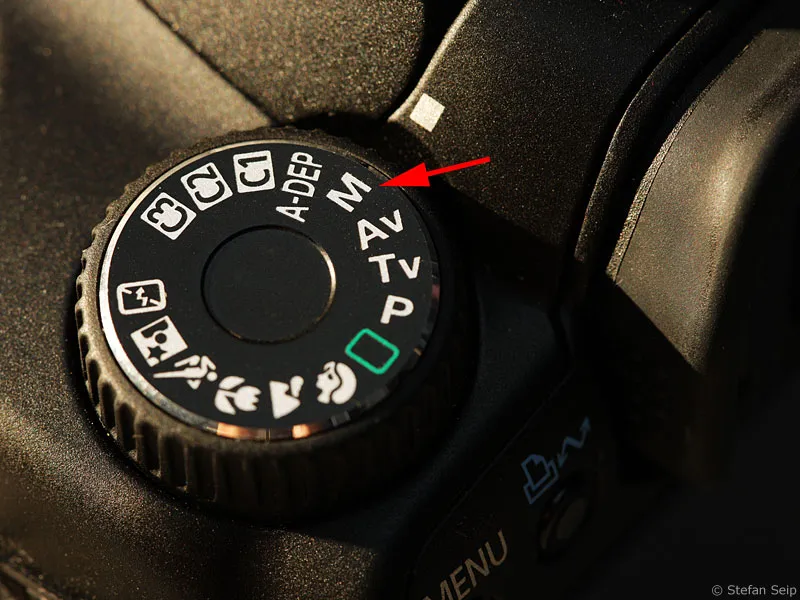
Setting the manual exposure control ("M") on the setting dial of a Canon EOS 40D.
Blender
Always set the largest possible aperture (i.e. the smallest f-number). Fast lenses with initial apertures of F/2.8 or better are ideal. Stopping down by half a stop or a full stop should only be considered if the imaging performance of the lens is unacceptable at open aperture.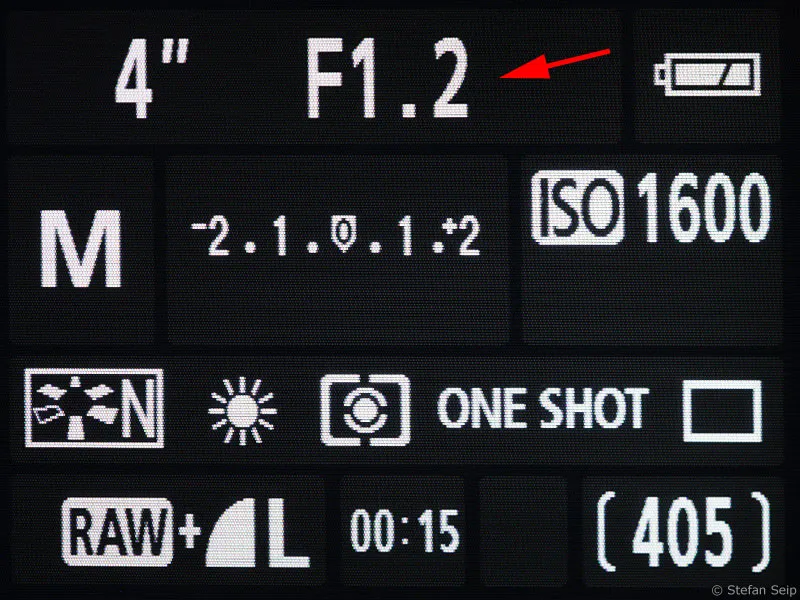
Almost all important settings are visible on the display of the Canon EOS 40D. The arrow indicates the 1:1.2 Blender setting. The "speed" of a lens is the smallest aperture value that can be set. Only a few lenses have an aperture of 1:1.2.
Mirror lock
This setting is used to prevent camera shake caused by the camera's mirror. If your tripod is not stable enough to absorb the shocks caused by the mirror, make use of this setting.
Mirror lock engaged. The first press of the shutter release button raises the mirror. Then wait a few seconds before pressing the (cable) release button a second time to start the exposure.
Image stabilizer
It is very important to switch off any existing image stabilization mechanism! According to the manufacturer, the electronics should register the use of a tripod and automatically deactivate the image stabilizer in this case, but this does not always work reliably. If the image stabilizer remains active, there is a risk of "distorted" stars despite the tripod!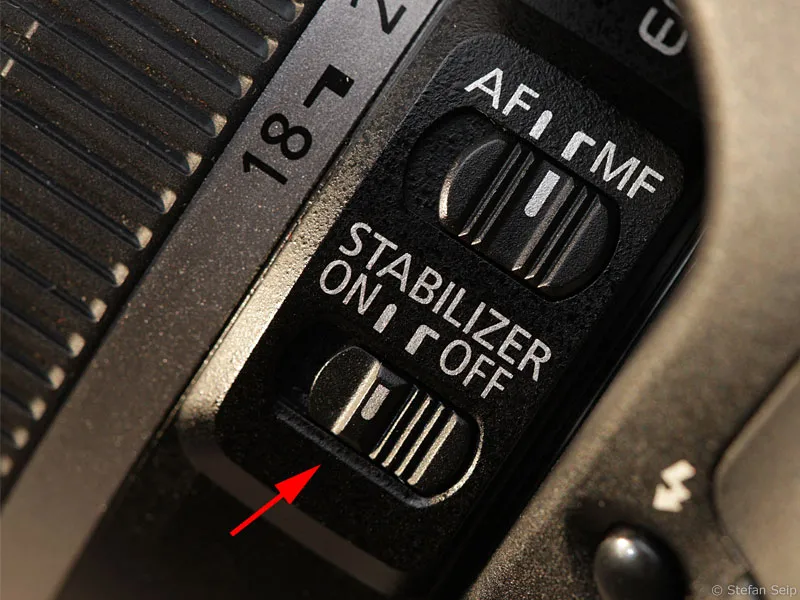
The image stabilizer should be switched off when the camera is on a tripod.
If the image stabilizer remains switched on when using a tripod and the electronics do not detect this situation, the image stabilizer may result in "distorted" stars.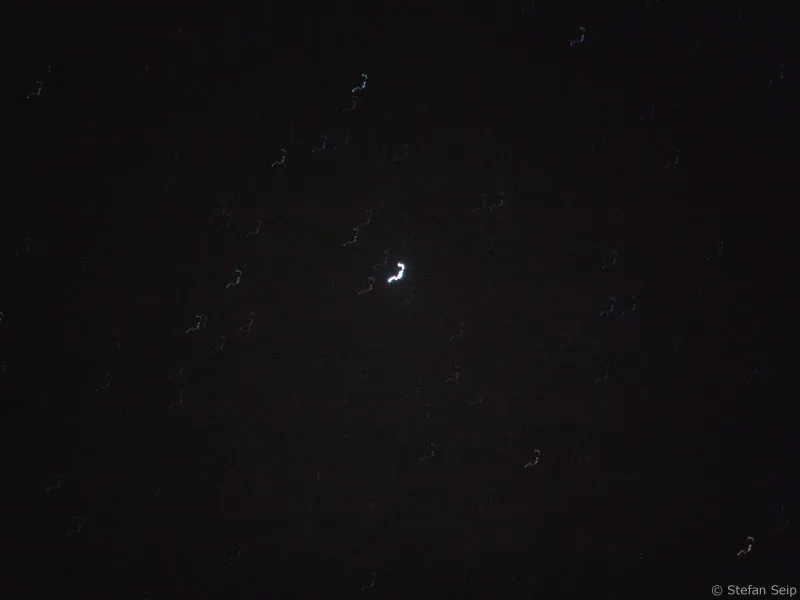
Taking pictures
The biggest challenge "on location" is focusing as precisely as possible to infinity. Autofocus will fail in most cases, even with bright stars, so manual focusing is the only option, unless you find a "substitute object" in the distance, such as the lights of a city.
Always focus without the soft focus filter applied!
Never use the infinity stop of an autofocus lens, as these can usually be turned beyond infinity.
A blurred star image would be the result if you turn the distance ring of an AF lens to its "infinity stop".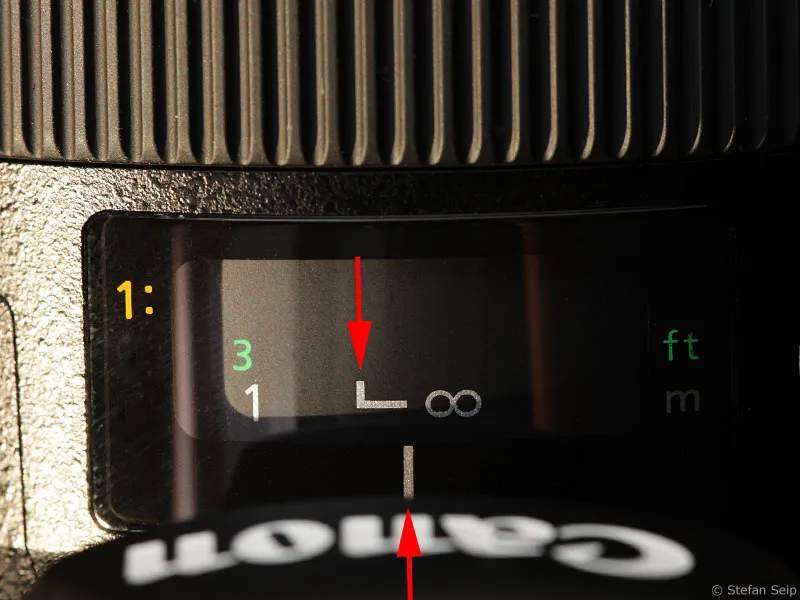
The infinity index on some lenses is also generally not precise enough.
The index mark for "infinity" is no guarantee for sharp photos of stars.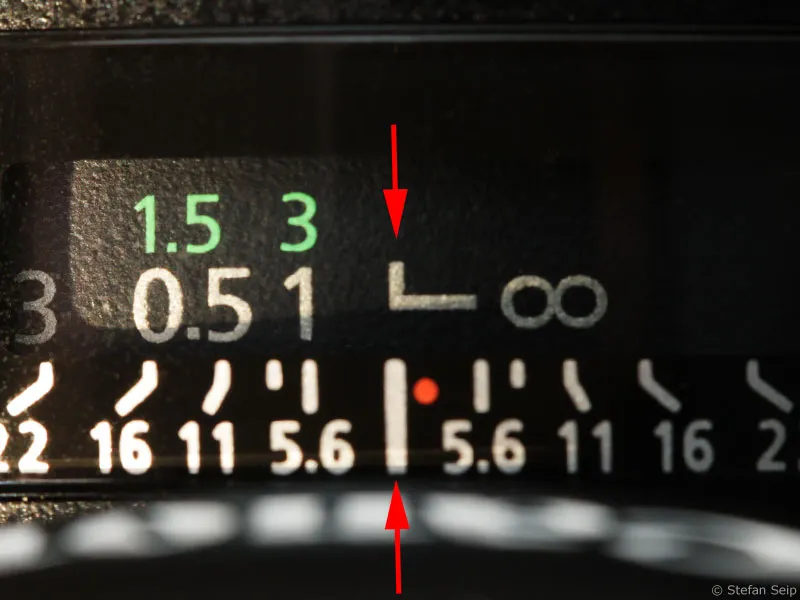
Camera models with a "live view" function are ideal for focusing, allowing you to aim at a bright star and then focus accurately at high magnification on the camera display.
If your camera does not have such a live view function, point it at a very bright star and first set the best possible focus point manually in the viewfinder. Then take test shots with the Blender fully open and an exposure time of one or two seconds. Evaluate the result at maximum magnification on the camera display.
You can approach the best focus point in ever smaller steps. Go beyond the supposed optimum point once and then correct in the opposite direction again to get a feel for the optimum focus point.
This sounds like a tedious, time-consuming process. However, it is worth the effort, as the focus will determine the success or failure of the shot. Remember that you can't do anything wrong now apart from getting the focus wrong.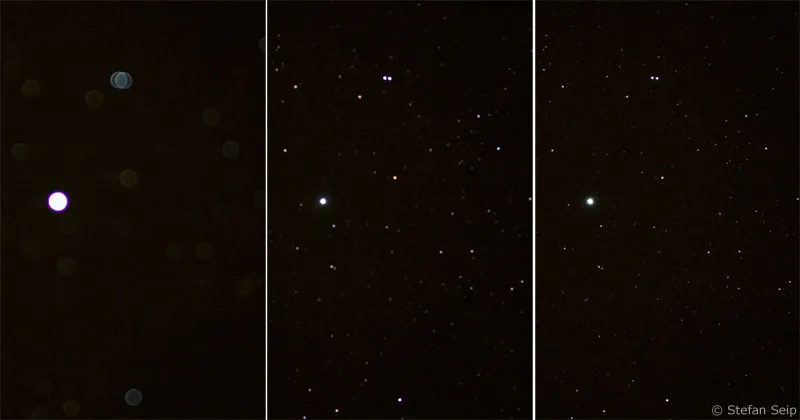
The area around the star Vega in Lyra. On the left you can see the result of the autofocus, in the middle the best focus point that was possible with classic focusing using the SLR viewfinder. The picture on the right shows the best sharpness after using the "Live View" function.
Of course, the autofocus switch remains on "MF" for manual focus even after focusing.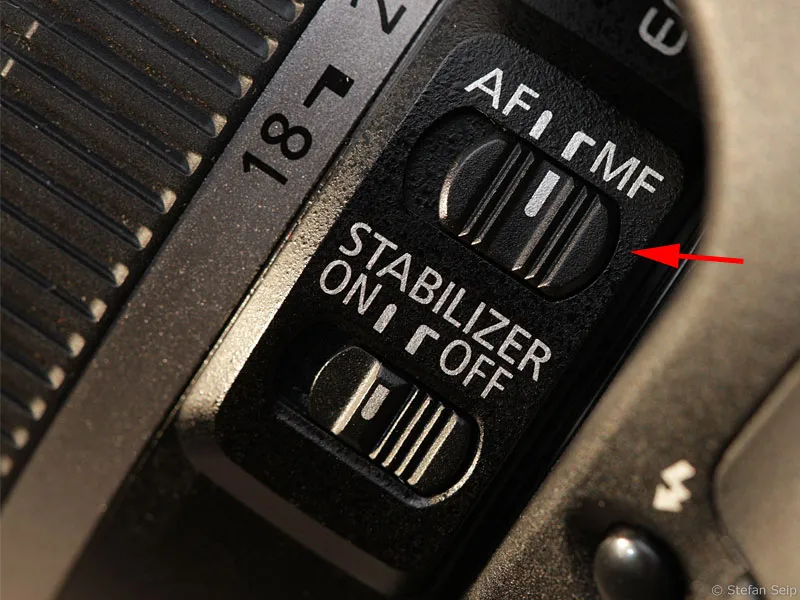
After some time, when the outside temperature may drop, it may be necessary to check the focus and correct it if necessary. Some lenses react to changes in temperature with a focus drift.
Now pan the camera to the constellation of your choice and carefully place the soft-focus filter in front of the lens.
Set the exposure time to the desired value (e.g. 4" for 4 full seconds). How long the maximum exposure time may be before stars are no longer depicted as dots but as short lines was discussed in Part 1 of this tutorial ("Atmospheric images at twilight"). The longer the focal length used, the shorter the exposure must be. Always stay below 30 seconds - even when using a wide-angle lens. With telephoto lenses, even five seconds may be too long.
Take a first shot and view the result on the camera display at maximum magnification. If the stars in the center of the image are still pinpoints, you can try again with a slightly longer exposure time. You can turn a blind eye here: even short lines that are visible on the camera display at maximum magnification are not noticeable on subsequent printouts at normal size.
If you don't have a cable or wireless remote shutter release, you can use the camera's self-timer to release the shutter without shaking.
And look through the viewfinder from time to time to check the framing. The rotation of the earth causes all the stars to move to the west. Before the constellation moves out of the field of view of your camera, you must realign it.
Image processing
The necessary processing steps depend very much on the nature of the source material. Therefore, the following explanations are to be understood as a sample and not as a "recipe". If you were to apply exactly the same steps with the same values to other image material, the result could be sobering.
First, open the RAW file of your constellation image in Photoshop. The Camera Raw module appears, in which the image is "developed". You should already be able to achieve significant improvements here. Switch on the overexposure warning by clicking on the small black arrow on the right above the displayed histogram: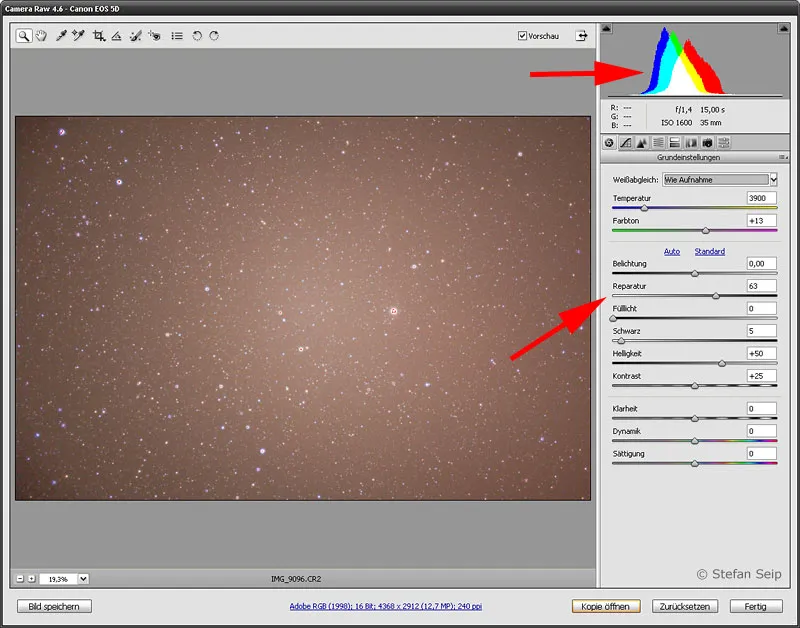
The "Start screen" of Photoshop's "Camera Raw" converter. By moving the "Repair" slider (lower arrow) to the right, overexposed, bright stars can be "rescued" from total saturation if necessary. The light emissions from the cities sometimes cause a brightened sky background, which is often shifted to a reddish color. A look at the image and the corresponding histogram (upper arrow) show this very clearly.
The next step is to remove the color cast. The Temperature and Tint sliders are used for this purpose: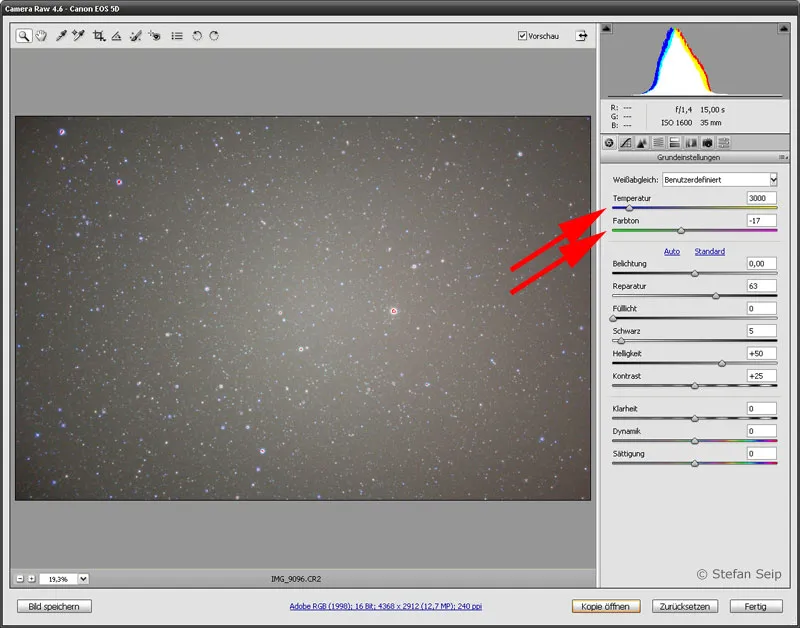
To eliminate the red cast, the "Temperature" slider (upper red arrow) has been moved to the left. The "Hue" slider (lower red arrow) was also moved slightly to the left in order to achieve a sky background with a neutral color and to align the "data mountains" of the three histograms for the red, green and blue channels.
Now click on the third tab of the RAW converter, which is called Details. This is where the image sharpness and noise reduction are adjusted: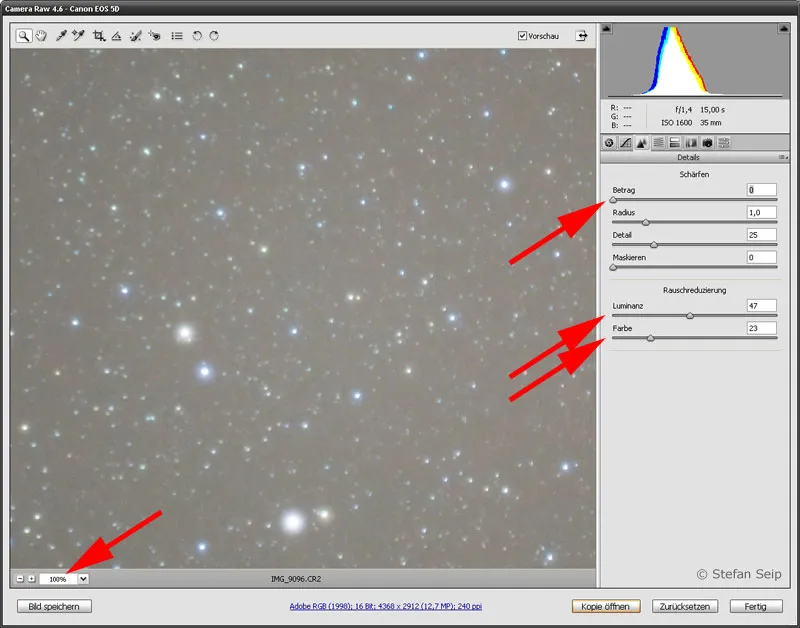
To check the effect of the settings made, it is useful to display the image in "100%" size. To do this, click on the field marked with the red arrow on the left and select "100%" from the list. The arrows on the right show the changed settings.
Sharpening should not be applied, so I have moved the Amount slider (top arrow) all the way to the left. The reason for this is that sharpening the image would also make the noise more visible. With noise reduction, on the other hand, I have combated both luminance and color noise by moving the sliders to the right. Depending on the camera model, exposure time and ISO value, you should decide which values are appropriate by looking at the image in the preview window.
Now open the Lens corrections tab if necessary. I felt compelled to do this because my image has dark corners, i.e. vignetting: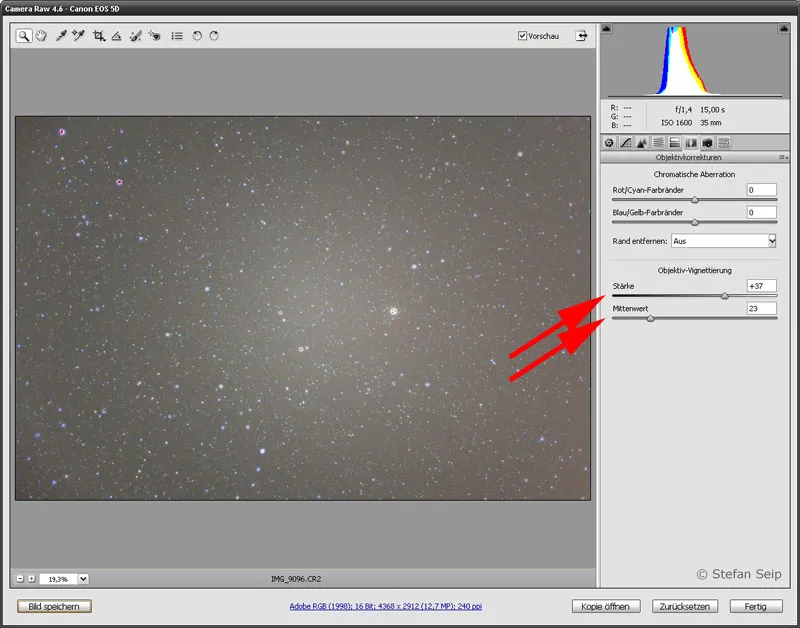
The two sliders "Strength" and "Center value" (red arrows) under "Lens vignetting" can be adjusted so that the dark image corners and/or the brightened image center appear in the same brightness or the edge light fall-off of the lens is at least mitigated.
Click the Open image button to complete the "Image development" and make the final corrections in Photoshop.
The only unpleasant effect now is the heavily brightened sky; it is therefore best to take a look at the histogram with the Photoshop command Image>Adjustments>Tone correction... You will first see a combined histogram of all three color channels: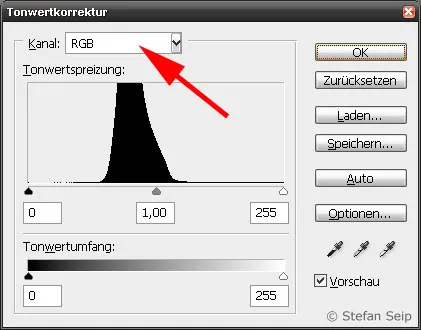
RGB (arrow) means the combination of the red, green and blue color channels.
As an image of the night sky consists mainly of dark sky components, the histogram must not reach its maximum value so far to the right, as is the case here. Therefore, cut off the histograms of all three color channels on the left side (black point) so that the steeply rising edge of the "data mountain" is close to the intersection point, but is not cut off.
Select the individual color channels one after the other and perform this operation in each of the three channels: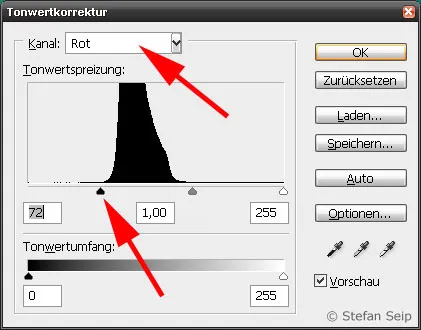
After selecting the red channel (upper arrow), I moved the black point (black marker below the histogram, lower arrow) to the value "72", i.e. just before the start of the rising edge.
For the green channel (upper arrow), setting the black point to the value "70" was appropriate.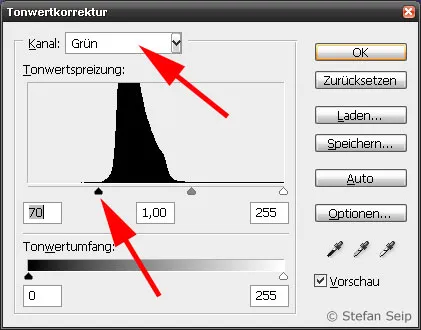
The blue channel (upper arrow) was changed to the black point "65".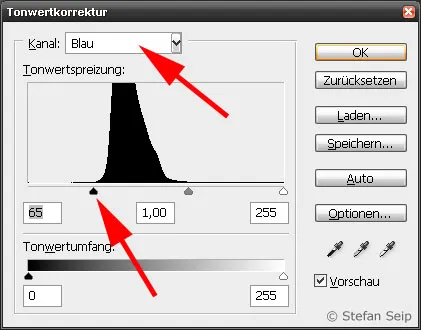
The result of this clipping of the histograms is a color-balanced photo with a dark sky and bright stars. Small corrections may now be necessary to achieve the final result. For example, a slight increase in contrast with the Photoshop command Image>Adjustments>Gradation Curves...: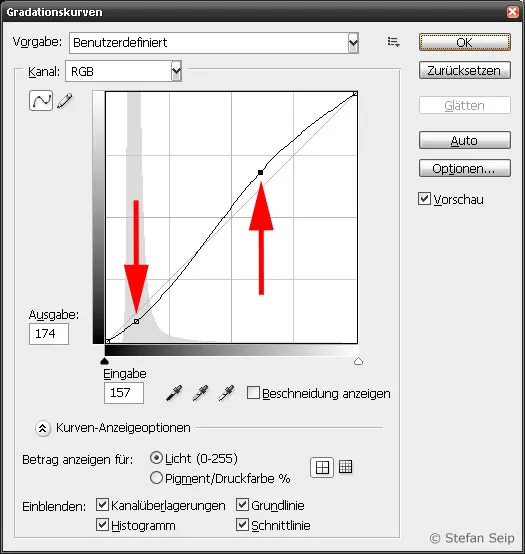
A sigmoid (S-shaped) bending of the gradation curve achieves an increase in contrast. The red arrows mark the positions at which the curve was shifted downwards (left arrow) and upwards (right arrow).
The result of the efforts looks like this: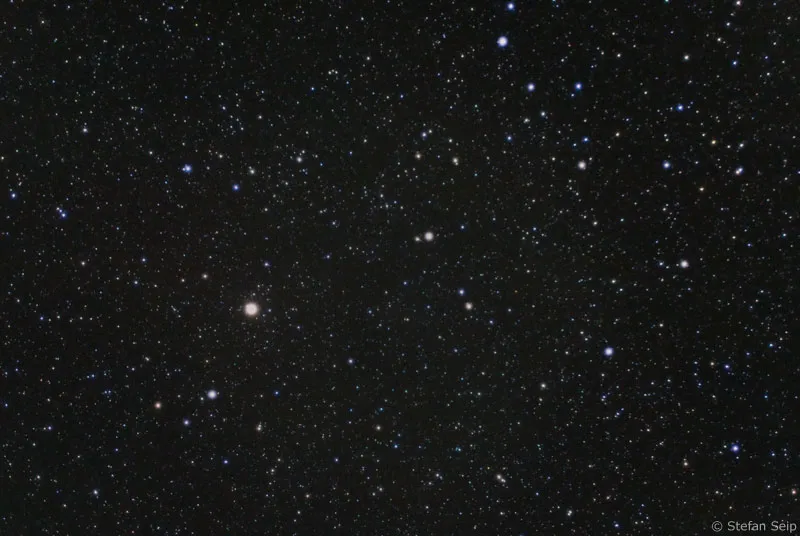
Finished image that has been cropped at the edges (cropping) and rotated by 180 degrees compared to the RAW file.
Can you recognize which constellation it is?
Here is the resolution: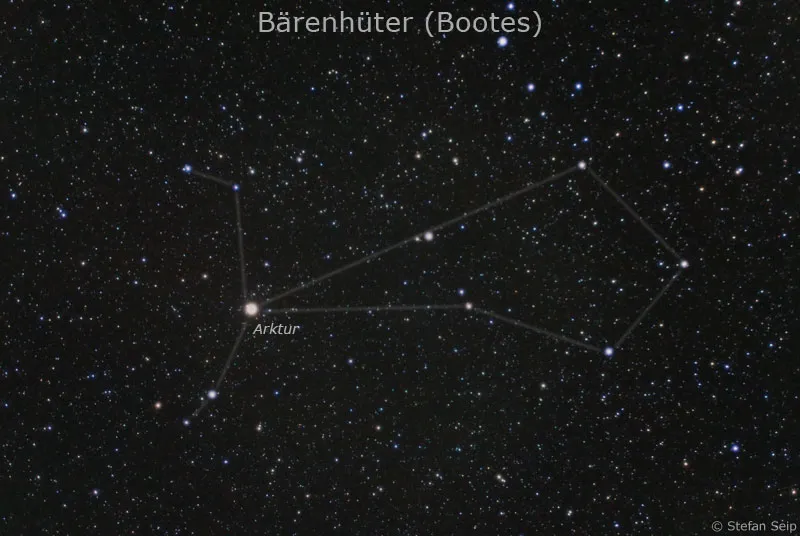
Adding lines and text makes the constellation easily recognizable. To add such elements to a photo, use Photoshop's on-board tools.
Your first constellation photo is the start. Nothing stands in the way of creating your personal star atlas. Have fun!
Sample images
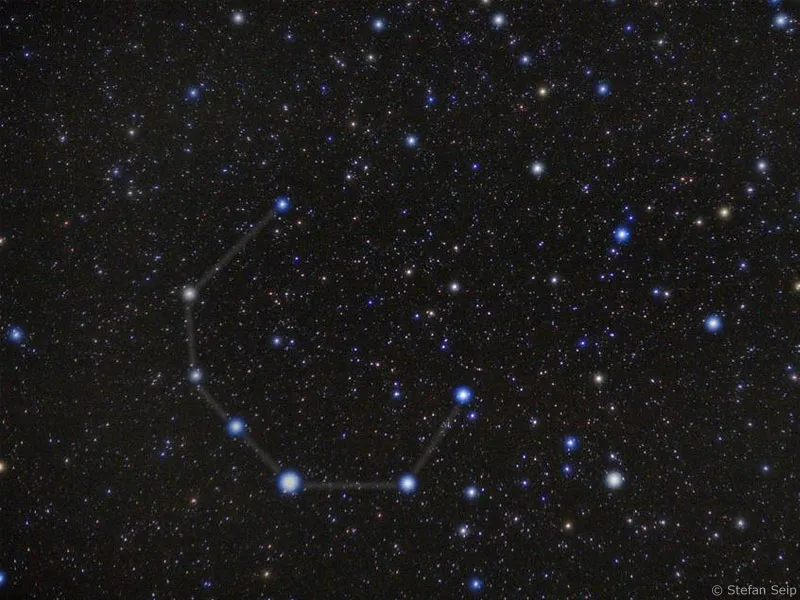
The constellation "Northern Crown". A 50-millimeter lens was used at Blender 1:1.8 and an exposure time of 15 seconds. Only a section of the complete image is shown here.
The Big Dipper (top left) is part of the constellation "Great Bear", which was photographed here. The picture was taken with the kit lens 18-55mm, with a focal length of 30mm. A large number of stars were visible in 20 seconds of exposure time because the observation conditions were optimal.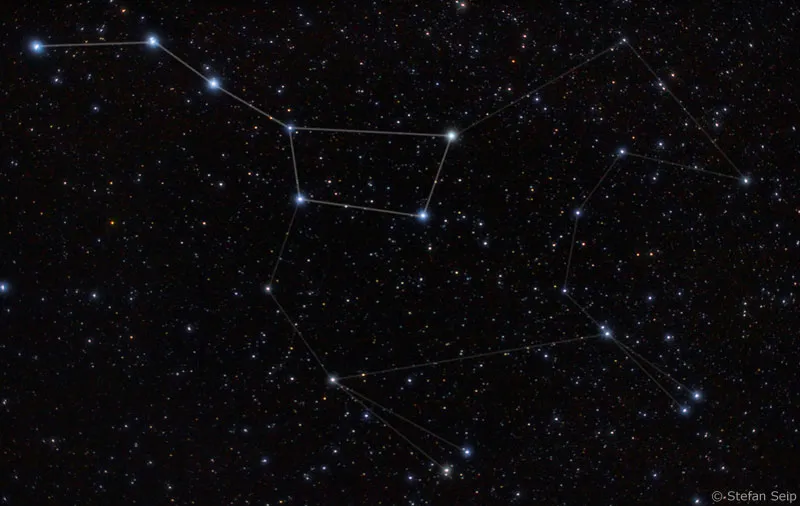
10 seconds of exposure time and a 35mm lens at Blender 1:2.0 were enough to capture the constellation Orion in all its glory. The image shown is an enlargement of a section. The blue sky color is due to the fact that the picture was taken shortly after dawn.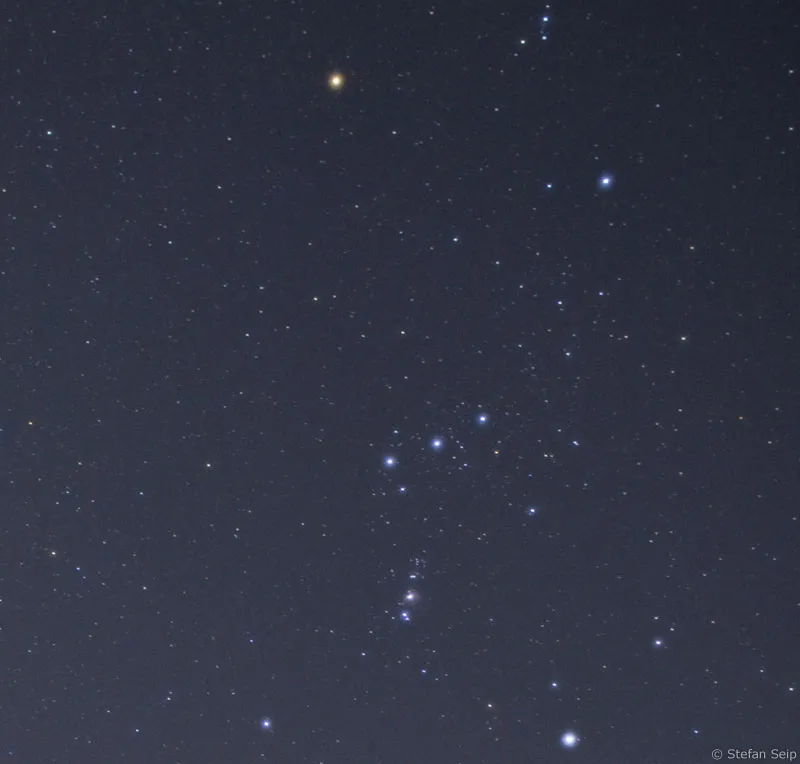
You can see the constellations "Big Dipper" (left), "Little Dipper" (center) and Cassiopeia (right). Two images with a focal length of 35 millimetres were combined to create this panorama. Each individual shot was exposed for 15 seconds at Blender 1:2.0.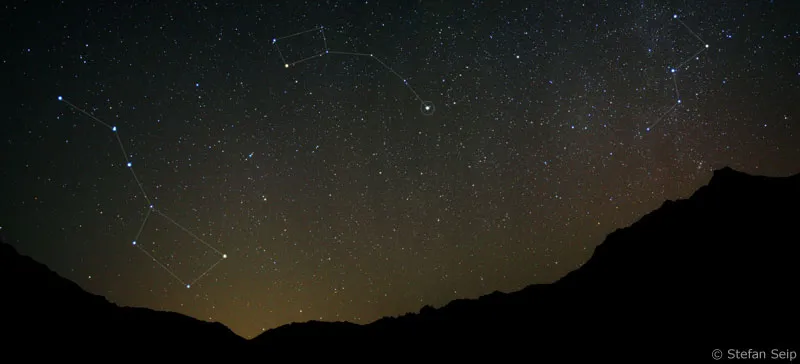
Note on our own behalf:
All image examples used are not photomontages, but were created in the manner described in the tutorial.
The only exception is the cover picture of the constellation "Leo" (see caption).
