Here is an overview of the individual chapters:
Part 01 - "Dream job" concert photographer?
Part 02 - Legal issues
Part 03 - Special features of concert photography
Part 04 - Behavior in the "trench"
Part 05 - The right equipment for concert photographers
Part 06 - Tips and tricks from (concert photography) professionals
Part 07 - Image composition (Part 1)
Part 08 - Image composition (Part 2)
Part 09 - Recommended camera settings
Part 10 - Post-processing
Figure 8.1: Spectacular, but also moving moments need to be captured in concert photography. If you consciously compose your pictures, you will get impressive photos of great artists. Here, the fantastic clarinettist Giora Feidman was celebrated at his concert in the Berlin Philharmonie on the occasion of his 75th birthday, which he was visibly touched by. Canon EOS-1D Mark IV with EF 2.8/24-70mm at a focal length of 38mm. 1/160 second, aperture 3.2, ISO 1,000, shutter priority (aperture priority).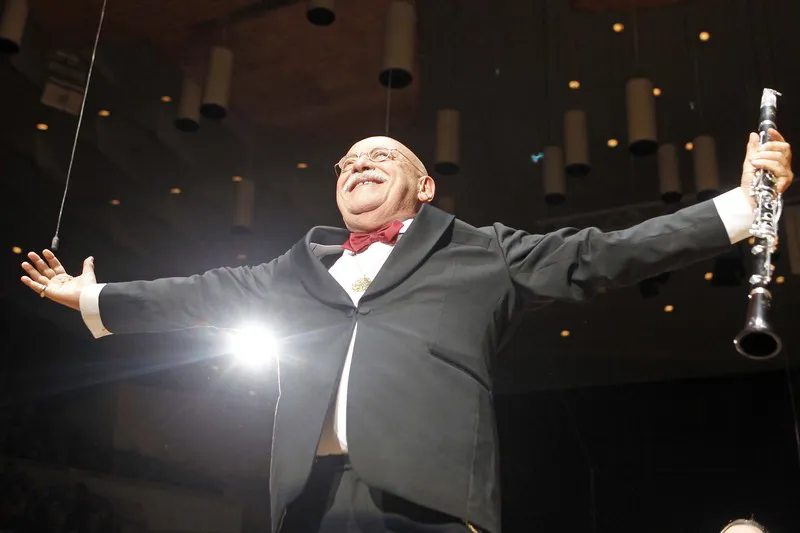
(Photo © 2013: DAVIDS/Sven Darmer - www.svendarmer.de)
8.1 Capturing the mood in the audience
If you want your pictures to show how successful the concert was, you should not only photograph the musicians on stage, but also the people in the audience. Here you can see whether the concert was a success or not from the beaming, happy (or, in the worst case, bitterly disappointed) faces.
Photographing the audience (or parts of it) is generally unobjectionable from a legal point of view. However, make sure that you do not take individual portraits and then use these photos commercially in a different context. This is not covered by the organizer's permission to take photographs.
However, you can photograph parts of the audience without hesitation and use these photos for reporting on the concert.
Figure 8.2: The audience celebrates, the atmosphere is great: Fans at the Sunrise Avenue concerton August 27, 2012. Photos like these should also be included in concert coverage. Nikon D4 with 2.8/14-24mm Nikkor with 14mm focal length used. 1/100 second, Blender 2.8, ISO 4000.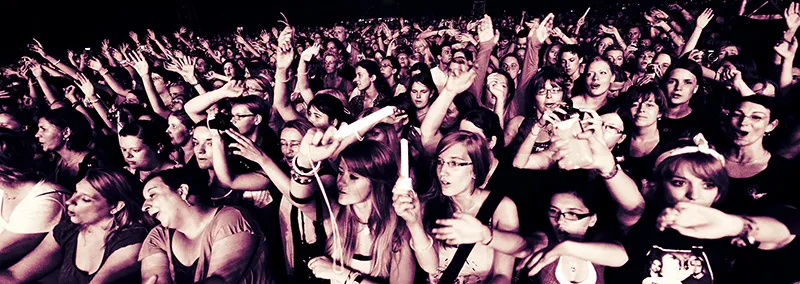
(Photo © 2012: Jens Brüggemann - www.jensbrueggemann.de)
Figure 8.3: Singer BOSSE at his concert in the C-Halle in Berlin on May 4, 2013. If you can photograph the musician in the middle of the audience, the atmosphere at the concert can of course be shown much better. You kill two birds with one stone, so to speak (a portrait of the musician and a photo of the audience). However, "bathing in the crowd" has become increasingly rare in recent years, partly for safety reasons. And unfortunately, it is extremely unlikely that this will happen during the first three songs. Canon EOS-1D X with EF 2.8/24-70mm at a focal length of 24mm. 1/160 second, Blender 3.2, ISO 2,500.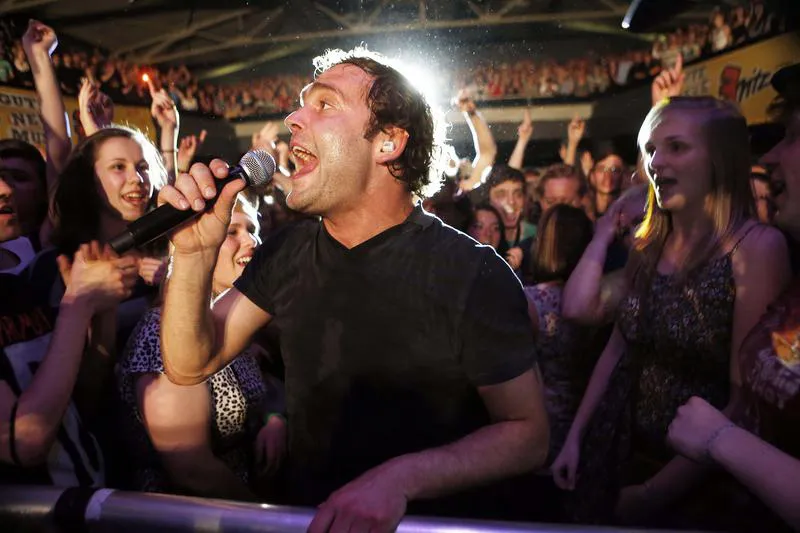
(Photo © 2013: DAVIDS/Sven Darmer - www.svendarmer.de)
Figure 8.4: Here I chose a more distant camera position: From the audience, I was thus able to photograph the outstretched arms of the enthusiastic fans in the foreground as evidence of the great atmosphere at the concert, while the H-Blockx went about their business in the background. Please note, however, that you can only take (and later publish) such photos with the express permission of the concert organizer. The photo shows the H-Blockx at their concert on August 31, 2010 at the ZFR in Bochum/Witten. Nikon D3S with 2.8/24-70mm Nikkor with 50mm focal length used. 1/250 second, Blender 2.8, ISO 6,400.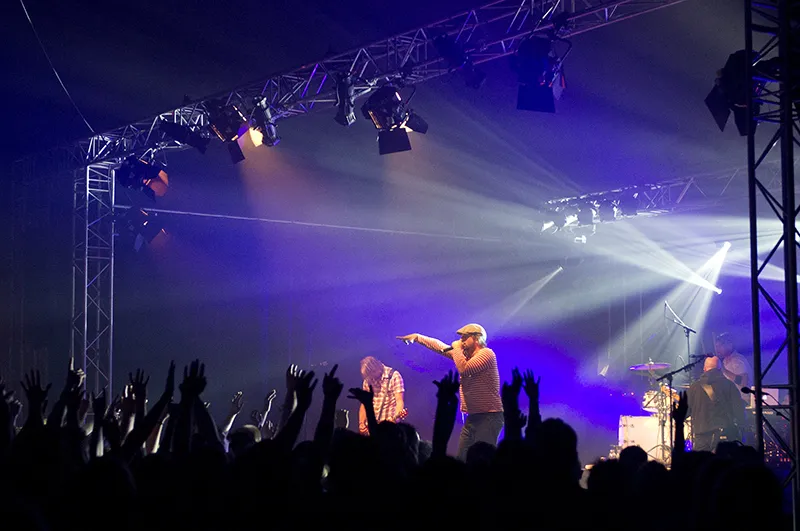
(Photo © 2010: Jens Brüggemann - www.jensbrueggemann.de)
8.2 Look for unusual viewpoints
Some photos are particularly spectacular because they were taken from an unusual point of view. The prerequisite for this, however, is that the photographer also has the opportunity to do more than just take the (usual) positions in the press pit. So if you want to get closer to the artists or use another exclusive position (e.g. from the mixing desk or from the audience) for your shots, you will need special permission from the organizer.
Please note that third parties (e.g. band members or lighting or sound technicians) are not authorized to give you special photo positions; it is always up to the organizer to allow or deny this. However, if security assigns you a particularly interesting spot, you can assume that this has been approved by the organizer. Security are the executive arm of the organizers; they work closely together and the security people usually know exactly what they are allowed to do, which photographer spots are permitted - and which are not.
Figure 8.5: Dieter Thomas Kuhn at his concert at the Waldbühne in Berlin on August 6, 2011. This photo also benefits from the interaction between the musician and his fans. The unusual angle was possible because the photographer was able to lean out of the press pit onto the part of the stage that led to the audience as a small catwalk. This back view of the artist was therefore possible without having to leave the pit. Canon EOS-1D Mark III with EF 2.8/16-35mm with 16mm focal length used. 1/200 second, Blender 5.0, ISO 1,000.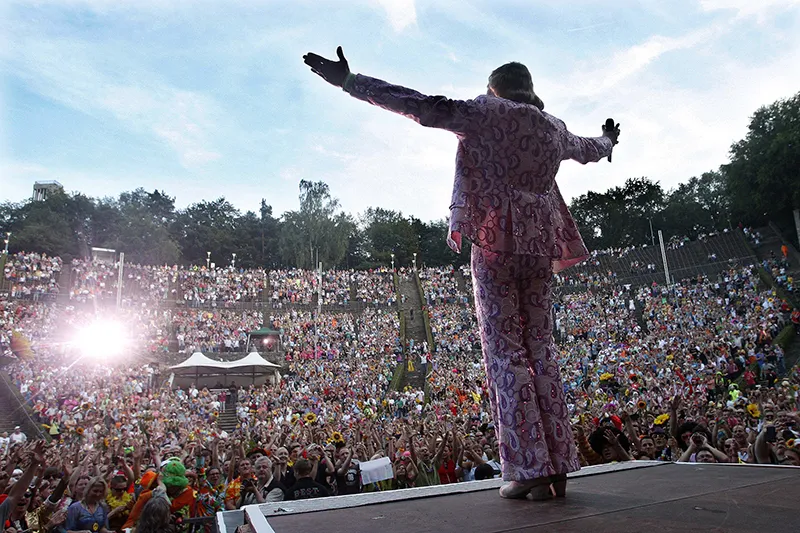
(Photo © 2011: DAVIDS/Sven Darmer - www.svendarmer.de)
Figure 8.6: This photo captivates on the one hand by its unusual camera position (it was taken from the rows of the orchestra) and on the other hand by the critical, almost evil look of the conductor Christian Thielemann, who was still General Music Director of the Munich Philharmonic Orchestra at this time (photo taken on May 22, 2008 in Berlin's Admiralspalast). Since 2012, the former assistant to Herbert von Karajan has been chief conductor of the Sächsische Staatskapelle Dresden and, since 2013, also artistic director of the Salzburg Easter Festival.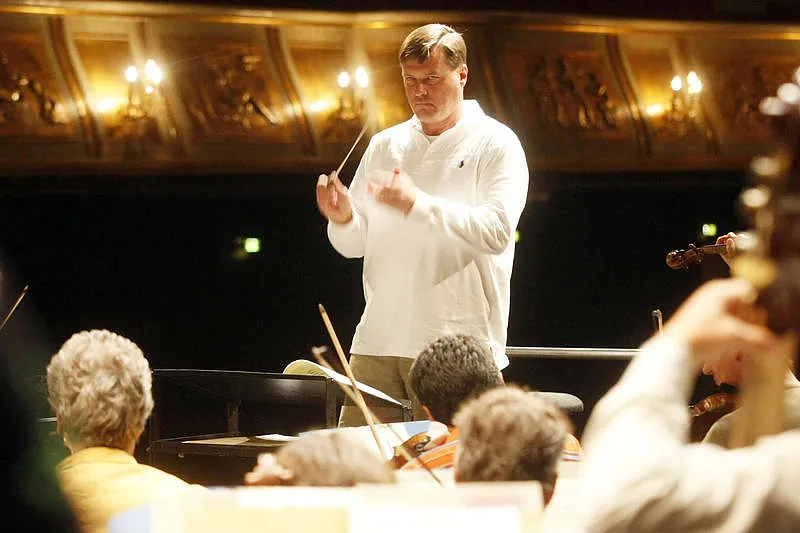
(Photo © 2008: DAVIDS/Sven Darmer - www.svendarmer.de)
8.3 Showing spectacular stage set-ups and images
Some - often better-known - bands use elaborate stage constructions and images in addition to sophisticated lighting technology. The rule of thumb here is: take pictures! We photographers benefit greatly from such special elements. However, try to photograph the musicians to match the spectacular backdrop, because the set-ups or stage sets alone are not interesting. The reference to the concert or the musicians should always be established through photographic design.
Figure 8.7: Roger Waters during The Wall concerton June 15, 2011 in Berlin (in front of the symbol: red circle with black surveillance camera). Canon EOS-1D Mark IV with EF 2.8/24-70mm with a focal length of 34mm. 1/125 second, Blender 2.8, ISO 1,250. Shutter priority (aperture priority) with spot metering.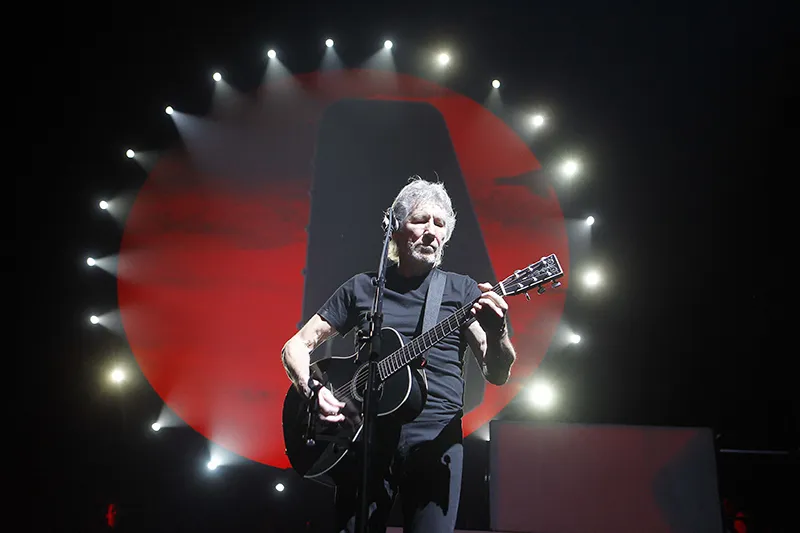
(Photo © 2011: DAVIDS/Sven Darmer - www.svendarmer.de)
Figure 8.8: Muse in concert at the Berlin Waldbühne on July 14, 2013. Canon EOS-1D Mark IV with EF 2.8/70-200mm at a focal length of 70mm. Such extraordinary and political pictures of the stage set-up are of course a must for concert coverage. 1/160 second, Blender 5.6, ISO 1,000, manual adjustment of the exposure parameters.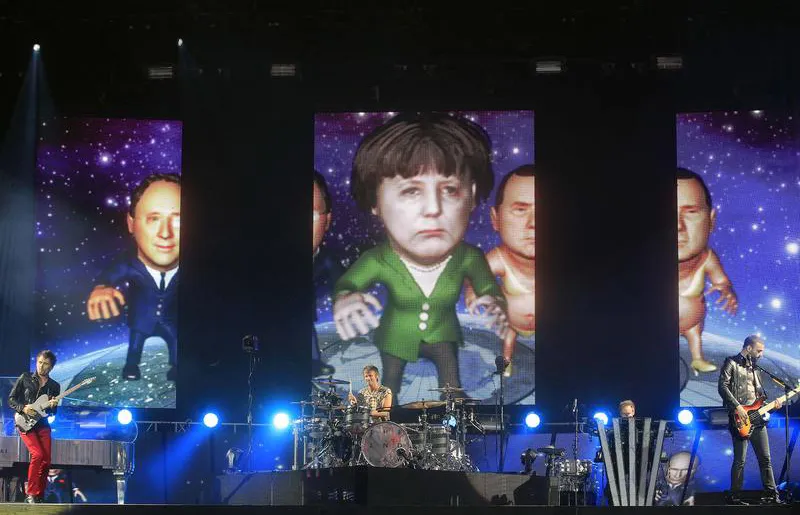
(Photo © 2013: DAVIDS/Sven Darmer - www.svendarmer.de)
8.4 Taking photos at an angle
Many photographs - not only in concert photography - are effective because they were (intentionally!) taken at a slight angle for creative reasons. However, you must be careful not to hold the camera at too much of an angle. If the horizon suddenly runs through two opposite sides (or even more obliquely), it rarely looks good. From an artistic point of view, angles between 10 degrees and a maximum of 40 degrees are ideal. Such tilts are seen by the viewer as dynamic, but not disturbing.
Please note, however, that such general recommendations should be taken with a grain of salt. It always depends on the subject whether (and how much) the camera should be tilted when taking pictures - or not.
Figure 8.9: Culcha Candela at their concert on August 20, 2011 at the Zeltfestival Ruhr in Bochum/Witten. The band was in (fast) motion the whole time. I decided to take many of the photos from this concert at an angle because I thought it suited the music and the brilliant show (the singers were in sweaty motion the whole time) better. Nikon D3S with 4.0/24-120mm Nikkor with 24mm focal length used. 1/400 second, Blender 4.0, ISO 3,200.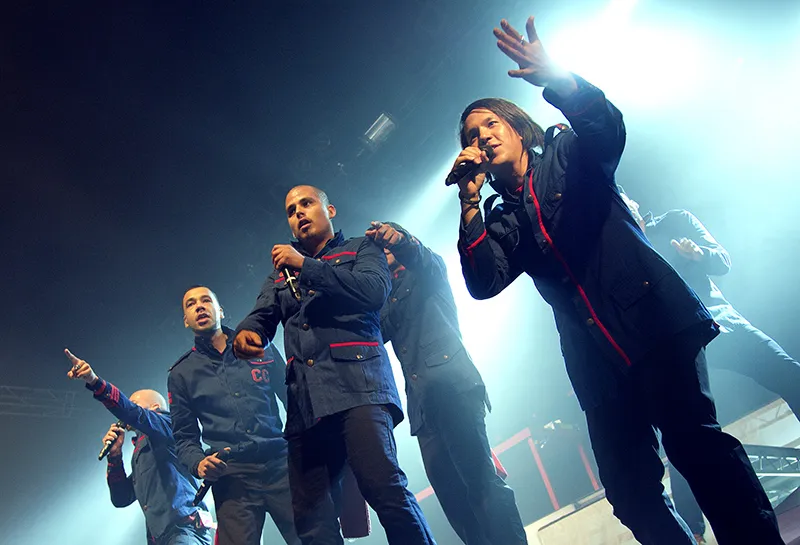
(Photo © 2011: Jens Brüggemann - www.jensbrueggemann.de)
Figure 8.10: Jamie Cullum in concert at Heimathafen in Berlin on April 17, 2013. Photos taken at an angle often look more modern and dynamic. Canon EOS-1D X with EF 2.8/70-200mm at a focal length of 80mm. 1/160 second, Blender 2.8, ISO 5,000, shutter priority (aperture priority) with spot metering.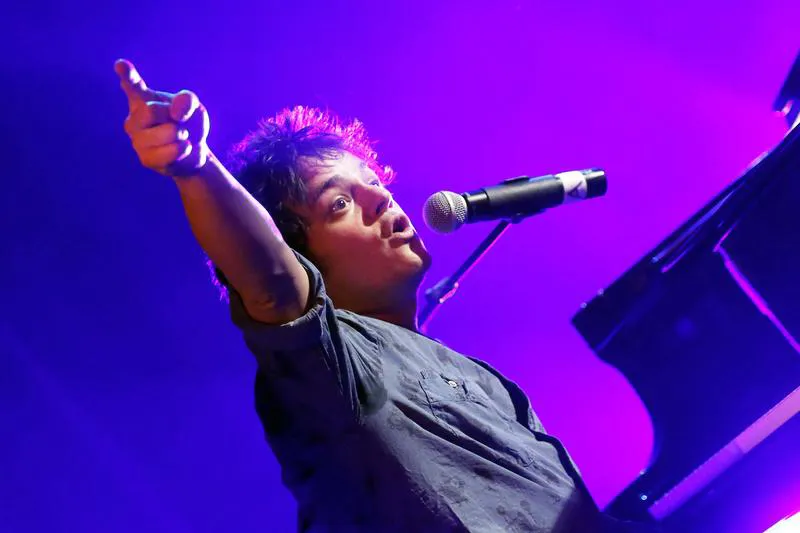
(Photo © 2013: DAVIDS/Sven Darmer - www.svendarmer.de)
8.5 Abstract photos
The first goal among concert photographers is actually always that the artist(s) on stage can be recognized as well as possible in the photos. This is the only way to sell the results to editors; after all, fans want to recognize their idols in the pictures.
However, more abstract photos sometimes also have their appeal; for example, if the photos are not to be used for editorial coverage of a particular concert.
If you need photos that "only" symbolize the terms "concert", "live music" or "music" in general, abstract photos are the first choice. They are "neutral", so to speak. (It would be different if, for example, well-known musicians or bands such as Udo Lindenberg, the Rolling Stones, AC/DC or Rihanna were to be recognized in the photos: Then the viewer would immediately associate a certain type of music or style, which would generally not be desirable at all in a text about live music, for example).
Figure 8.11: Milow on 1 September 2011: Even though the singer is completely in the shadow of the atmospheric backlight, he is still recognizable (for insiders) due to his typical body and guitar posture and head shape. Because of this intense red and the abstract graphic effect, I still really like this photo. Nikon D3S with 4.0/24-120mm Nikkor at focal length 24mm. 1/200 second, Blender 4.0, ISO 1,600. Manual adjustment of the exposure parameters. (Photo © 2011: Jens Brüggemann - www.jensbrueggemann.de)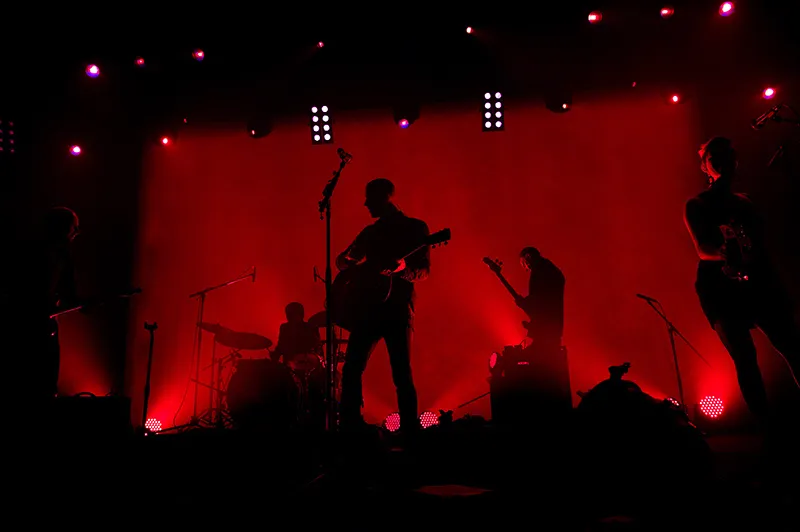
Figure 8.12: Also an abstract photo, here of a drummer at a live concert. The light and the fog, together with the few recognizable picture elements (outline of the drummer and his instrument), make the photo an unusual but effective document of an atmospheric live concert. Nikon D3S with 4.0/24-120mm Nikkor at a focal length of 120mm. 1/200 second, Blender 4.0, ISO 2,500. Manual setting of the exposure parameters.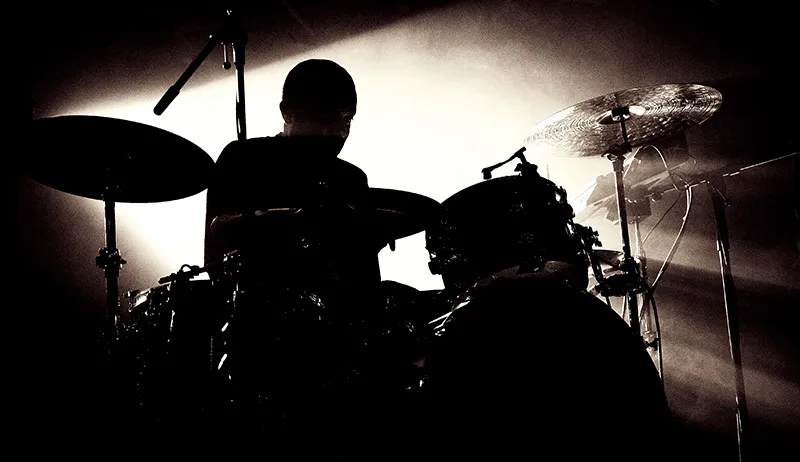
(Photo © 2011: Jens Brüggemann - www.jensbrueggemann.de)
8.6 Targeting the focus
Many beginner photographers do not use autofocus selectively (for example by using a single autofocus metering area), but have the entire autofocus metering area activated. In the end, they do not even know which autofocus area the camera is using.
This can result in many incorrectly focused photos. As the cameras focus on the object at the shortest distance from the photographer (in many cases this is the microphone stand, for example), many photos will not show the most important element in the picture (usually the musician's face) in sharp focus as desired.
It is therefore better to work specifically with the autofocus. I prefer to use the center autofocus area for this (because it is the most powerful on most cameras). By tapping the shutter release button, the distance value is saved (in conjunction with spot metering, the exposure value is also saved) and after I have panned the camera at lightning speed so that the image section corresponds to my ideas, I only need to press the shutter release button all the way down.
In many cases, however, it is advisable to use an autofocus field that is not in the center of the viewfinder, but rather further up in portrait format, for example. In this way, you can dispense with the short camera pan.
This method always makes sense if many photos are taken in succession where the distance to the most important element in the picture is always roughly the same. This is often the case with portraits of musicians if the artist is not moving too much (for example, because he or she is standing at the microphone stand).
Figure 8.13: Here I photographed the BAP guitaristat a concert on August 24, 2011. I emphasized the happy, satisfied expression on the artist's face in this photo because I photographed with a very open Blender (and thus only a small amount of focus). This way, neither the foreground nor the background distract from the face. Nikon D3S with 1.4/85mm Nikkor. 1/400 second, Blender 2.2, ISO 1,250.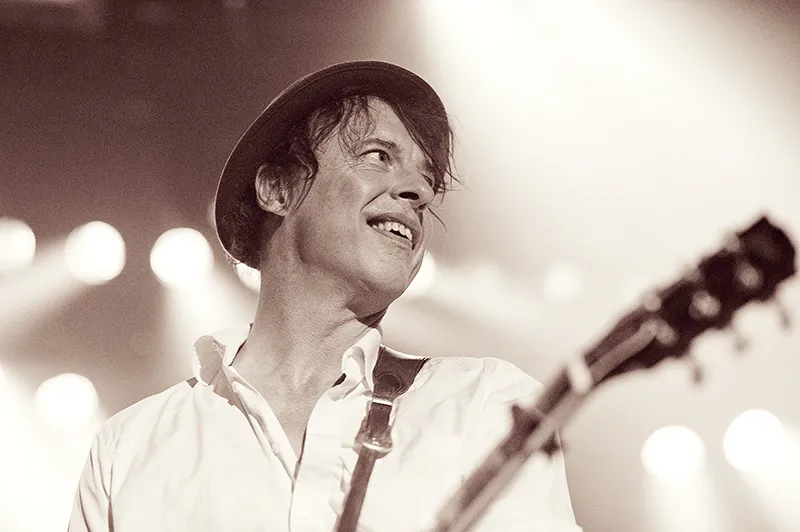
(Photo © 2011: Jens Brüggemann - www.jensbrueggemann.de)
Figure 8.14: Because the face of the guitarist from RUNRIG (concert on August 29, 2012) was always mostly in shadow, I decided to focus on the guitar neck for this photo. The blurring of the guitarist's face doesn't bother me in this case, because the anonymity of the artist is already given by the shadow. The result is a (neutral) musician's photo that can be used in general on the subject of (live) music. Nikon D4 with 1.4/85mm Nikkor. 1/1600 second, Blender 2.2, ISO 2,500.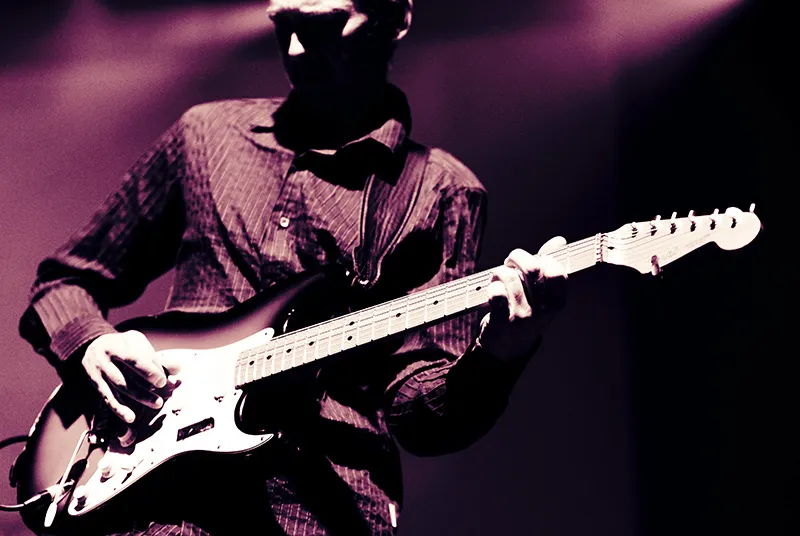
(Photo © 2011: Jens Brüggemann - www.jensbrueggemann.de)
8.7 Portrait or landscape format?
Since most professional system cameras have been equipped with portrait format handles, the portrait format has been chosen as a creative option almost as often as the landscape format. Cameras equipped with portrait format grips are just as comfortable to hold as they used to be with landscape format only. In some areas of photography, it is safe to say that mainly portrait format shots are taken (for example in fashion photography).
In concert photography, both formats are equally common. There are enough motifs that look perfect in portrait format and others that virtually "demand" landscape format.
Figure 8.15: This motif is perfect for portrait format: the guitarist's cheering hands above his head virtually set the format for me. Nikon D800 with 2.8/70-200mm Nikkor at a focal length of 155mm. 1/250 second, Blender 4.0, ISO 800.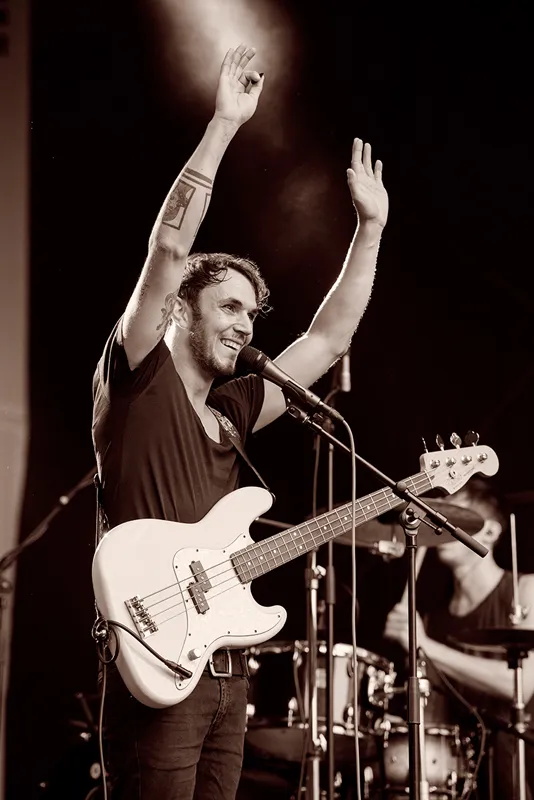
(Photo © 2013: Jens Brüggemann - www.jensbrueggemann.de)
Figure 8.16: BAP concertat the Zeltfestival Ruhr in Bochum on August 24, 2011. The guitarist's oblique pose made him and his guitar neck fit even better into the (portrait) format. Nikon D3S with 1.4/85mm Nikkor. 1/320 second, aperture 2.0, ISO 1,250. Aperture priority (aperture priority).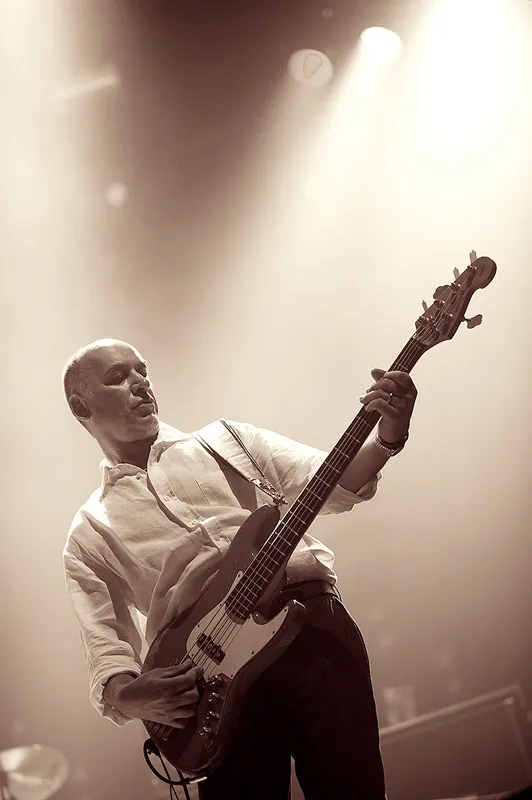
(Photo © 2011: Jens Brüggemann - www.jensbrueggemann.de)
Figure 8.17: Kraftwerk at their concert in Berlin's Tempodrom on March 26, 2004. Here, the strictly straight image design fits perfectly with the constructed music of Kraftwerk (who, by the way, were founded over 44 years ago and had their first big hit exactly 40 years ago: "Autobahn"; unless you consider the song "Ruckzuck", released in 1971, to be this). Of the founding members, however, only Ralf Hütter remains today. Florian Schneider, another founding member who only left Kraftwerk in 2008, was still active in the band in this photo from 2004.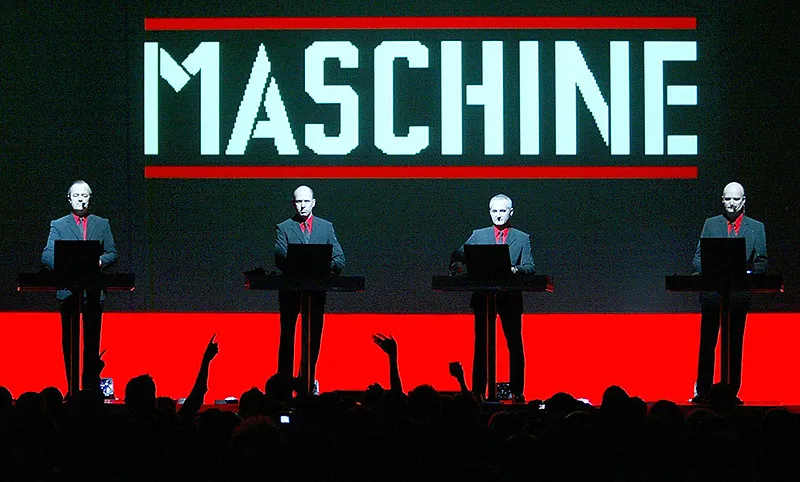
(Photo © 2004: DAVIDS/Sven Darmer - www.svendarmer.de)
8.8 Square as an option
The square format is the most unusual of the "typical" photo formats. It used to be much more widespread because of the 6x6 medium format cameras. Of course, the square camera format still exists today, but the proportion has fallen sharply.
However, everyone has the option of switching to the square format later when editing images. After all, it is a very exciting format, which is why the decision to use it should not only be made because you want to remove disturbing image elements (by cutting off part of the image).
Figure 8.18: Sunrise Avenue in concert at the ZFR in Bochum on August 27, 2012. Although I placed the guitarist on the left at the edge of the picture, the square is the optimal format in this case because the drums still find their place in the picture. Nikon D4 with 2.8/24-70mm Nikkor with 24mm focal length used. 1/320 second, aperture 2.8, ISO 3,200, aperture priority (aperture priority).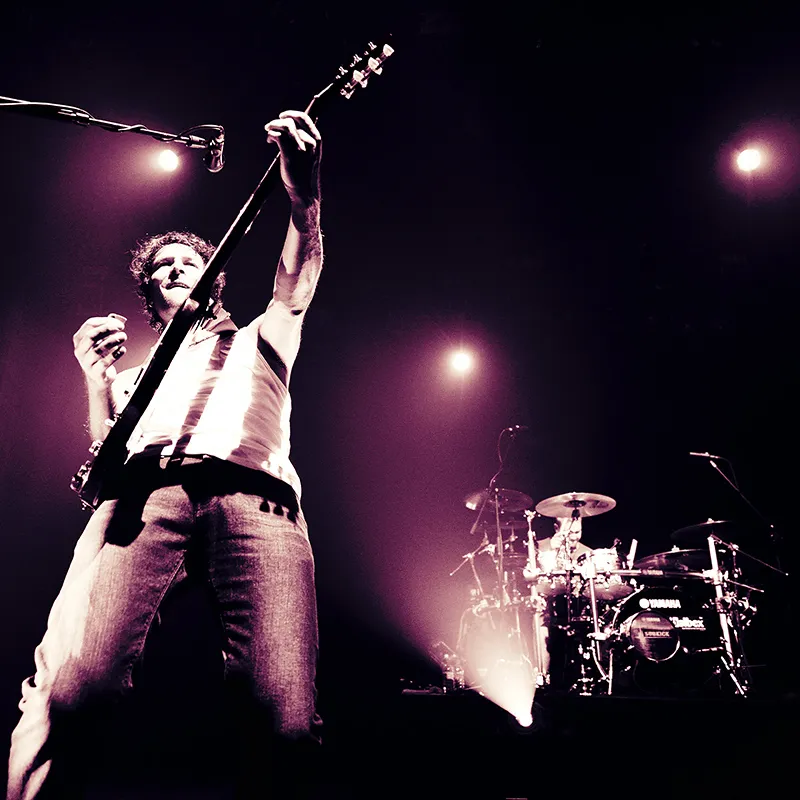
(Photo © 2012: Jens Brüggemann - www.jensbrueggemann.de)
Figure 8.19: Nobody mimes the "bad boy" as skillfully as Billy Idol (here a photo from his concert on November 27, 2005 in Berlin). His face, together with the raised index finger, fit perfectly into the square picture format.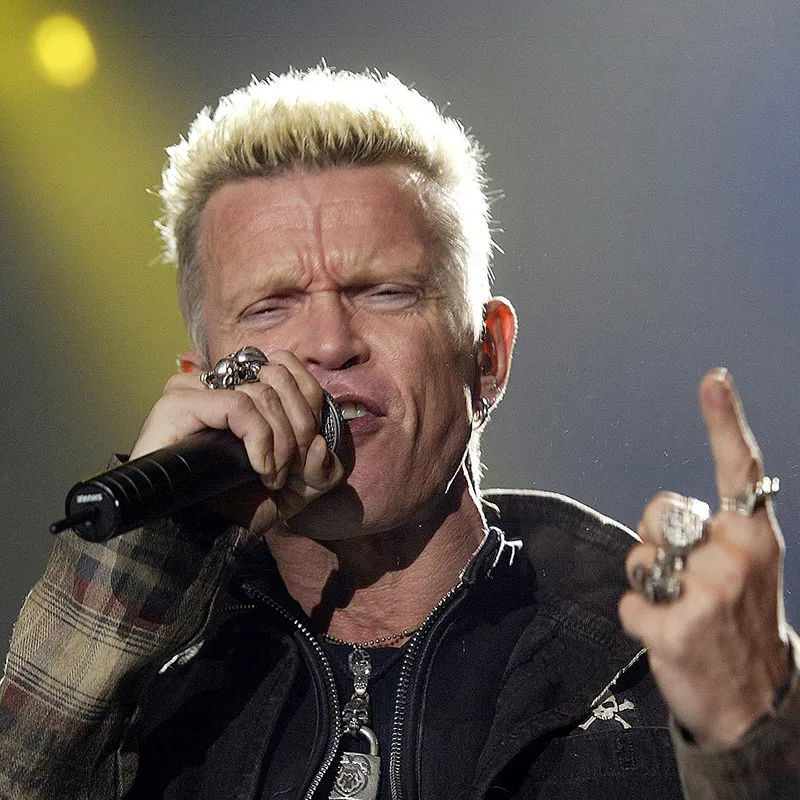
(Photo © 2005: DAVIDS/Sven Darmer - www.svendarmer.de)
Figure 8.20: I didn't want to cut off the microphone stand in this photo - so I opted for the square format. The portrait format solution would have shown a microphone protruding into the picture, which would have come out of nowhere (in the photo). Nikon D800 with 2.8/70-200mm Nikkor at a focal length of 105mm. 1/500 second, Blender 4.5, ISO 800.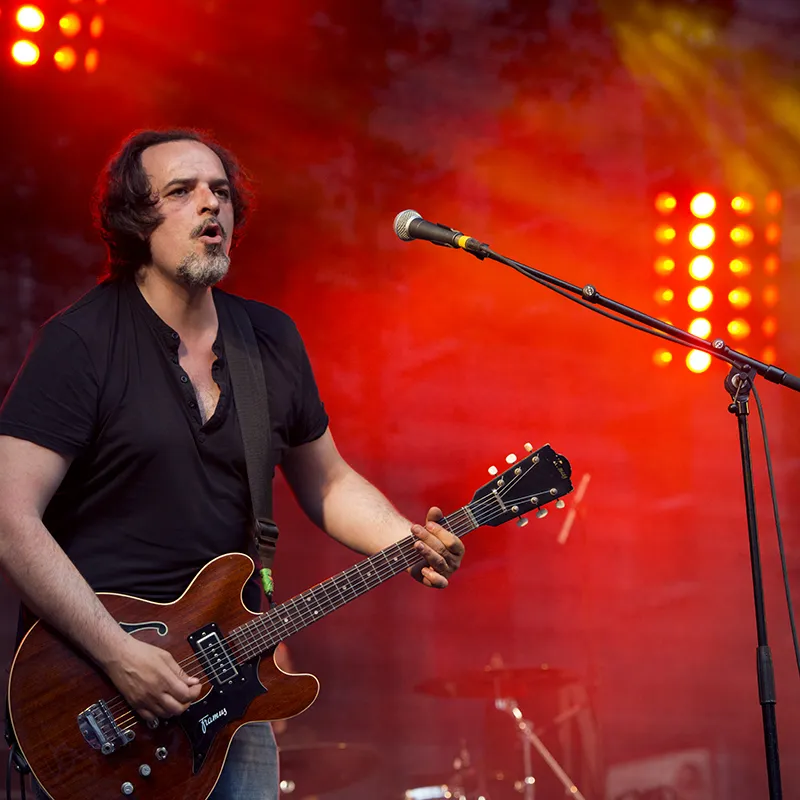
(Photo © 2013: Jens Brüggemann - www.jensbrueggemann.de)
Figure 8.21: Wir sind Helden concerton August 25, 2011: drummer Pola Roy in action. Drummers with their instruments are usually best depicted in a square format. At least if you want to show the instrument as a whole (not cropped). This is due to the structure of this instrument, also known as a "shooting gallery". Nikon D3S with 1.4/85mm Nikkor. 1/250 second, Blender 3.5, ISO 2,000. Manual setting.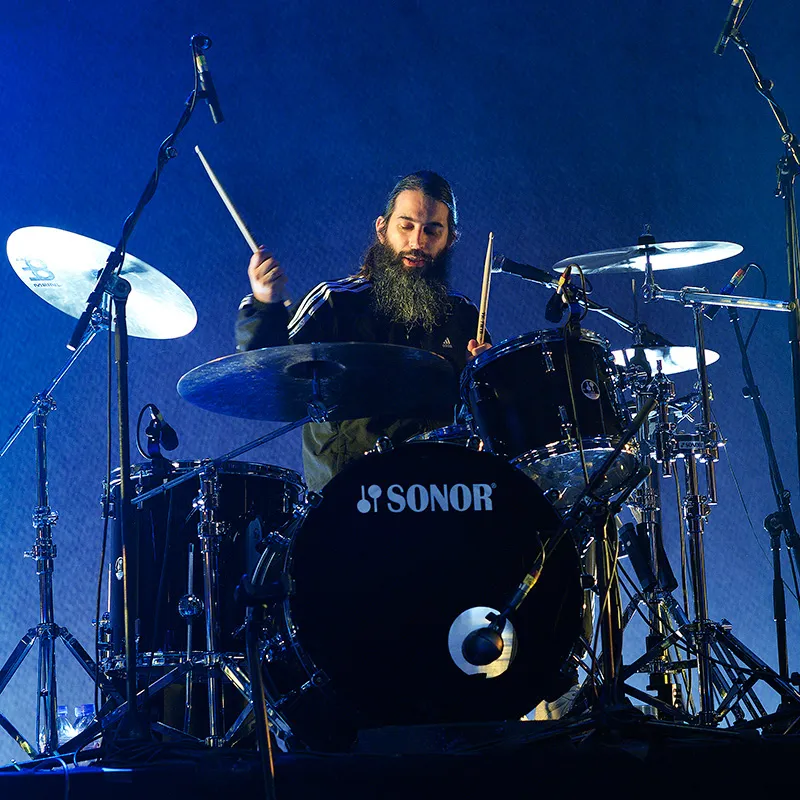
(Photo © 2011: Jens Brüggemann - www.jensbrueggemann.de)
Note
Most concert photographers will use professional system cameras (i.e. cameras with interchangeable lenses) with a format ratio of 2:3 (DSLR full format = 24mm x 36mm). This means that the vast majority of photos will be "constructed" in either landscape or portrait format when the image is composed through the camera viewfinder.
However, from a creative point of view, you should not allow yourself to become a "slave" to your camera format. Other formats also have their appeal. However, you should be careful not to choose any "non-formats" that are not perceived as harmonious by the viewer.
The square format is a very "strict" format, but it derives its appeal from the fact that it is not encountered very often. In this respect, it is also well suited for concert photography, as long as the picture elements fill the photo sensibly.
For your next concert photo shoot, try to consciously align the image composition with the square format. To do this, simply remove the side edges of the landscape format. The result will certainly be concert photos that are both unusual and exciting.
