Here is an overview of the individual chapters:
Part 01 - "Dream job" concert photographer?
Part 02 - Legal issues
Part 03 - Special features of concert photography
Part 04 - Behavior in the "trench"
Part 05 - The right equipment for concert photographers
Part 06 - Tips and tricks from (concert photography) professionals
Part 07 - Image composition (Part 1)
Part 08 - Image composition (Part 2)
Part 09 - Recommended camera settings
Part 10 - Post-processing
Figure 6.1: If you want to take atmospheric, extraordinary concert photos, you need not only suitable photographic equipment, but also a little experience - or at least a few good tips from experienced photographers. Of course, a little bit of luck also plays a role. However, as the saying goes: "Fortune favors the hard-working!" In this respect, you shouldn't rely on your luck alone, because then you will rarely bring home special photos from a concert. Here photographer Sven Darmer was able to capture the singer of Depeche Mode, Dave Gahan, in front of the impressive stage backdrop (concert on June 9, 2013 at the Olympiastadion Berlin). Canon EOS-1D X with EF 2.8/70-200mm at a focal length of 142mm. 1/250 second, Blender 7.1, ISO 3,200.
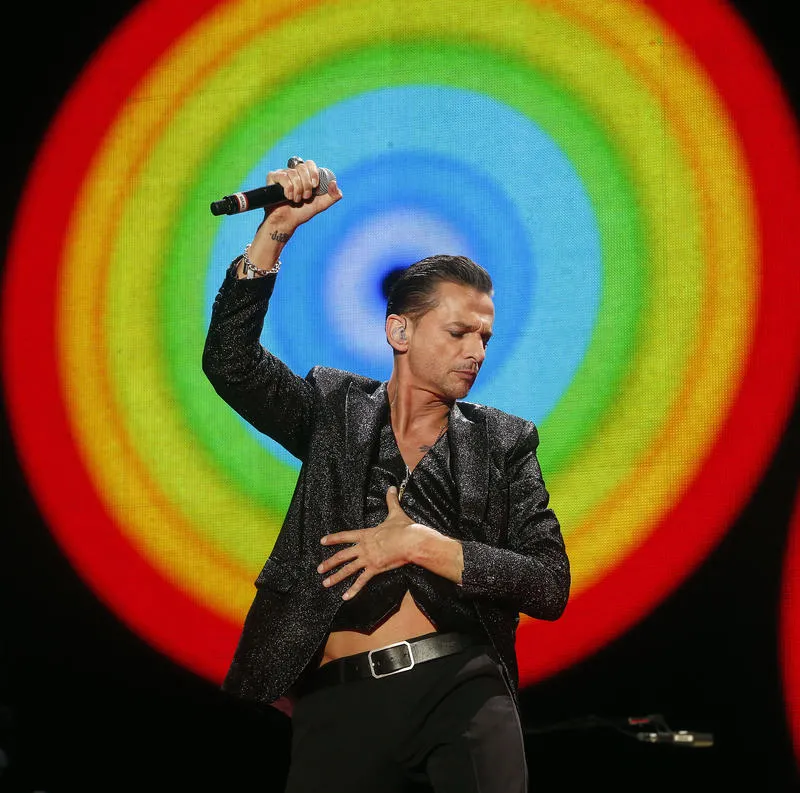
(Photo © 2013: DAVIDS/Sven Darmer - www.svendarmer.de)
6.1 Suitable exposure metering methods
The following exposure metering methods are possible with most modern cameras:
- (center-weighted) integral metering
- spot metering
- Multi-segment metering
Figure 6.2: Musicians, like all artists, are often dressed entirely in black - a circumstance that does not exactly make exposure metering any easier for us photographers. However, if the musician maintains their position over a certain period of time, spot metering can sometimes be used sensibly.
In this case, you can meter the artist's face and determine a value that is independent of the backlight from the stage lighting. This also ensures that the person is depicted well in the photos and can be recognized. Nikon D800 with 2.8/70-200 mm Nikkor at a focal length of 120 mm. 1/1000 second, Blender 5.6, ISO 1000.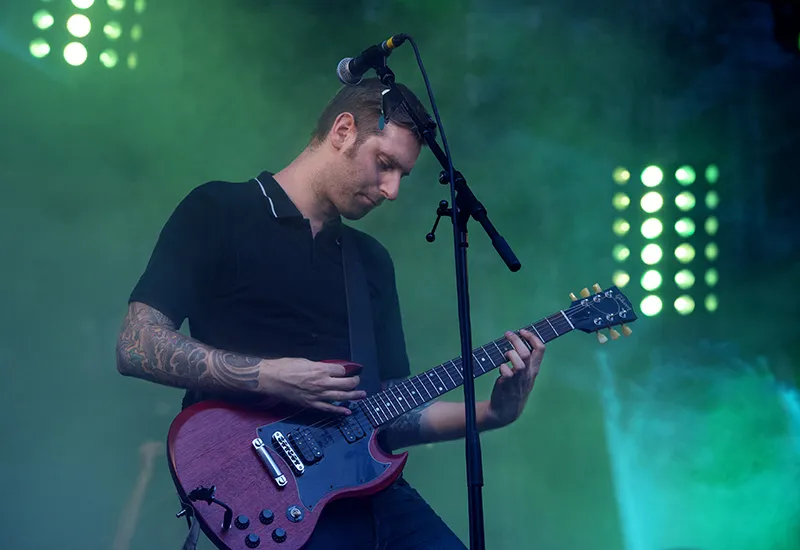
(Photo © 2011: Jens Brüggemann - www.jensbrueggemann.de)
With integral metering, the individual brightness values of the entire image field are taken into account. It is ideal, for example, for typical vacation photos or shots of large groups in normal lighting conditions (with not too strong contrasts). In the variant of center-weighted integral metering, the area in the center of the image is weighted more heavily than the peripheral areas (in the Nikon D4, this is a circle in the center of the image with a diameter of 12mm, which is weighted at 75%).
The camera designers assume that the important parts of the subject are usually placed in the center of the image (for example, in group shots).
Figure 6.3: Peter Maffay at a concert at the Waldbühne in Berlin (on May 28, 2011). If the subject consists of an equal number of dark areas (here: guitar strap, trousers) and light areas (here: parts of the guitar body) and the rest consists of neutral light areas (here: gray background), then the best results are achieved with the integral metering exposure method. (The center-weighted integral metering was used here). Canon EOS-1D Mark IV with EF 2.8/70-200mm at a focal length of 165mm. 1/250 second, Blender 4.5, ISO 1,000.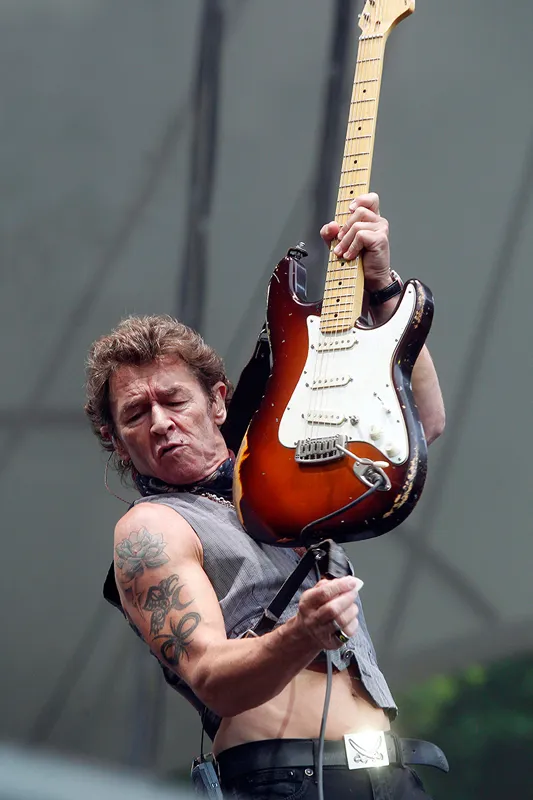
(Photo © 2011: DAVIDS/Sven Darmer - www.svendarmer.de)
Spot metering is an exposure metering method for experienced photographers; meaningful (correct) results can only be achieved with practiced use. With spot metering, a very small part of the image field (the metering area is usually in the middle) is used to specifically measure a small part of the brightness in the subject. This will be the part that is considered most important and must be correctly exposed. In concert photography, this is often the face of the singer/musician. However, the following points often cause difficulties for users: firstly, the size of the metering field, which on my Nikon D4, for example, only has a circular diameter of 4mm (this corresponds to approx. only 1.5% of the entire image field).
Secondly, it must be ensured that the brightness of the area of the subject to be metered corresponds approximately to 18% gray. This is what the camera's exposure metering is calibrated for; the reflection of an 18% gray is therefore the reference value, and if the appropriate area in the subject deviates from this in terms of reflection, the exposure will be incorrect. So only subjects where the appropriate spot reflects the light as an 18% gray are suitable for spot metering. (Holding a reference gray card in front of the singer's face to determine the correct exposure is - I think - rather impractical during a concert ...) What also confuses some photographers is that the exposure measurement often takes place in the middle of the active focus metering field.
This can easily lead to confusion that the two functions could be "related" to each other. However, in terms of camera control and logic, exposure metering and autofocus have nothing in common. Exposure metering is used to create an image that is not too bright and not too dark (unless you have opted for high-key or low-key photos). Autofocus, on the other hand, is needed to take a properly focused photo.
Figure 6.4: A subject (with many dark areas) that is suitable for using spot metering to determine the right combination of shutter speed, Blender and ISO sensitivity to get a correctly exposed photo. When using spot metering, it is important that there is constant (in this case daylight) lighting over a sufficiently long period of time, during which you have time to carry out the exposure measurement.
The artist on stage must also not move too quickly so that the exposure measurement can be carried out. Due to the dark background and the musician's black clothing, a different metering method would have produced an overexposed result in which the clothing would look gray and the face would be much too bright. (Unless you had used integral metering or matrix metering in combination with manual exposure compensation, also known as plus-minus correction). Nikon D800 with 2.8/70-200 mm Nikkor at a focal length of 175 mm. 1/640 second, Blender 4.0, ISO 1,000.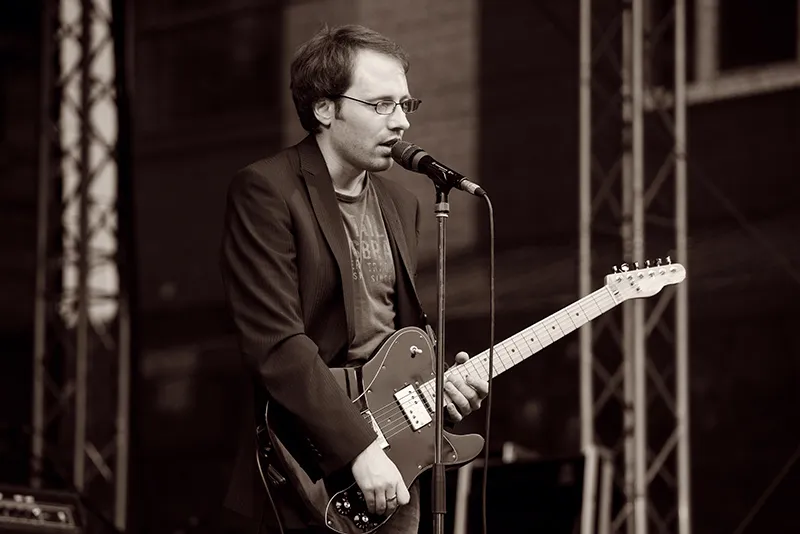
(Photo © 2013: Jens Brüggemann - www.jensbrueggemann.de)
With the multi-segment metering method (also known as matrix metering ), the image is divided into several areas (for example five: one field in the center and all four corner areas adjacent to it). Each field is (automatically) measured by the camera and then an average value is calculated.
This exposure metering method is recommended if, for example, high-contrast subjects are to be photographed. The idea is that all parts of the image should be taken into account and a time/blender/ISO combination is determined that can be seen as a compromise from all areas (in order to avoid white washed-out areas in the image or deep blacks without drawing).
Even if manufacturers have developed this exposure metering method further (for example, color matrix metering, which also takes the colors in the subject into account when determining brightness; or 3D color matrix metering, which also takes the distances between the subject areas into account in the calculation), all exposure metering methods always suffer from a dilemma:
If the differences in brightness in the subject are too great (= large contrast range), it is impossible to take a satisfactorily exposed photo with a single shot. This is because the contrast range in the subject is greater than the dynamic range of the camera, which means that there will inevitably be areas in the photo that are black without detail or washed out white. The solution would be HDR; however, this is completely unsuitable for concert photography due to the tripod ban in the pit and the movement of the musicians on stage.
Figure 6.5: Lighting conditions that are not easy to manage are the norm in concert photography, at least at rock and pop concerts. In particular, when a spotlight shines into the lens as (atmospheric) backlighting, it can happen that the people (singers/dancers) on stage end up too dark in the photo. However, the possible incorrect exposure due to the backlight may be compensated for under certain circumstances, for example as in this photo, where the dark (predominantly black) clothing of the boy band virtually counteracts the exposure metering. In this way, the two extremes (backlight on the one hand; black clothing of the performers on the other) cancel each other out. The result is an atmospheric concert photo in which the singers' faces are also shown to their best advantage. US5 in concert on November 24, 2007 in Berlin.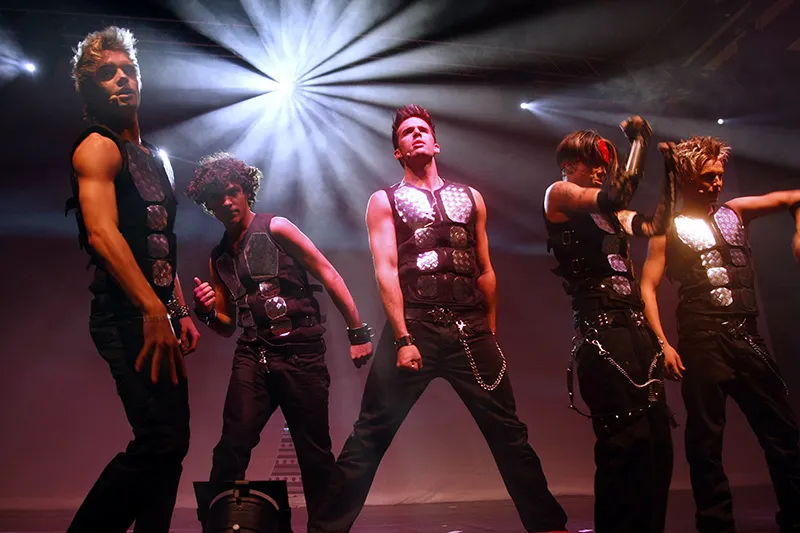
(Photo © 2007: DAVIDS/Sven Darmer - www.svendarmer.de)
Ultimately, the photographer has to decide which (image-important) part of the motif should be correctly exposed. And whether he or she uses the spot, integral or multi-segment metering method is completely irrelevant. The decisive factor is that he or she achieves the correct result with the method used.
However, the camera preset (which is regarded as a "recommendation" to the photographer) should not be followed "blindly". Since we have three parameters on the camera side (shutter speed, Blender, ISO sensitivity) to achieve a certain exposure (image brightness), we can also change these three parameters in such a way that the exposure (and thus the brightness of the photo) remains the same; but then with a different speed-Blender-ISO combination that is more suitable for our purposes. For example: If the camera's automatic exposure control (no matter which one) gives us the following values: shutter speed = 1/250 second, Blender = 8, ISO = 800, we can change these in such a way that we get, for example, a faster shutter speed with the same ISO setting and a more open Blender (and thus a clearer sharpness-blur gradient).
In concert photography, playing with the sharpness/blur gradient is often used to make the photographed musician stand out from the (often disturbing) stage background. If the background is unattractive, it can be made largely unrecognizable by using a shallow depth of field (often just a few centimetres or even millimetres). The aim is always to draw the viewer's attention to the elements in the picture that the photographer considers important. In concert photography, this will usually be the faces of the artists, or in more abstract shots, sometimes just the instruments (or the hands playing).
But in order to achieve this, we need to use an aperture that is (as far as possible) open; the aperture 8 suggested by the camera's automatic exposure control is not practical (because the area in focus would be too large). In order to be able to photograph with an open aperture, we "shift" the values suggested by the camera by opening the aperture further (up to 2.8, for example) and shortening the shutter speed (in our example to 1/2000 second), while keeping the ISO setting the same (800). In this way, we achieve the same image brightness, but with a different combination of parameters.
Note: This "shifting" (changing the parameter combination of time, Blender and ISO suggested by the camera while maintaining the same image brightness), which is based on the requirements of the subject and must be carried out manually by the photographer, is of such great importance for practical photography that many camera manufacturers have placed this function on the function wheel (at Nikon: which is operated with the right thumb). This allows the photographer to intervene quickly and select the exposure combination that he or she considers more appropriate.
The photographer often prefers to shoot with a wider aperture (in which case the aperture is opened and this is compensated for with a faster shutter speed or by reducing the ISO value) or a faster shutter speed is required, for example because the musicians are putting on a brilliant, fast show that requires a fast shutter speed when taking photos (in which case the shutter speed is reduced and this is compensated for by opening the aperture or increasing the ISO sensitivity). Conversely, there are also cases where the focus range needs to be enlarged, for example because the musicians on stage all need to be in focus in one photo or where the photographer needs a slightly slower shutter speed than suggested to show certain effects (for example when using pyrotechnics in the show).
The speed/blender/ISO combination suggested by the camera is therefore only one way of achieving the correct exposure; however, by combining shutter speed, aperture and ISO sensitivity, many different combinations can be selected, all of which will result in a consistent exposure. Choose the combination that gives you the optimum result for the subject you are photographing!
Figure 6.6: In this photo, the artistic dexterity of the BAP guitaristshould definitely be in the foreground (concert on August 24, 2011). For this I chose the time/blender/ISO combination, which makes it possible to emphasize the sharpness/blur gradient (almost open aperture). This allowed me to blur the guitarist a little and the background completely. As a result, the photo almost looks like a posed studio shot - but hardly like a snapshot of a concert on a relatively small stage. Nikon D3S with 1.4/85 mm Nikkor. 1/125 second, Blender 2.2, ISO 1,250.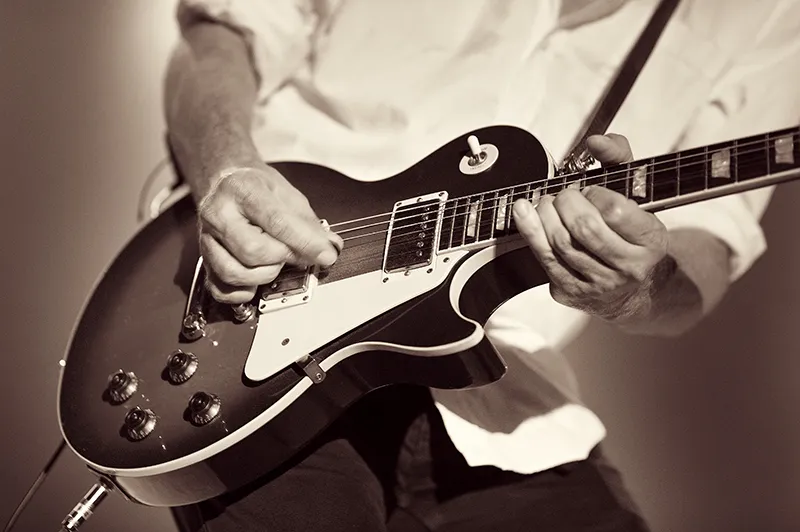
(Photo © 2011: Jens Brüggemann - www.jensbrueggemann.de)
6.2 Automatic exposure versus manual control
Many photographers (especially beginners with great ambition) absolutely want to take pictures with manual camera settings. By this they mean that they do without the automatic exposure settings and set the shutter speed, Blender and ISO sensitivity manually.
I think this is the wrong approach for several reasons: firstly, fluctuations in the lighting (which can occur quite frequently and quickly in concert photography) can mean that we have to constantly adjust the shutter speed/blender/ISO combination. However, we (equipped with a great eye and a powerful brain) don't always notice these fluctuations; incorrect exposures are inevitably the result. Secondly, it is rather - well, let's say: courageous, if photographers think they can estimate the brightness of the subject to such an extent that they can set the time, Blender and ISO value manually of their own free will. Our eyes get used to changing light situations (very quickly!), so that we don't even notice the differences; or only when they are very large and sudden.
The rule with manual settings is therefore to follow the values suggested by the camera (automatic exposure). These in turn are based on the camera's internal exposure metering, which means that the difference between manually setting the time, aperture and ISO parameters and shooting with one of the three (professional) automatic exposure modes (program, aperture and time automatic; we strongly advise against using the automatic ISO mode!), the only difference is that in the former the values are set by the photographer (but according to the specifications of the automatic camera) and in the latter the camera sets the parameters itself (because one of the automatic exposure modes has been selected).
Figure 6.7: At classical concerts (or at jazz, country, folk music, pop music, etc.), you should not expect the lighting to fluctuate greatly. Also, fewer or even no color effects ("lightshow") are used; the concert photographers can therefore count on constant, natural (white) light, which of course greatly simplifies manual exposure control. Here Montserrat Caballé was photographed at her concert in the Berlin Philharmonie on January 31, 2011. Canon EOS-1D Mark IV with EF 2.8/300mm. 1/160 second, Blender 2.8, ISO 1,000.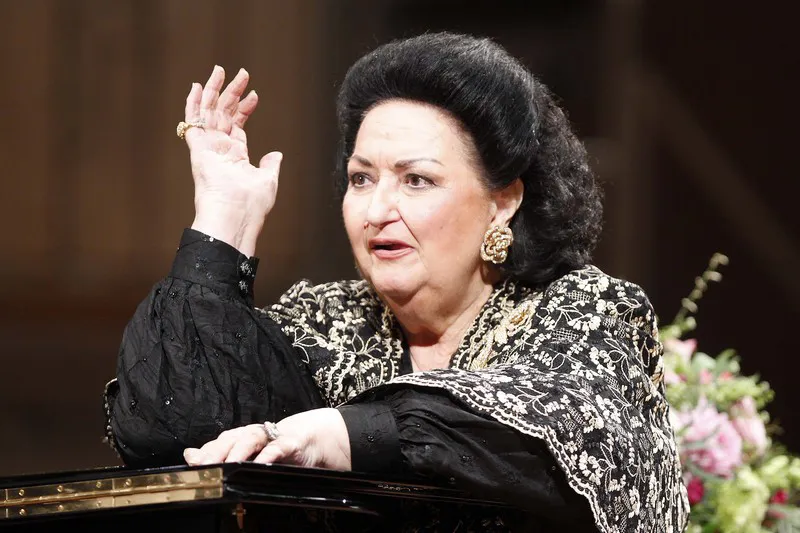
(Photo © 2011: DAVIDS/Sven Darmer - www.svendarmer.de)
Figure 6.8: RUNRIG on August 29, 2012 If the lighting on the musicians is constant (at least for a "lucky" but indefinite period of time), you can work well with manual exposure settings. Then it doesn't matter whether spotlights illuminate the background, because the foreground, the musicians, remains equally (correctly) exposed.
(Between these two photos, I took 18 others with identical exposure settings). Nikon D4 with 1.4/85 mm Nikkor. 1/250 second, Blender 2.5, ISO 2,500.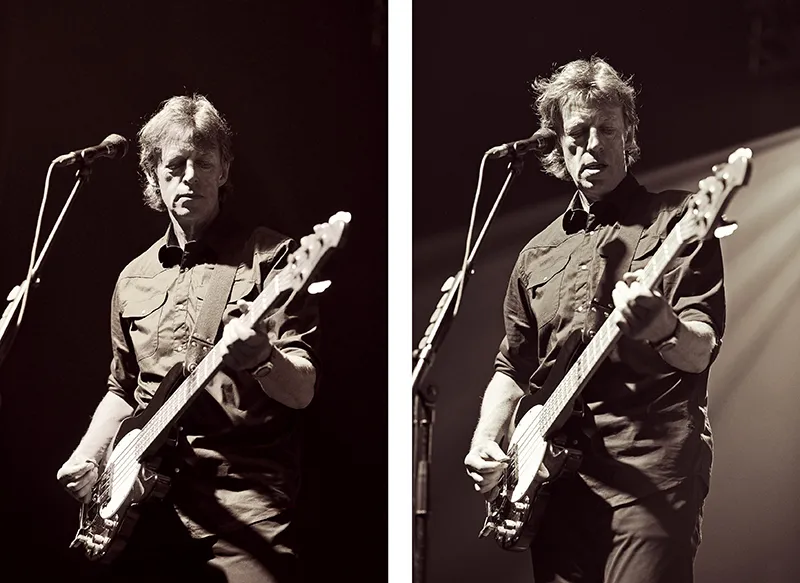
(Photo © 2013: Jens Brüggemann - www.jensbrueggemann.de)
Conclusion
Those who - for whatever reason - prefer to shoot manually are of course welcome to do so. But in professional concert photography, as in other areas of photography, it's the result that counts. In this respect, you shouldn't worry so much about the way, but rather make sure that the result is successful. It doesn't matter how you get there. (A photo is not better just because the photographer has worked with manual settings).
If you decide to set the shutter speed, Blender and ISO sensitivity manually, you should bear in mind that changing light conditions require you to adjust the exposure parameter settings. In this case, always check whether the exposure settings produce the desired result or whether a correction is necessary.
6.3 Using the camera's continuous shooting function
Spots go on and off in fractions of a second. Due to the often rapid movements of the musicians on stage, they obscure a (back) light or allow it to shine into our lenses. Tenths of a second decide whether the artist in the portrait photo is blinking or making an unfortunate (unphotogenic) grimace.
Concert photography is action photography, so it is advisable to set the camera to continuous shooting speed. However, there is no point in regularly taking a dozen almost identical photos in succession; it is advisable, on the other hand, to always take 2-4 short "bursts of fire" when taking photos. In this way, the photographer can photograph the motifs in a targeted and deliberate manner and still avoid the risk of the respective photo becoming unusable due to a brief moment (for example, because a spotlight shines directly into the camera in a short fraction of a second and is therefore disturbing).
We concert photographers don't have to limit ourselves; due to the short time available (usually only three songs) we don't have to worry that the memory card might be full before we are led out of the pit. And the camera battery will probably last for 3-4 concerts in a row before the battery level indicator prompts us to charge it. So don't skimp on photos, but "hold on"!
Figure 6.9: Many rock stars have typical poses. If you manage to capture them, it will boost the sale of the photo immensely. Billy Idol (here on November 27, 2005 in Berlin) is of course a thoroughbred professional and also a master of self-portrayal. The continuous shooting setting on the camera helps to select the optimum result from similar photos. The one where the pose fits perfectly, the image detail and exposure are right, and the many little details (spotlight position, facial expressions, people and equipment in the background, etc.) harmonize in an ideal way.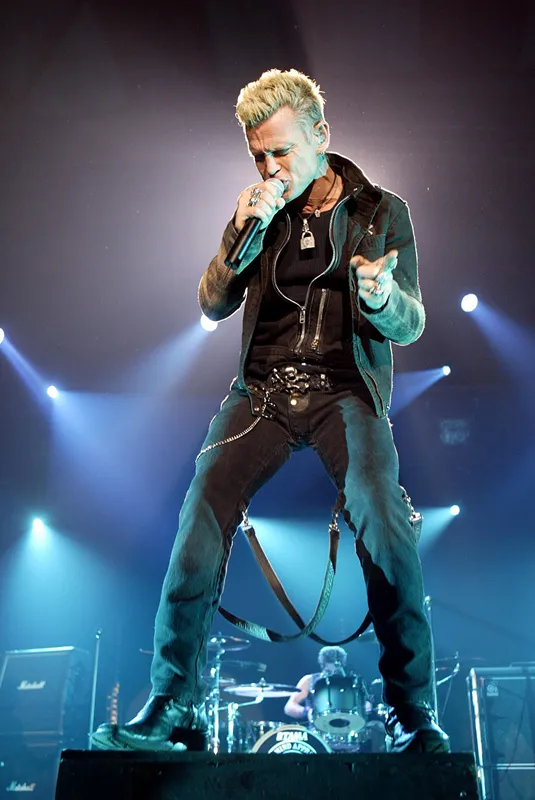
(Photo © 2005: DAVIDS/Sven Darmer - www.svendarmer.de)
6.4 Bracketing - a critical view
I have never really understood the point of bracketing. It seems a bit like shooting sparrows with cannons. And at least in the digital age, where we photographers shoot in RAW format and post-process all our photos (at least slightly), bracketing is superfluous.
Figure 6.10: Bracketing only makes sense if the photographer is unsure which exposure is optimal; in this way, he tries to get at least one optimally exposed result with several photos with different exposures. However, concert photography with its rapidly changing lighting conditions is only suitable for bracketing to a limited extent. As already mentioned several times, the lighting of the performers on stage changes constantly and very quickly anyway. This means that you can get completely different results even with the same exposure setting. If, in addition to this uncertainty based on the lightshow, a second uncertainty is brought into play, namely the change in exposure settings during a series of shots, two risk factors come together so that the (optimum) result can be predicted (achieved) even less. Bracketing takes you into very uncertain territory, so that the results are purely dependent on factors that cannot be predicted. For example: Does the underexposure associated with bracketing perhaps even take place at the exact moment when a spotlight shines directly into the photographer's lens and would therefore result in underexposure anyway? (Photo © 2013: Jens Brüggemann - www.jensbrueggemann.de)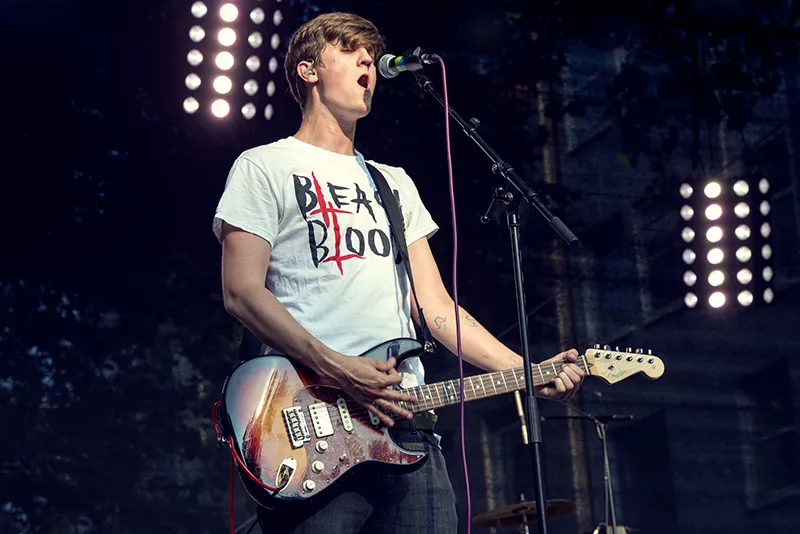
In my opinion, it makes far more sense to focus on the presumably correct setting of the camera instead of photographing exposure variations. Even if the settings were not quite optimal when the photo was taken, the photo can still be "saved" in most cases thanks to RAW development in Photoshop or Lightroom. So concentrate on unusual compositions, on capturing great scenes from the show, on photographing all the musicians (even if some of them are still unknown). And to check the exposure settings, a quick glance at the camera display from time to time is enough to discover and eliminate major errors.
6.5 Using full batteries
You never know ... True to this motto, you should always have fully charged batteries in your camera if you want to take concert photos. Of course, only one sixth of the capacity of a powerful battery is often enough, especially as you are only allowed to take photos during the first three songs. But you never know what might happen, whether the photography time might be extended on a whim or because a young musician needs to be promoted. And who knows if you won't get the opportunity to take more photos before or after the concert at the interview (or beforehand at the sound check)? So: Charge your camera battery! (Or take a charged spare battery with you).
Figure 6.11: "That's enough to make you tear your hair out!" When Woody Allen picks up the clarinet on stage (like here at the concert with his New Orleans Jazz Band on March 22, 2010 in Berlin), expressive concert photos are guaranteed! It would be a great pity if you had to stop taking photos prematurely because the battery had too little remaining capacity and had completely drained.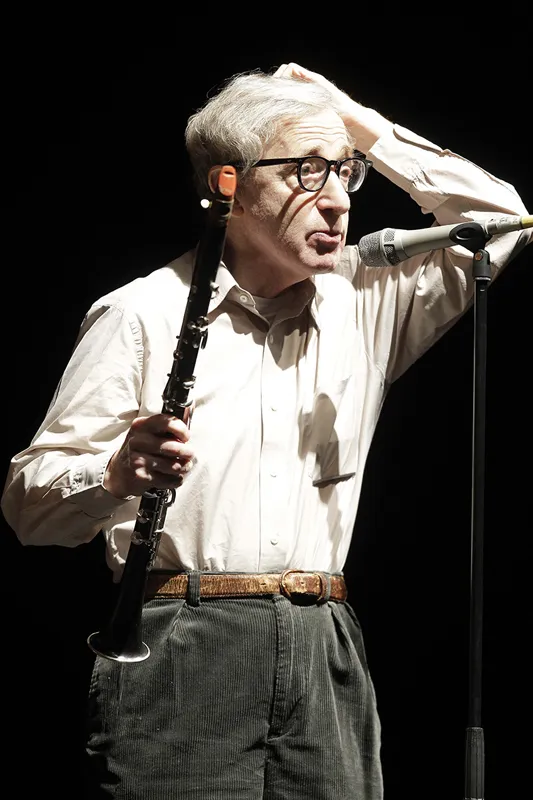
(Photo © 2010: DAVIDS/Sven Darmer - www.svendarmer.de)
6.6 Shooting in RAW format
In many areas of photography, it is completely unnecessary to take photos in RAW format. JPEG is completely sufficient in terms of quality. However, shooting in RAW format is really recommended in concert photography, more so than in any other area, because here we regularly have to deal with strong brightness contrasts. Blown-out white areas where spotlights shine directly into the lens and darkest areas in the stage background are not uncommon. Faces also often disappear; either they are too bright because the spotlight was too strong for our exposure setting, or the faces are too dark because the backlit spotlights have distorted the measurement of our automatic exposure system.
If we take photos in RAW format, some settings can be easily changed afterwards (for example the white balance) and the exposure can be optimized by at least a few f-stops.
Figure 6.12: me & me with singer Adel Tawil at the microphone on September 1, 2010. At most concerts, you can expect difficult to barely manageable brightness contrasts. It's helpful to take photos in RAW format so that you can later use the computer to extract detail from both the bright, overexposed areas and the dark, underexposed areas. Nikon D3S with 2.8/24-70 mm Nikkor at a focal length of 24 mm. 1/1000 second, Blender 3.2, ISO 3200.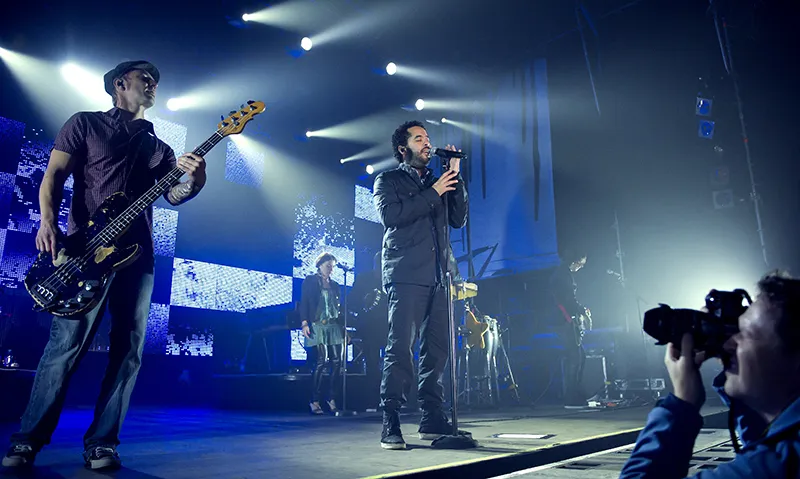
(Photo © 2010: Jens Brüggemann - www.jensbrueggemann.de)
6.7 Regular photo check - with automatic (and format-filling) image display
The great advantage of digital photography is the possibility of an immediate image check (on the camera display). Errors can thus be recognized immediately (and of course corrected). However, this advantage is only effective if photographers actually carry out the image check. Especially when photographing under time pressure in the heat of the concert, some forget this necessity. Or are too hectic and think they can do without it at that moment. But this is a fallacy. I have often seen photographers who, after leaving the pit, looked at the photos they had taken with eager curiosity and realized that they couldn't take a single usable photo home with them due to an unintentionally incorrect setting ...
So get into the habit of checking your pictures regularly, preferably every 10-12 photos. A quick glance at the camera monitor is all you need. To save time, you should activate the camera's automatic image playback function. After each photo is taken, it is shown on the display for a few seconds. A quick tap on the camera's shutter release button also makes the photo disappear again immediately.
It also makes sense to check the focus at longer intervals. A quick glance is not enough for this; in this case you have to zoom into the photo. However, this check is not necessary so often; once per song should be sufficient. (Unless you have frequent problems with the sharpness of your photos, in which case I would of course check the reason for this beforehand).
Figure 6.13: When photographers are eager to take photos at a concert (as here with Tim Bendzko on August 24, 2012) and under time pressure, it can happen that they forget to regularly check the camera display to check the photos they have taken for focus, correct exposure settings, image composition, etc. This is how it happens again and again. And so it happens again and again that photographers take photos with the wrong (or inappropriate) setting for the entire three songs and only realize their mistake after leaving the press pit, when it is too late to take corrective action. Nikon D4 with 2.8/14-24mm Nikkor with 24mm focal length used. 1/80 second, Blender 3.5, ISO 3,200.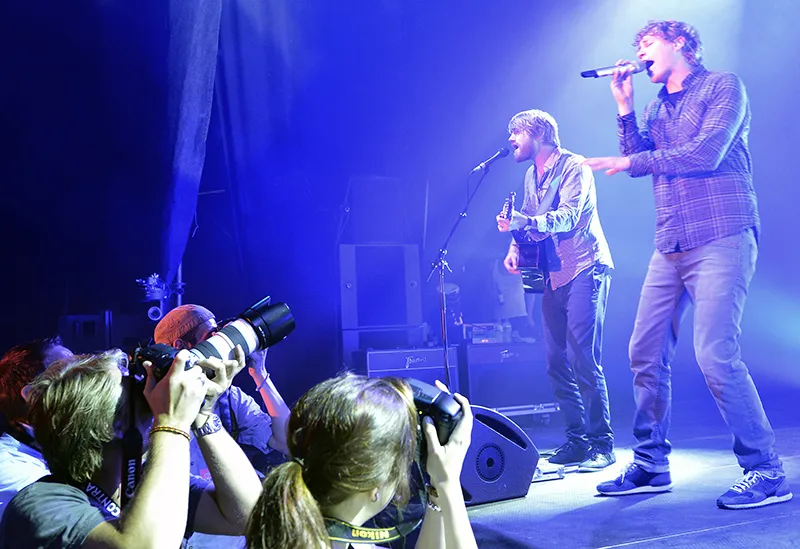
(Photo © 2012: Jens Brüggemann - www.jensbrueggemann.de)
6.8 Sometimes photographing in black and white
Concert photography actually lives from the many bright colors (of the lights). Nevertheless, black and white photos can also be very attractive. I recommend setting the camera mode to black and white when taking photos. This makes it easier to assess the effect when you look at the monitor. If you take photos in RAW format, the color information is not lost; you can still "develop" the photos in color.
However, black and white photography is not just about omitting color. Rather, it is about seeing motifs in black and white ; the photographer who has mastered this will also be able to distinguish between motifs that are suitable for black and white and others that are not, where the color is merely missing.
Figure 6.14: The special expressive power of black and white photos (or, belonging to the same category, photos in sepia tones) make black and white photography timeless; it is still "in". This motif of the BAP guitarist(concert on August 24, 2011 at the Zeltfestival Ruhr in Bochum/Witten) also loses nothing through reduction; on the contrary, it gains in (nostalgic) charm and effect. Nikon D3S with 1.4/85 mm Nikkor. 1/160 second, Blender 2.5, ISO 1,250.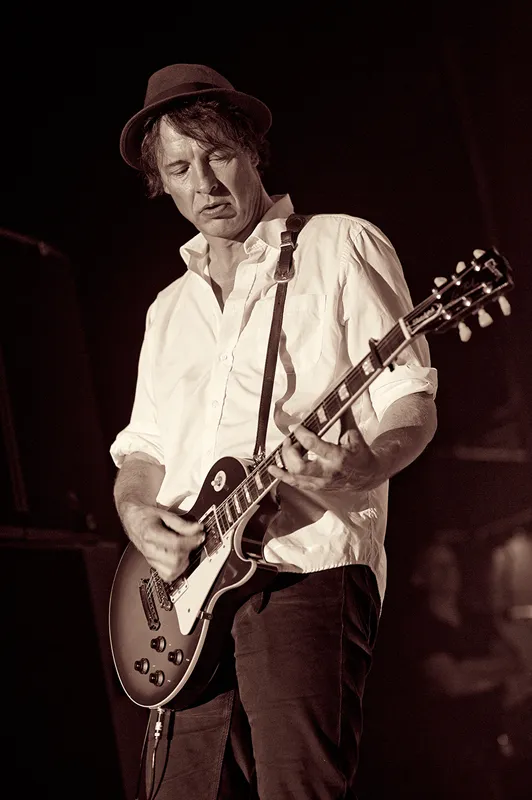
(Photo © 2011: Jens Brüggemann - www.jensbrueggemann.de)
Hint
- Some motifs literally "demand" to be photographed in black and white.
- Others, however, are equally effective in black and white and in color.
- However, there are also motifs that are better not to be photographed in black and white because they lose something.
It is up to the photographer to find out which category the subject to be photographed belongs to. If you have decided to take black and white photos, concentrate on this during the shoot and adjust your image display accordingly. This will train your eye and help you to judge which concert photos really work in black and white and which don't.
Figure 6.15: One of the few photos that look equally good in both black and white and color. Ultimately, the intended use (editorial use in a newspaper or music magazine, publication on a fan page, etc.) and your taste will determine which variant you choose. Nikon D800 with 2.8/70-200 mm Nikkor at a focal length of 125 mm. 1/640 second, Blender 5.0, ISO 800.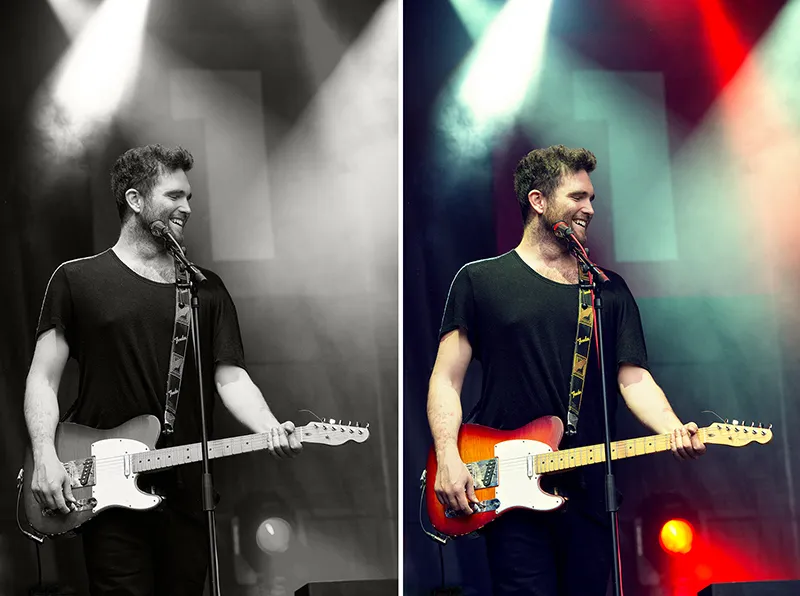
(Photo © 2013: Jens Brüggemann - www.jensbrueggemann.de)
