Three reasons why lighting technology should be used
Photography means "painting with light". If you look at the usual photography magazines, you might think that camera technology alone (plus the whole range of small photo accessories) is enough to create exceptional photos.
However, if you analyze really impressive photos, you realize that the light or the lighting mood is often a significant factor in the success of the photo. Nevertheless, many photographers have several cameras, but hardly any lighting equipment. With the exception of the system flash, which is probably in every photographer's bag.
Modern camera technology is certainly much more exciting than lighting technology. The fun and play factor of a high-tech camera is far greater. Nevertheless, there are good reasons to take a closer look at the possibilities of lighting technology.
Figure 2.1: Light without shadows is boring. Many beginners in the field of lighting make the mistake of over-lighting photos and blotting out all the shadows, which results in the photos looking bland and muddy. Soft light is counterproductive, especially when photographing structures.
(Photo ©: Jens Brüggemann - www.jensbrueggemann.de)
However, it's not about being "en vogue". There are tangible reasons why lighting technology should be used (sensibly). These reasons are:
- It is too dark (or too bright).
- The contrasts are too strong (or too weak).
- Creative-design reasons.
Figure 2.2: When I ask participants in my workshops on lighting technology why lighting technology should be used at all, they usually only give the two reasons "it's too dark" and "to create with light". The most important reason "to soften the contrasts" is usually forgotten.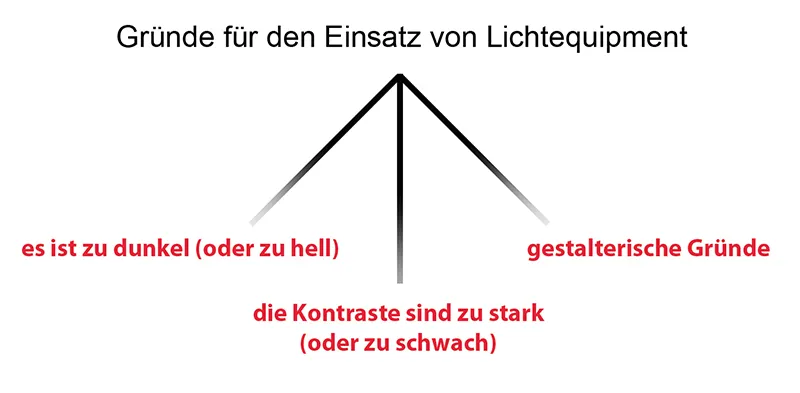
2.1 It is too dark (or too bright)
This reason is trivial, or at least immediately obvious: if I'm at a party late at night and want to take photos, I will hardly achieve any usable results without using additional light (-> system flash unit).
But the other case is also conceivable, where I have too much light and have to "take away" light with the help of a shading device.
Figure 2.3: When taking photos in the evening or at night in indoor areas that are only lit with party light, it is necessary to use light to brighten up the scene. Although there are now cameras that allow ISO settings of up to 204,800 (Nikon D4), the image quality above 3,200 ISO is usually no longer acceptable, and not just for quality fanatics. It is then better to use additional lighting than to shoot only with available light. However, this does not mean that the subject is "flashed to death" - but that both the available light (here: the shelf lighting) and the artificially added light (here: the flash) are used in the resulting mixed light situation.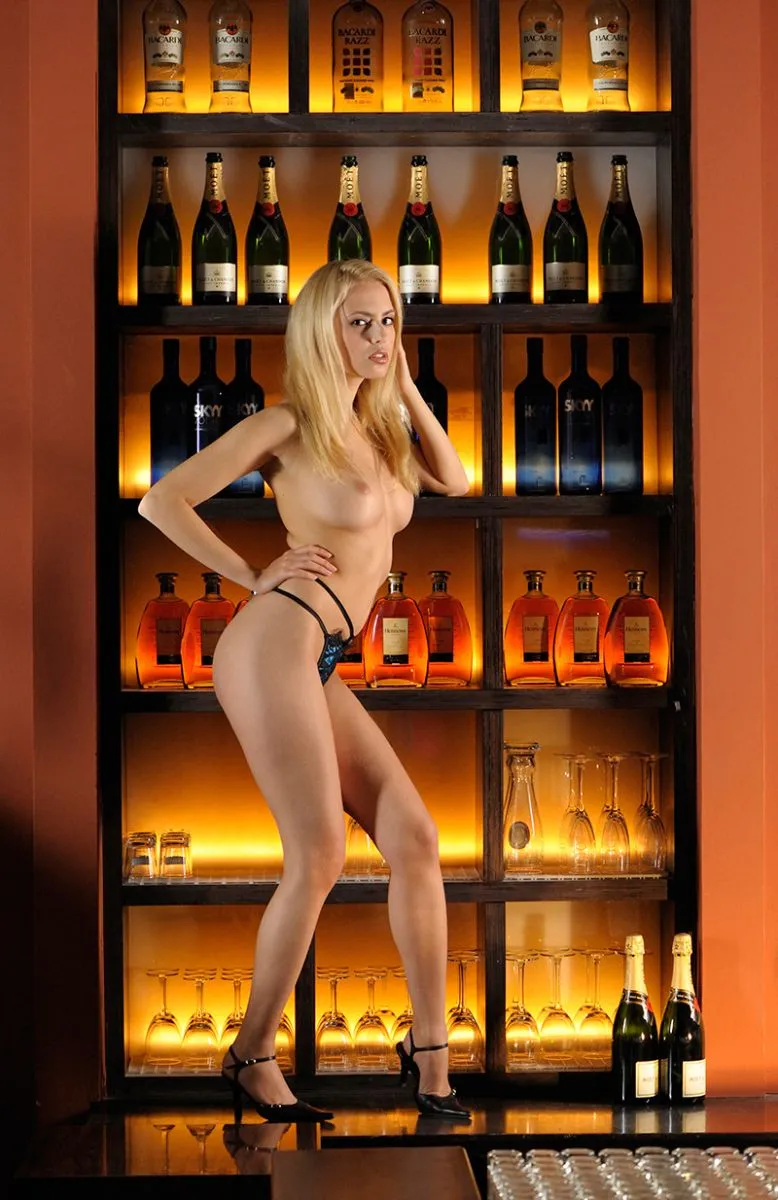
(Photo ©: Jens Brüggemann - www.jensbrueggemann.de)
Determining the optimum mixing ratio is easier than many photographers think. Here is the recommended procedure for setting the parameters for party photos (in very low light conditions; for practical reasons, the use of a system flash unit is recommended):
- ISO value: This is set as high as possible so that the camera sensor can take the existing low light into account. Depending on the camera model, this value will be between 800 ISO and 3,200 ISO. Remember that the ISO sensitivity should not be set as high as you like so that the image quality does not become too poor.
- Blender: The Blender should be opened as wide as possible so that the little available light can be used. It is advisable to use fixed focal lengths, which are significantly faster than zoom lenses. In order to make the most of the sharpness of the lens for the best possible quality, it is advisable to close it down a little, for example by one aperture. This is another reason in favor of fast fixed focal lengths, because if you close a low-light zoom lens even further, there is not much aperture left to let light onto the sensor.
Note: A zoom lens with an aperture of 4.0 is 8 times slower than a fixed focal length with an aperture of 1.4. In other words: The person using the zoom lens with the initial aperture of 4.0 needs 8x more light than the person taking photos with the lens with the initial aperture of 1.4. These differences look small when you compare the absolute figures: 1.4 to 4.0. But in terms of photographic reality, these are worlds apart!
- Shutter speed: Use a shutter speed that you can just hold in your hand without blurring (which depends not only on the number of cocktails you have already consumed, but also on the lens you are using). For example, 1/60 second or even 1/50 second. (Lenses with camera shake reduction/image stabilization are helpful in low light conditions. However, many photographers prefer to do without this function. A 1.4/50mm fixed focal length lens will not have image stabilization anyway, which is not necessary as you can usually still shoot handheld at 1/40 second with such a lens.
Note: This described setting of the three parameters time (e.g. 1/50 second), Blender (e.g. 2.0) and ISO (e.g. 1,600) ensures that as much of the existing weak (party) light as possible can be taken into account. (Often you will only find candlelight and fairy lights that illuminate the room only minimally). The basic lighting mood is at least captured quite well in this way. To brighten up the people sufficiently, you now need lighting technology. In this case, we use a system flash, which is ideal for party photos due to its compact size.
- System flash: As we have already captured the basic lighting mood well (as described), we only need the system flash to brighten up (the shadows and the partygoers). In order to avoid a light fall-off in the distance, i.e. to achieve a nice even room illumination, we use the system flash as indirectly as possible. To do this, we point the swivel reflector indirectly at the (hopefully white) ceiling. The indirect flash ensures that the entire room is illuminated and that the light does not cast any hard shadows, but is soft and even. If the ceiling is not white (or at least light gray), the swivel reflector can also be used against a white wall or against the Sunbounce "Bounce Wall" or another brightener instead. It is easiest to set the system flash unit to TTL. A flash exposure correction to minus 1, for example, may be necessary in order not to destroy the mood of the existing party lighting.
Figure 2.4: The Bounce Wall from California Sunbounce is a good tool for avoiding direct flash with its negative consequences (unattractive frontal, flat, hard light). The gold and silver zebra design surface ensures that the reflected light creates pleasant skin tones (slightly warmer than with direct flash). The fact that the light no longer falls on the model from the front but from the side makes the photos look more vivid with this aid(http://www.sunbounce.com/bounce-wall-set).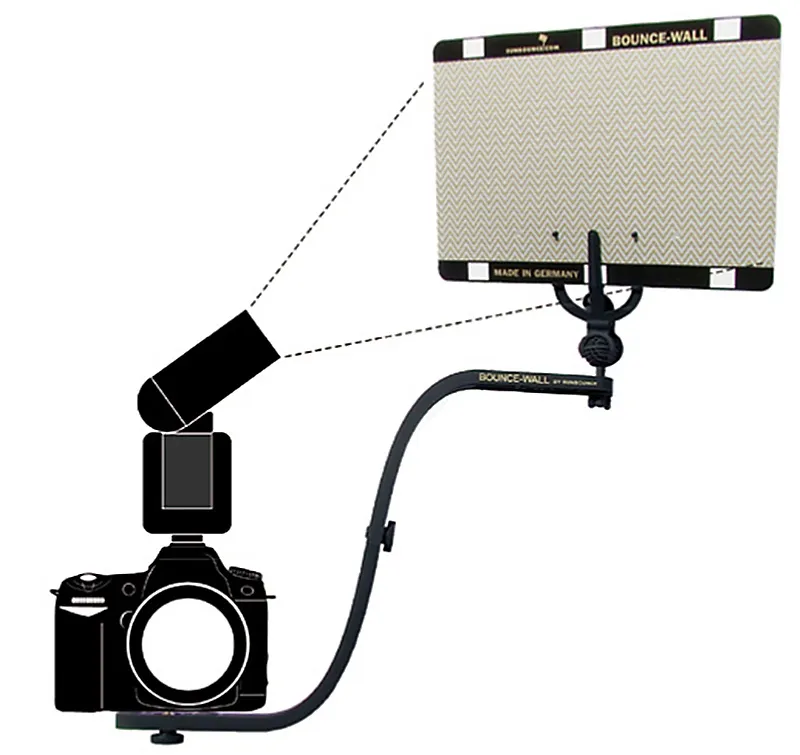
(Graphic: Manufacturer)
Note: If your system flash unit has a fixed reflector that cannot be swiveled, the only solution is to sell it! Do not use it any more! Or at most use it as a second unit. But a system flash must have a swiveling reflector in order to be used sensibly on the camera!
The larger the reflective surface, the more "pleasant" the light characteristics (at least in the case described). If the reflective surface is enlarged, the light is softer and a larger area is illuminated.
Therefore, as an alternative to the bounce wall, a normal reflector can also be used, held by a helper or from a tripod using a grip head.
At a crowded party in the middle of the hustle and bustle, this approach will lead to space problems (the Bounce Wall was designed for such cases, which is attached directly to the photographer's camera by means of a bracket), but at an upscale event in the foyer, for example, when the hosts are welcoming the guests, this approach is perfectly possible and makes sense.
Figure 2.5: As you can clearly see here, the brightener (Sunbounce Micro Mini) was used in such a way that it serves as a reflective surface like a wall. For this purpose, the reflector of the flash unit was swiveled sideways to direct the reflected light onto the person being photographed according to the principle of "light entry angle = light exit angle".
The Sunbounce Micro Mini has a reflective surface of 60 cm x 90 cm and therefore offers a significantly larger reflective surface than the smaller Bounce Wall. Where possible, the solution with the Sunbounce Micro Mini should therefore be preferred; however, if space and time are an issue, using the Bounce Wall is a good and above all practical alternative! Direct flash with a system flash, on the other hand, is strongly discouraged - at least for people photography!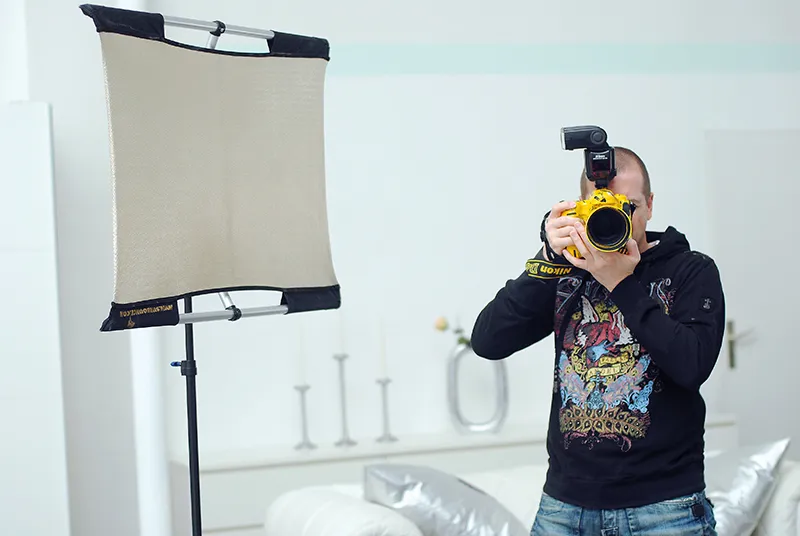
(Photo © 2013: Hodzic)
2.2 The contrasts are too strong (or too weak)
The most common reason why lighting technology is used professionally is because the contrasts in the subject are too strong and the photos would be technically flawed if taken without lighting technology.
Figure 2.6: Here it is fitting that I have not brightened up the model. It was part of my image idea that I rendered it completely dark, as in the silhouette. But when it comes to depicting the person(s) in a recognizable way, I would not have been able to take a technically flawless photo in this backlit situation without the use of aids.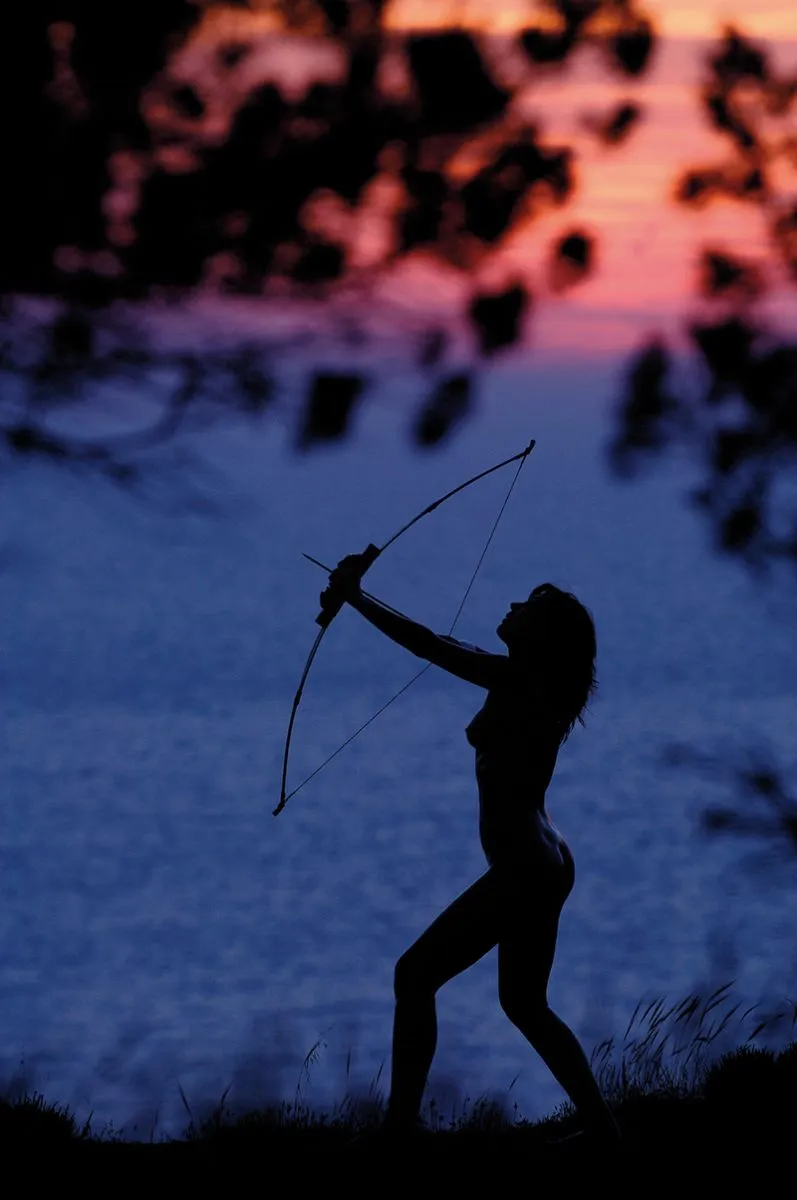
(Photo ©: Jens Brüggemann - www.jensbrueggemann.de)
The alternative to the result shown here would have been to completely overexpose the background in order to make the person sufficiently bright. But then the background would have appeared far too bright, probably even blown out, in the photo.
But how is it that contrasts in photos can be so strong that the brightest areas appear "washed out" and the darkest areas appear without any detail?
Note: The human eye is still vastly superior to modern cameras when it comes to handling contrasts. We can still see detail in dark areas that only appear black in the photo. The same applies to the brightest areas, which only appear washed out in the photo if the exposure is not right.
The contrast range that a camera can process (i.e. depict on the photo in such a way that all areas show detail) is called dynamic range. It varies from camera model to camera model (and then also from the set ISO sensitivity). A top professional camera such as the Nikon D4 can handle a contrast range of just over 13 f-stops. Amateur cameras, on the other hand, have a contrast range that is around three f-stops lower.
However, the contrasts are often higher than what the camera can process. Especially in summer, when the sun is shining brightly and the sky is cloudless, the contrasts can be enormous. If you then have to photograph a subject that is not exactly easy to photograph in terms of contrast ratios, you will despair with the possibilities of the camera technology alone.
The best example is wedding photos. If the bride and groom are dressed in high-contrast clothing (bride: shiny high white dress with embroidery pattern; groom: black velvet suit), the contrast ratios in the motif "bride and groom standing in the sun in front of the church door" are far beyond the dynamic range of any camera:
Figure 2.7: Shown here is the contrast range of the motif "Bride and groom standing in the sun in front of the church door". The contrast range will be significantly more than 13 f-stops (which is what my Nikon D4 camera can handle).
The contrast range is different (significantly lower) for the photo of one of the bridesmaids, who, dressed in a colorful dress, is also to be photographed in front of the church door:
Figure 2.8: Since the bridesmaid is wearing a colorful dress, which does without strong contrasts, the contrast range is significantly lower than in the "bride and groom" motif.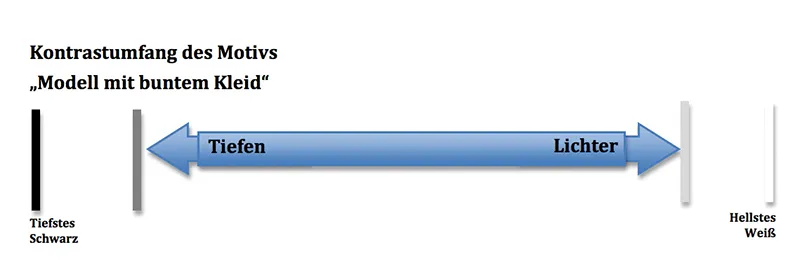
If you add the dynamic range of the camera to the figure for comparison, it becomes clear that the contrast ratios can just about be processed with this motif (unlike the bride and groom motif):
Figure 2.9: Lucky! With the "Bridesmaid with colorful dress" motif, the photographer can deliver a technically flawless photo. All the contrasts in the subject can be reproduced. :-)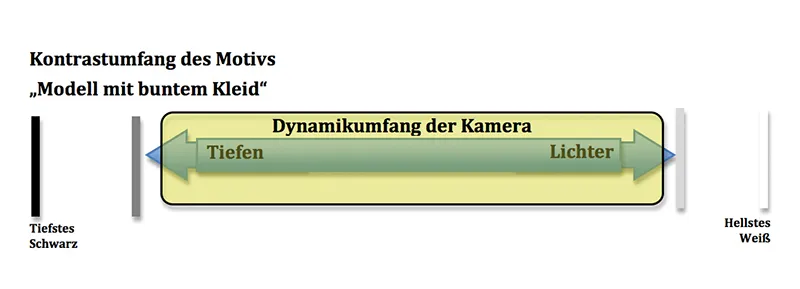
To illustrate how strong the contrast ratios are for the important "bride and groom" motif and how much of it the camera used can process, please refer to the following figure:
Figure 2.10: To the left and right of the yellow bar are the depths and highlights, which are shown in the photo without drawing (i.e. completely black and washed out white). The consequence is a technically flawed photo which, in the worst case, can be criticized by the client (with unpleasant financial consequences for the photographer). :-)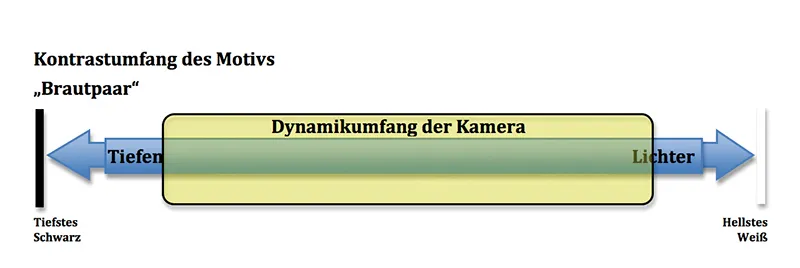
What can the photographer do if he finds himself in such a situation?
The ideal solution would be to increase the dynamic range of the camera. But this is not possible, as it is technically limited. However, there is a trick that makes it seem possible to increase it, namely by taking several shots with different exposures in quick succession, which are then merged together in Photoshop. This is known as an HDR shot (HDR = High Dynamic Range).
However, a tripod should be used if possible so that the photos fit exactly on top of each other. In addition, there should be no movement in the subject, which is somewhat unrealistic, because on the day of the wedding the bride and groom will laugh and react to shouts, confetti may fly through the air or the leaves on the tree next to the church door may move in the wind, as will the bride's veil and hair. In short: HDR is not suitable for people photos, or only to a limited extent.
Note: Some modern cameras, such as the Nikon D4, allow HDR photos to be taken during shooting (but only in JPEG file format). With a single shutter release, three shots are quickly exposed in succession and immediately processed by the camera into one image.
If the photographer does not have any lighting equipment with them, they only have the choice of either photographing the black velvet suit correctly or, alternatively, presenting the wedding dress in such a way that all the details and the lace and knitted patterns are shown to their best advantage. If you consider the purchase price and the effort involved in selecting the respective garments, it quickly becomes clear that the photographer should make every effort to focus the correct exposure on the wedding dress:
Figure 2.11: Under-exposing(for example, by setting a faster shutter speed or a smaller aperture or a lower ISO value) may render the black velvet suit even darker (and therefore with even less detail), but the wedding dress is "saved". The underexposure ensures that areas that were previously washed out are now still white, but with detail.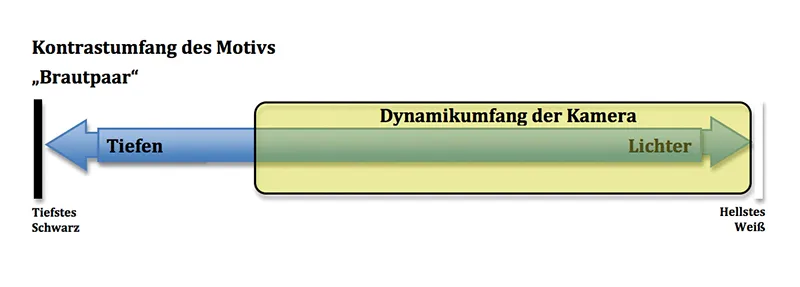
However, it is not satisfactory to only capture 50% of the motif correctly in this situation, while the other 50% is reproduced in an even worse way. Another solution is needed!
One way to lighten the dark areas in the subject (the groom in the black suit) when underexposing (we do this so that the wedding dress has sufficient detail) would be to add a fill light or a flash:
Figure 2.12: At my model photography workshops abroad (here is a snapshot from the week-long Andalusia workshop in 2012, on this day in Ronda), the participants like to work with the stable brighteners from California Sunbounce (here using the Micro Mini), as they are less susceptible to wind with their sturdy aluminum frame. The reflective surface does not twist in the wind, which enables precise alignment of the reflective surface. Here the brightener was used to reduce contrast, because otherwise either the model standing in the backlight would have been underexposed or the background overexposed.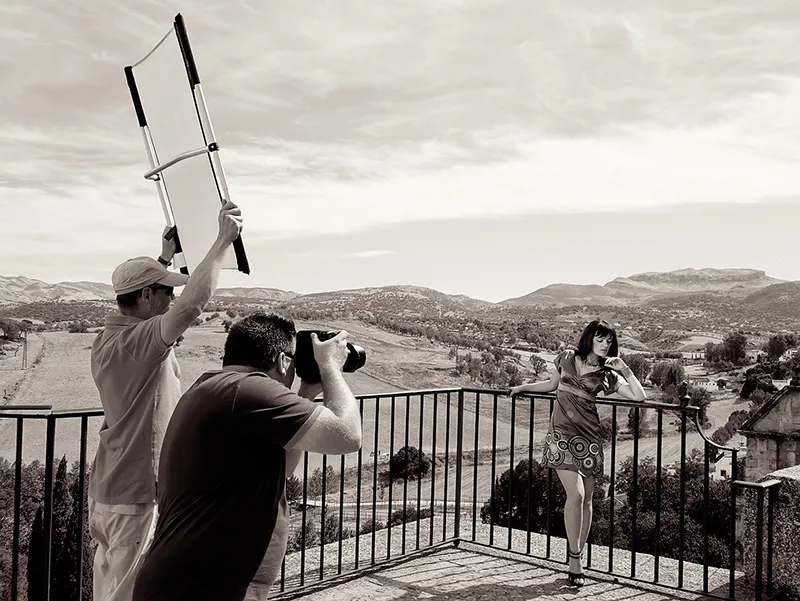
(Photo © 2012: Jens Brüggemann - www.jensbrueggemann.de)
Figure 2.13: Another way to soften the contrasts is to brighten the model with a flash. This can be a system flash, which is used for this purpose, or a battery-powered flash unit, as in this photo. The Hensel Porty Lithium 1200 with normal reflector was used.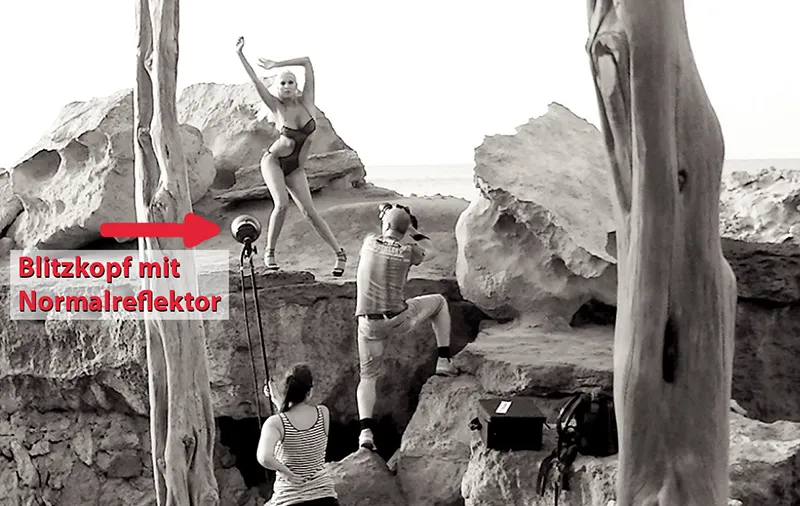
(Photo © 2011: K. Bloch)
Figure 2.14: If I had not used a flash to brighten this photo and had tried to expose the model correctly, the background, the evening sky with the setting sun, would have been hopelessly overexposed. So, with the help of the mobile flash unit, I was able to soften the contrasts and deliver an atmospheric backlit shot. Nikon D3X with 2.8/14-24mm Nikkor with 14mm focal length used. 1/200 second, Blender 20, ISO 100.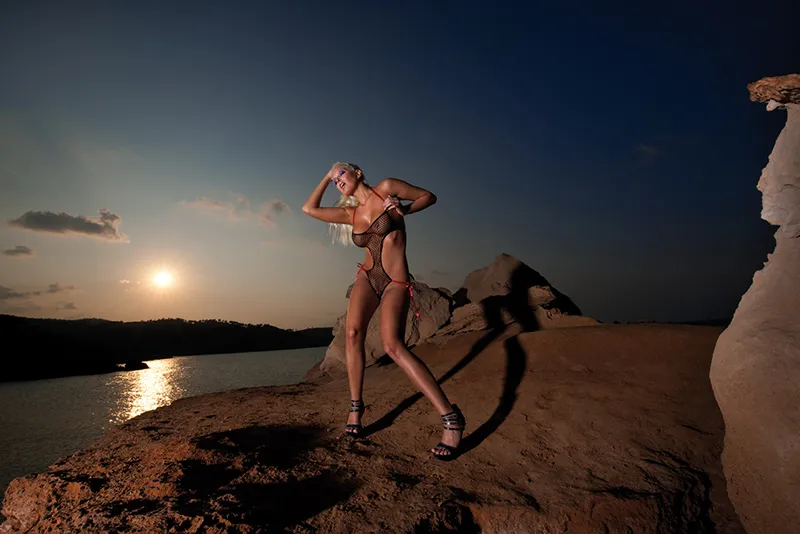
(Photo © 2011: Jens Brüggemann - www.jensbrueggemann.de)
Another way to soften the contrasts using lighting equipment is to use a shading device. This means that instead of brightening the dark areas of the subject, as was previously the case, the bright areas are "darkened". The shade, which is held between the sunlight and the model, softens the light on the one hand and reduces the light by 1-2 f-stops on the other.
Figure 2.15: Shading softens the harsh sunlight. They reduce the brightness of the sun's rays and make the light pleasantly softer. Here, at my Andalusia workshop in 2012 (the photo was taken in Málaga), the participants used the brightener to prevent the harsh sunlight from eroding the model's shoulders in the photo.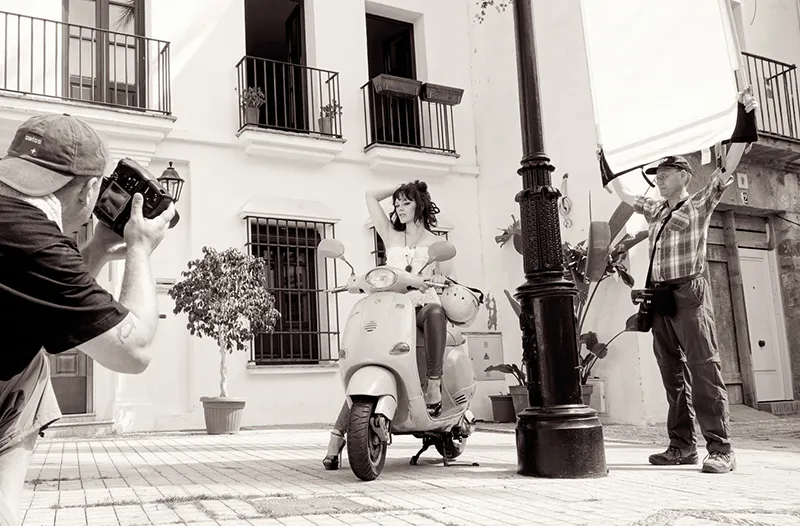
(Photo © 2012: Jens Brüggemann - www.jensbrueggemann.de)
A combination of both methods is also useful: The shadows are brightened and the highlights are shaded. In this way, even our bridal couple motif, which is difficult to photograph, can be photographed technically flawlessly and to the satisfaction of everyone involved:
Figure 2.16: Brightener (or flash) and shading ensure a reduction in contrast in the subject.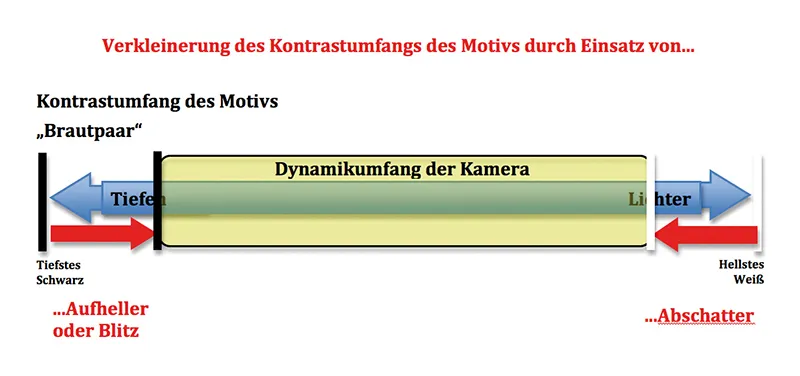
As we could not increase the dynamic range of our camera (as this is technically predetermined), we reduced the contrast range in the subject instead. With a little skill, we reduced it to roughly the range that our camera can handle:
Figure 2.17: By using suitable lighting technology, we have thus manipulated the lighting conditions of our subject to such an extent that it is possible for us to deliver a technically flawless photo. For professional photographers in particular, this is extremely important in order to avoid complaints from customers. A more balanced lighting mood will also be preferable for aesthetic reasons, which is why the use of lighting accessories not only serves to deliver technically correct results, but also to create photos that are more pleasing to the viewer.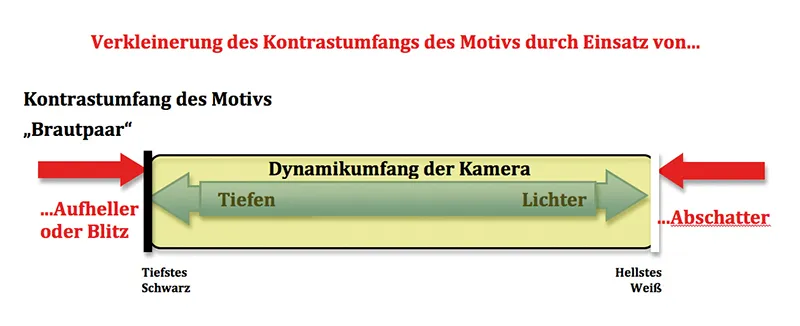
2.3 Creative design reasons
When photographers start to take an interest in lighting technology, creative and artistic reasons are usually at the forefront. "Painting with light" allows photographers to emphasize or hide details, set accents, accentuate shapes, etc. It is precisely this area of photography that awakens creativity and is particularly fun.
Figure 2.18: In classic nude photography, light is used to accentuate the shapes of the body.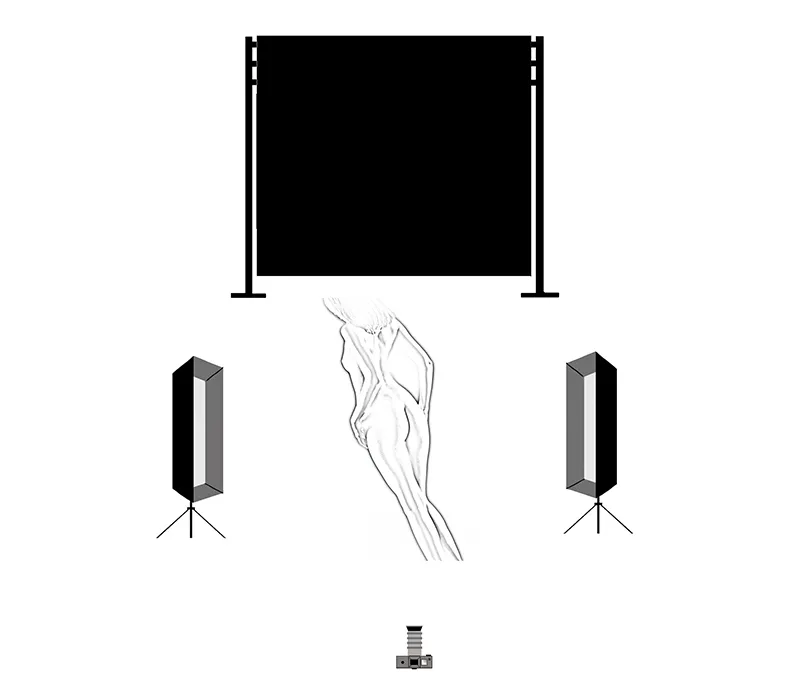
Figure 2.19: Light and shadow ensure that the model does not come across as ordinary or exposed in the photos, but rather graceful and beautiful. Once you have started to no longer rely solely on the existing lighting situation for your photo shoots, but to "spice it up" with lighting technology, you will quickly see the advantages of the targeted use of technical lighting aids.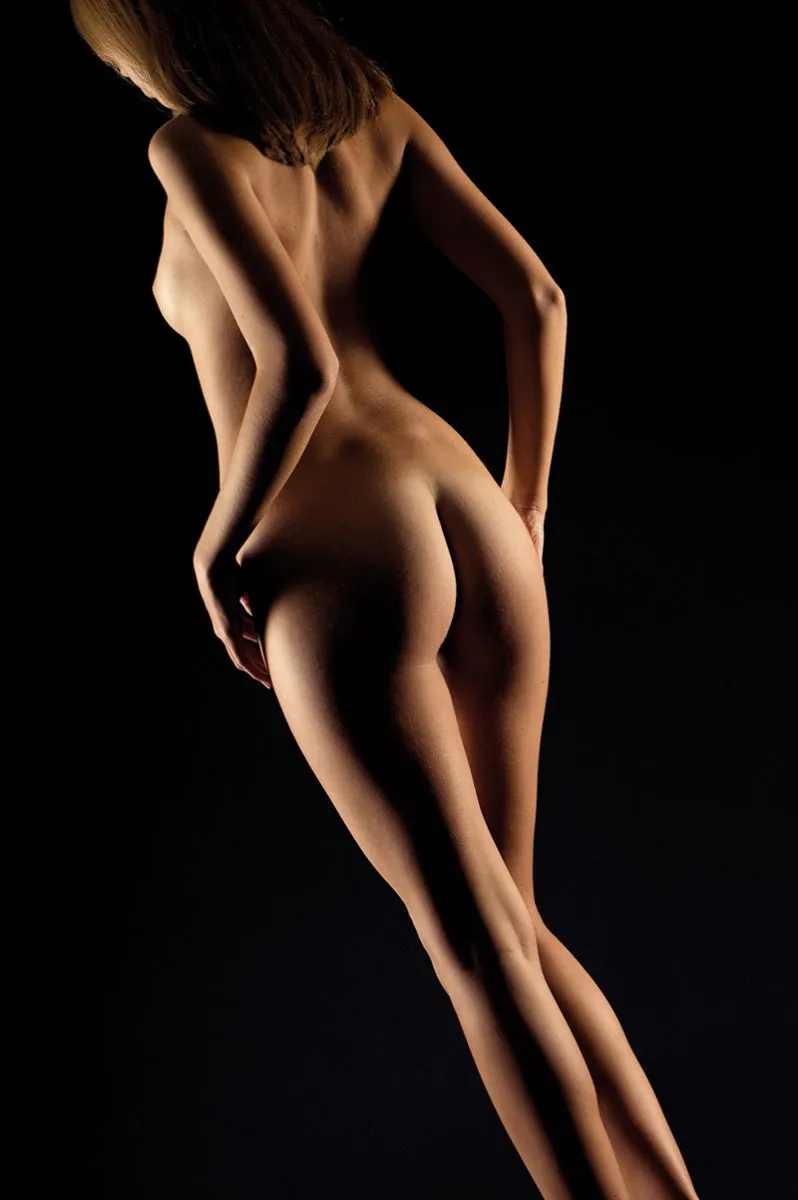
(Photo ©: Jens Brüggemann - www.jensbrueggemann.de)
Figure 2.20: In product photography, the correct use of light ensures that the objects appear particularly high-quality.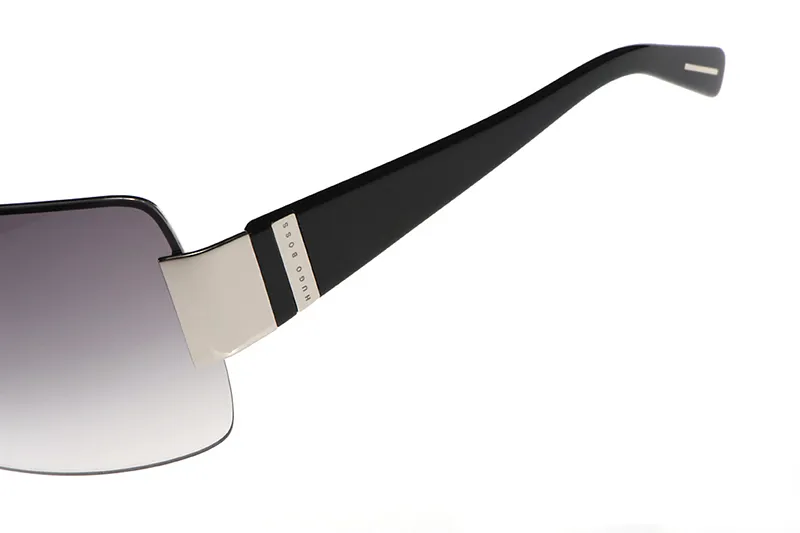
(Photo ©: Jens Brüggemann - www.jensbrueggemann.de)
Figure 2.21: To make the young man's muscles stand out, I used the main light from above. I usually use the Red Wing boom for this, the design of which allows me to vary the distance of the light from the model without changing the angle.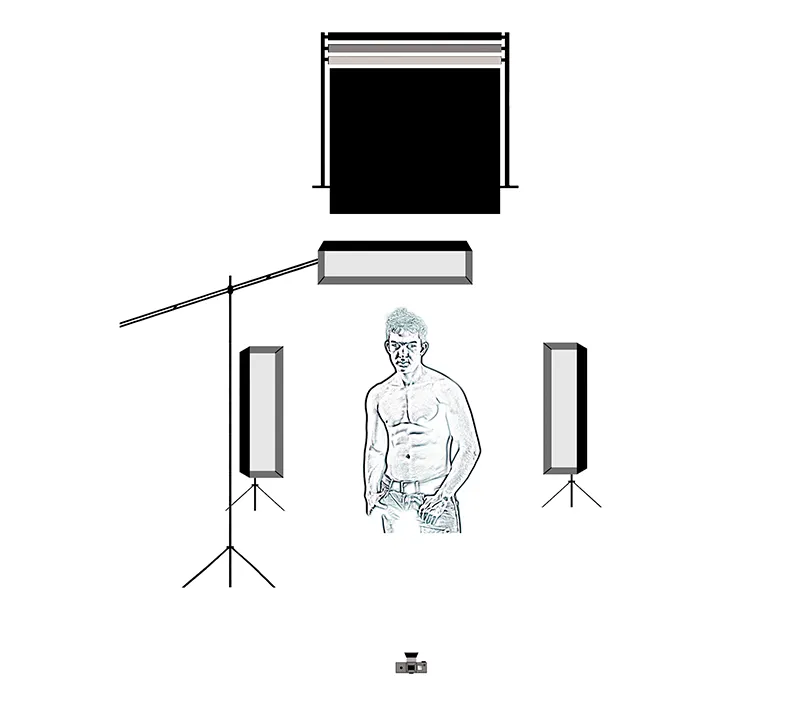
Figure 2.22: If you want to set the light in a targeted manner, you need time above all, because precise work is a prerequisite for skillful lighting. The photographer must also be able to look closely. In order to see like my camera, I usually only look at the subject with one eye, while also slightly squinting the other eye. This means I can only see in two dimensions and no longer see all the details that only our human eye can see, but which usually don't appear in the photo.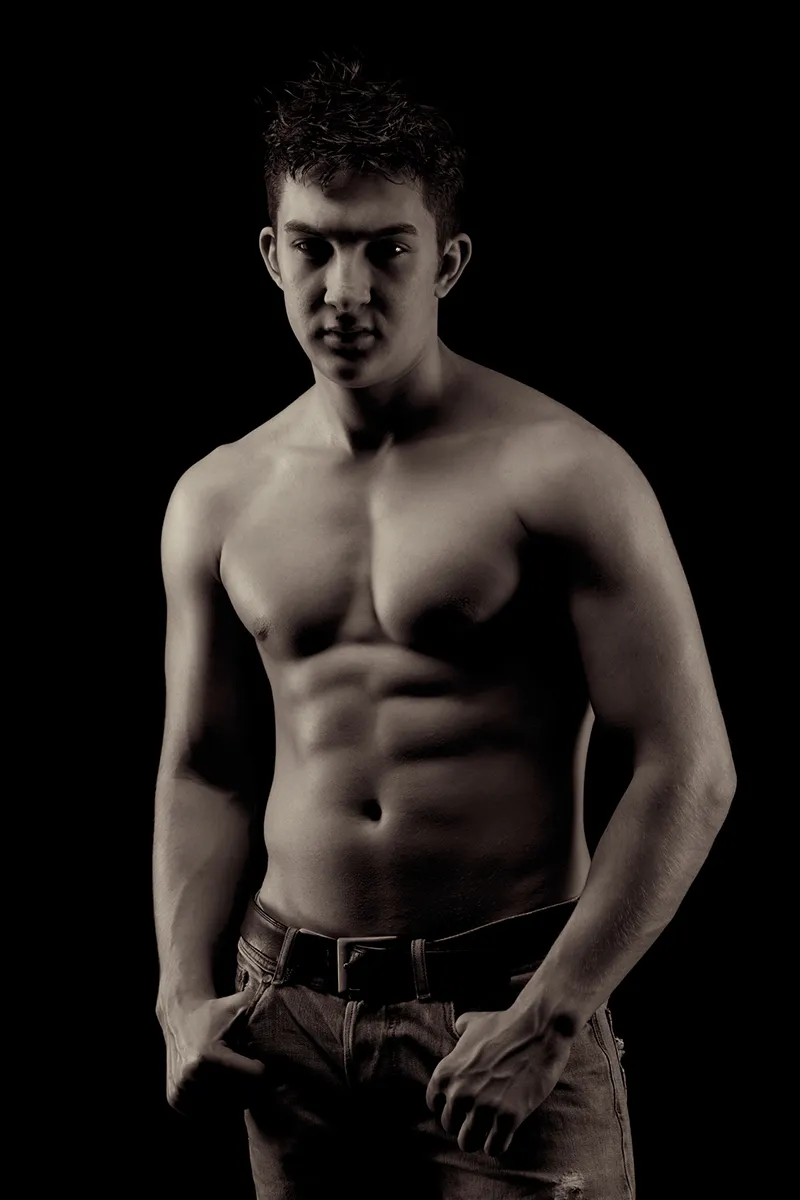
(Photo © 2013: Jens Brüggemann - www.jensbrueggemann.de)
"Where there is a lot of light, there is also a lot of shadow" is a well-known saying. If you want to work creatively with light, you also need shadows, because without shadows (with shadow-free lighting), photos look flat, muddy and boring.
Shadows give a photo depth and plasticity. In this respect, the aim of using lighting equipment cannot (as many beginners mistakenly think) be to illuminate the shadows away. Rather, the art is to work creatively with light and shadow. This is the only way to create extraordinary images.
Preview
But which light sources are actually suitable for creative photography? You will find an overview with a subsequent evaluation in the next part 3 of this tutorial.
