Browser open and Google Docs launched - the web application makes us hit the keys hard every day. We've summarized the really helpful shortcuts and really useful functions we've come across so far ... top tips and tricks from the field!
While using Google Docs, our team has accumulated a wealth of experience that we would like to share with you. 11 and more tried-and-tested tips and tricks from ours for your practice ... Let's get straight to it!
- 01 | The same styles in all documents
- 02 | Outline made easy: automatic table of contents
- 03 | Directly to the text passage: set bookmarks
- 04 | Click and there: links to headings and bookmarks
- 05 | Linking between Google Docs and Google Sheets
- 06 | Counting words and characters
- 07 | Top ten shortcuts
- 08 | Formatting tables and switching row overflow on and off
- 09 | Solved: the problem with checklists (UPDATE)
- 10 | Working on a document at the same time
- 11 | Pulling images in full quality from a Google Docs document
- 12 | Briefly noted: More tips and tricks
1 | Structure for all documents: create your own standard styles
We use Google Docs, among other things, to describe in more detail to our developers what changes should be made to TutKit.com or what new features should be developed for the platform. This can quickly add up to 10, 30, 50 or more pages and numerous documents.
Especially for such extensive projects, our recommendation is: Use the standard styles from Google Docs or create your own. Styles can currently be applied or defined for normal body text, the document title, subtitles and three heading levels.
The advantage of standard styles (as with other word processing programs): You can use them later to create an automatic table of contents in just one click. You can also easily create links to the headings of your text.
Apply standard styles: Select the text area to which you want to apply the style or place the cursor on a text passage in the section you want to format. Open the menu for standard styles and select the desired style.
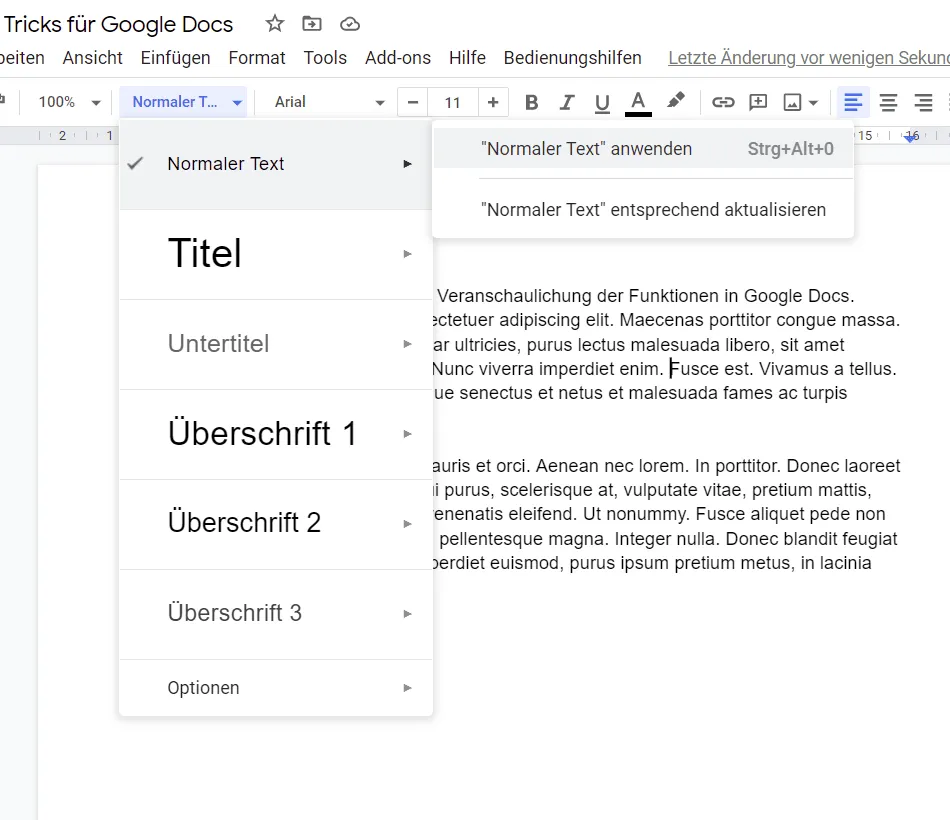
Create your own standard styles: Format a section of text in the document as you would like a particular style to appear. Open the menu for standard styles. Select the function Update style accordingly for the desired style.
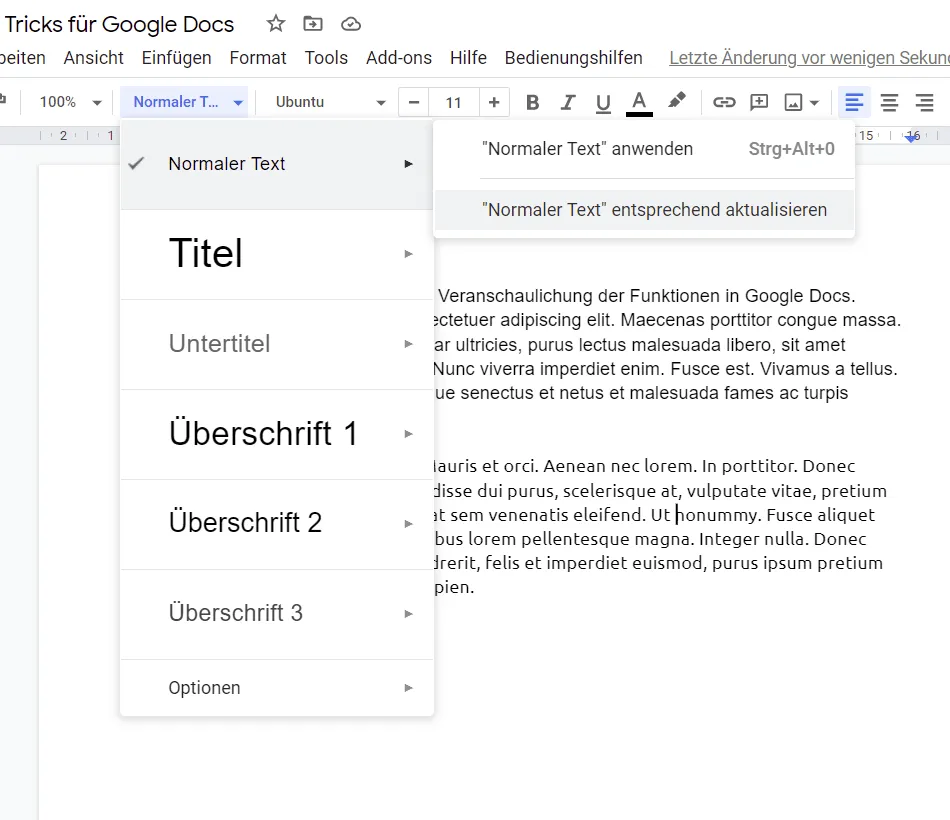
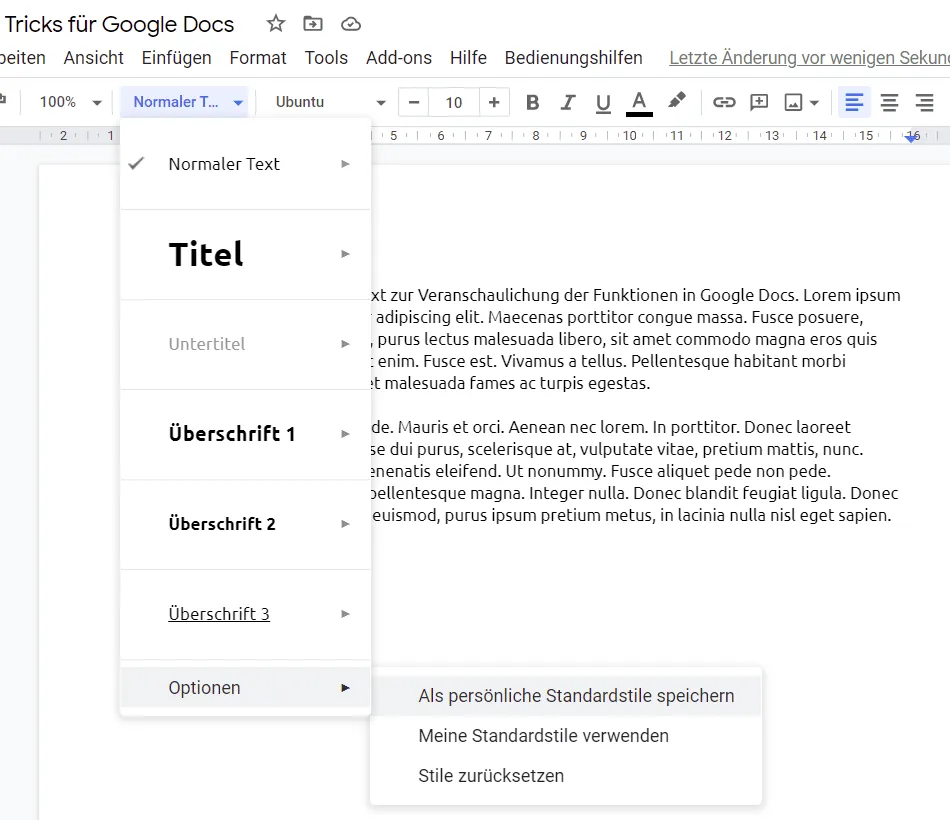
Set personal default styles for retrieval in all Google Docs documents: Use Update style accordingly to apply your desired settings to all standard styles. Open the menu for default styles and select the Save as personal default styles function under Options. From now on, you can call up your personal styles in every Google Docs document (under the style options under Use my default styles).
2 | Outline made easy: document structure, automatic table of contents
If you follow 1, 2 is child's play. By using the default styles for your headings, Google Docs knows how your document is structured. You can access the document structure at any time via the small list icon in the left margin and jump from heading to heading.
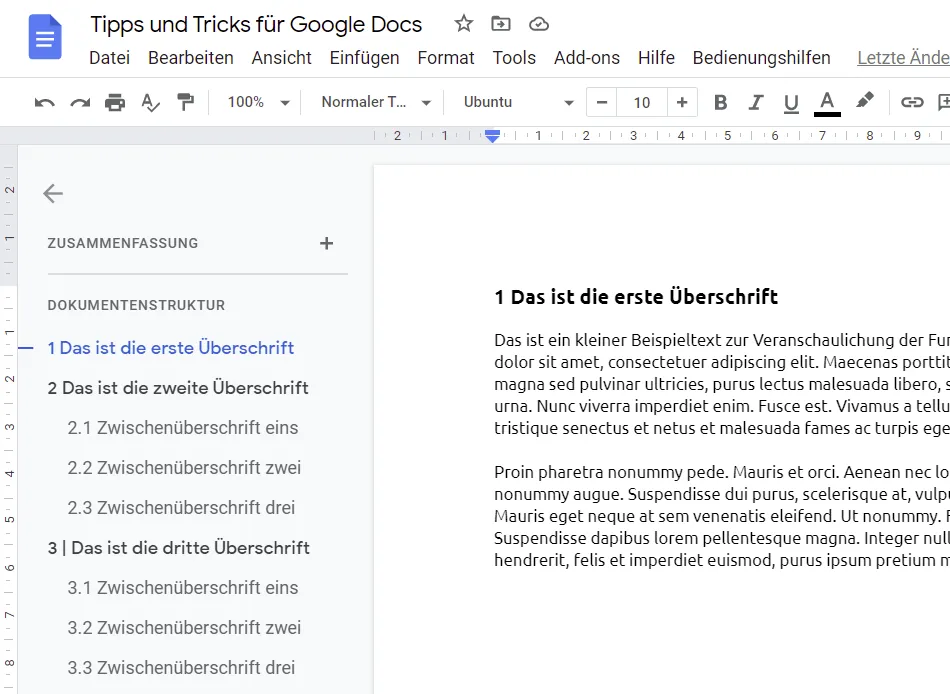
Speaking of jumping - memorize these three shortcuts:
- Open document structure: Ctrl + Alt + A + H or Ctrl + Cmd + A + H
- Jump to the next heading: Ctrl + Alt + N + H or Ctrl + Cmd + N + H
- Jump to the previous heading: Ctrl + Alt + P + H or Ctrl + Cmd + P + H
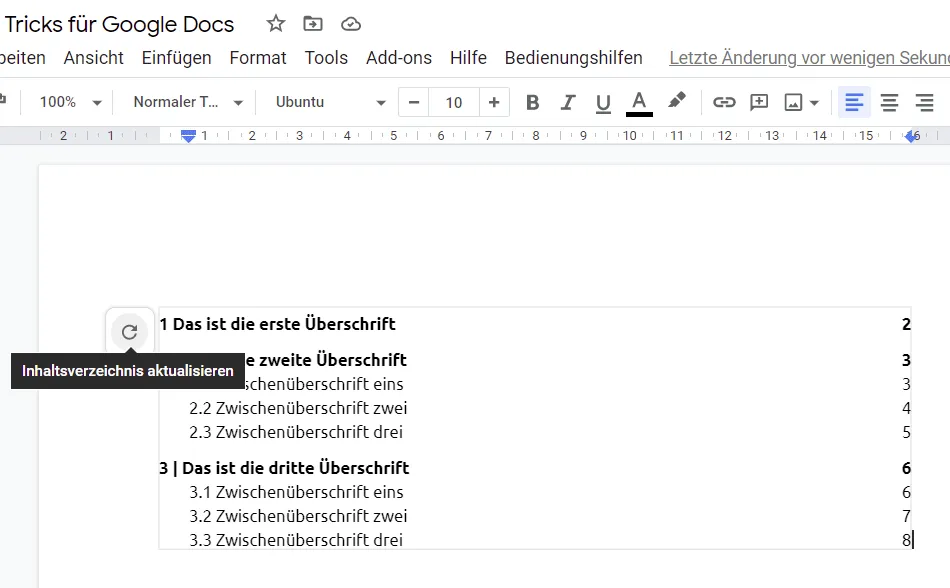
Use the Insert tab under Table of contents to automatically create the table of contents for your document with just one click. Once this is in place, you can update it at any time using the arrow icon in the top left-hand corner of the directory and jump directly to the relevant place in the document by clicking on an entry in the directory.
3 | Always quickly at hand: Set bookmarks
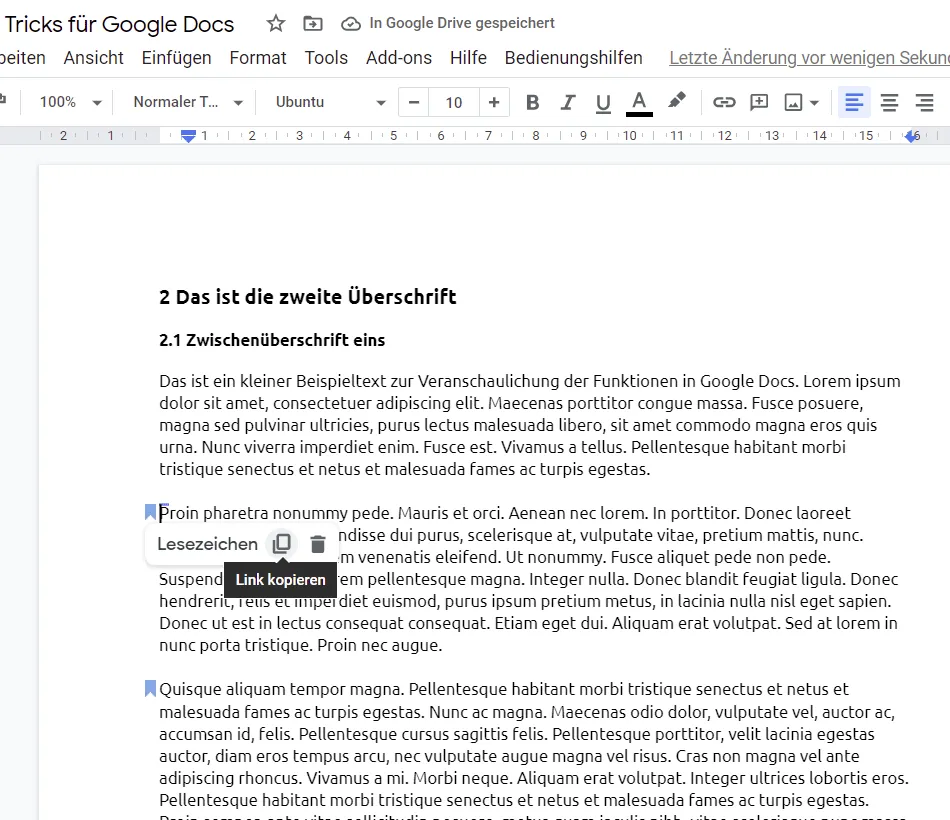
"Dear Stefan, can you fly over there quickly?" ... Team colleagues often don't need to read through the entire 100-page pamphlet. Instead, you want to refer them to a specific section at regular intervals. The bookmark function is perfect for this : simply click on Bookmark under Insert, then copy the link and send it.
This is probably one of our favorite features in Google Docs, because it is actually used in many cases: for internal document links (see point 4), for links in the ticket system of our programmers and also for links in the table of our social media editorial plan.
4 | Click and there: Insert links to headings and bookmarks
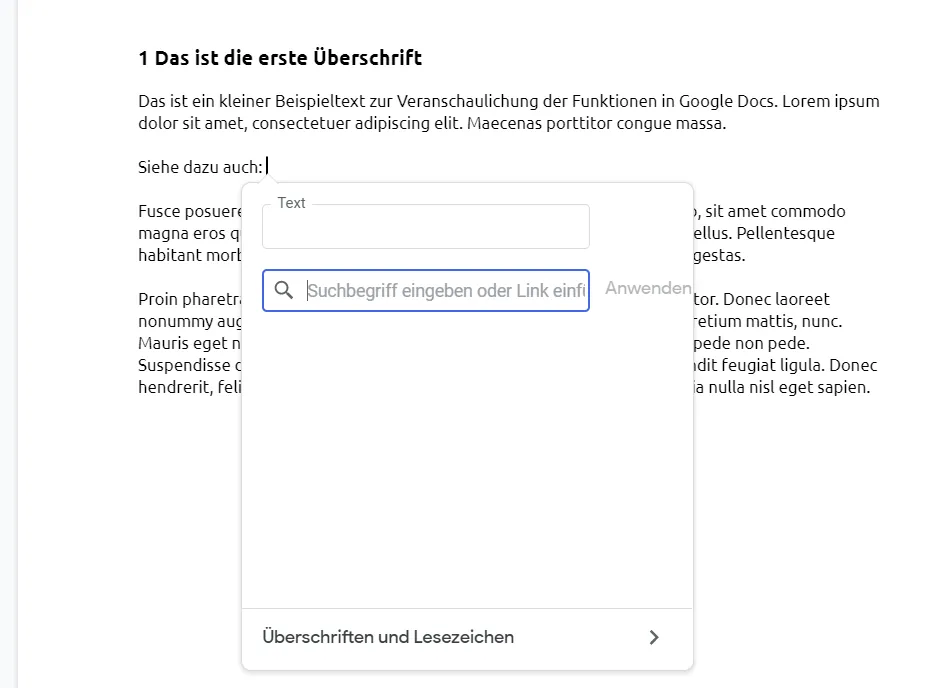
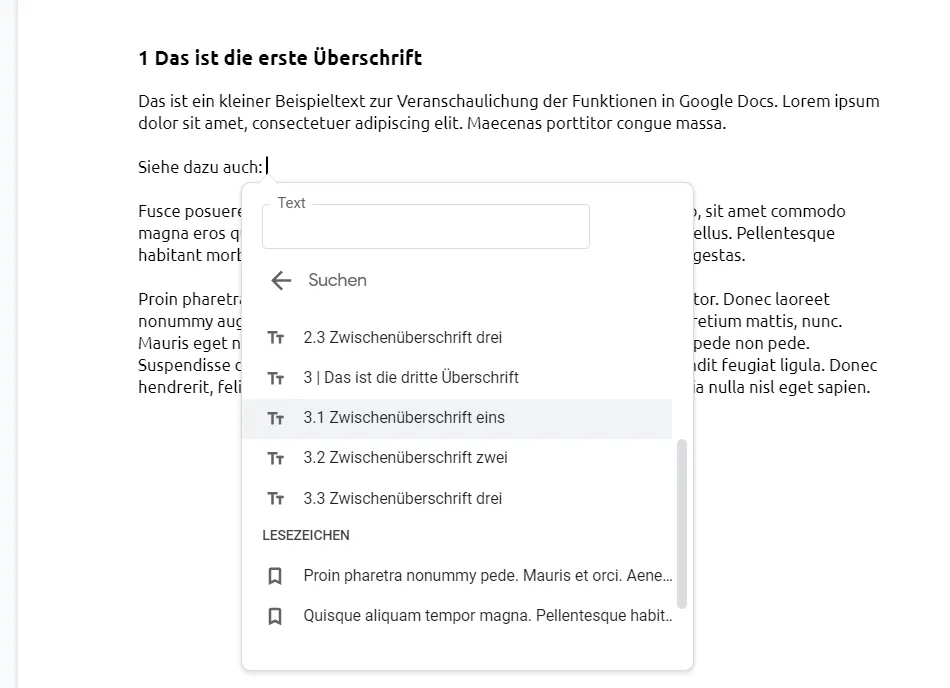
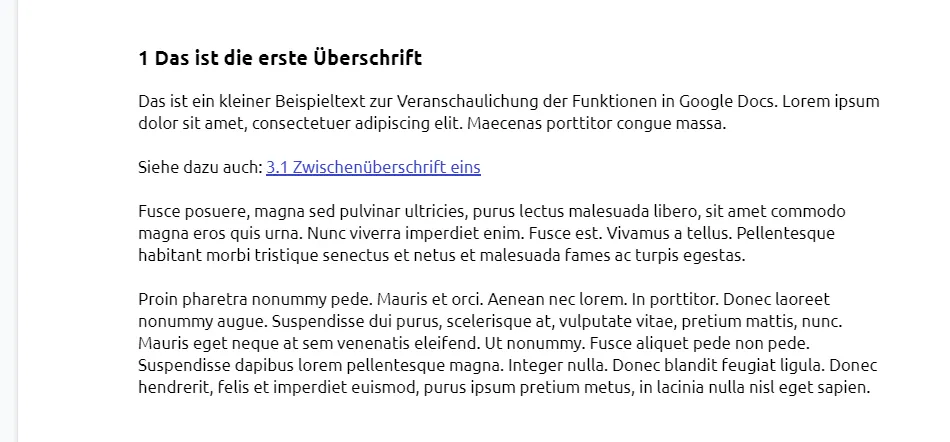
You write and write and then suddenly want to quickly refer to another part of the document? This works wonderfully user-friendly in Google Docs via the link window. This is how you open it:
- Click on the chain icon in the menu bar.
- Or right-click and select Link in the context menu.
- Even better: Press Ctrl + K or Ctrl + K on your keyboard.
At the bottom of the link windowyou will find the actual magic area of this function: headings and bookmarks. All your headings and bookmarks are available there in a nice list for direct linking. Extremely practical!
5 | Best linked: Links to specific cells in Google Sheets
With the bookmarks described above, you can create links to a specific section in a Google Docs document and place them in a Google Sheets table, for example.
But does it work the other way around? Is it possible to retrieve links to a specific cell in a Google spreads heet? We urgently needed a solution for this, and lo and behold, there is another way - but it works:
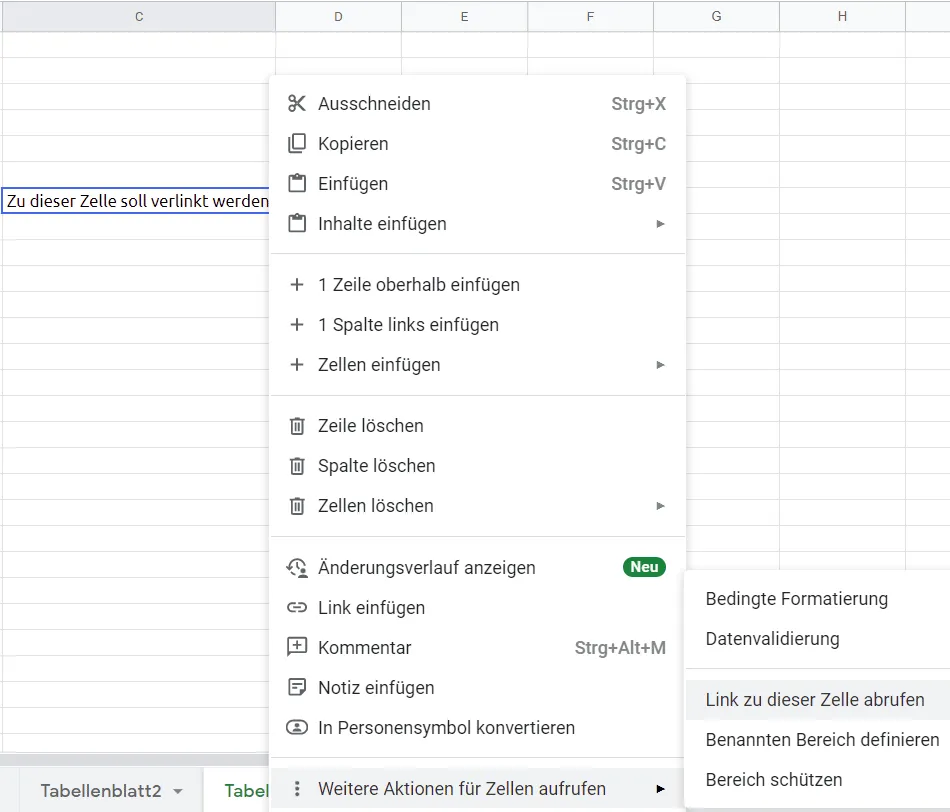
By right-clicking on the relevant cell, you can open the context menu item Call additional actions for cells. This is exactly where we find what we need: the Get link to this cell function. Once clicked, it is in the clipboard ...
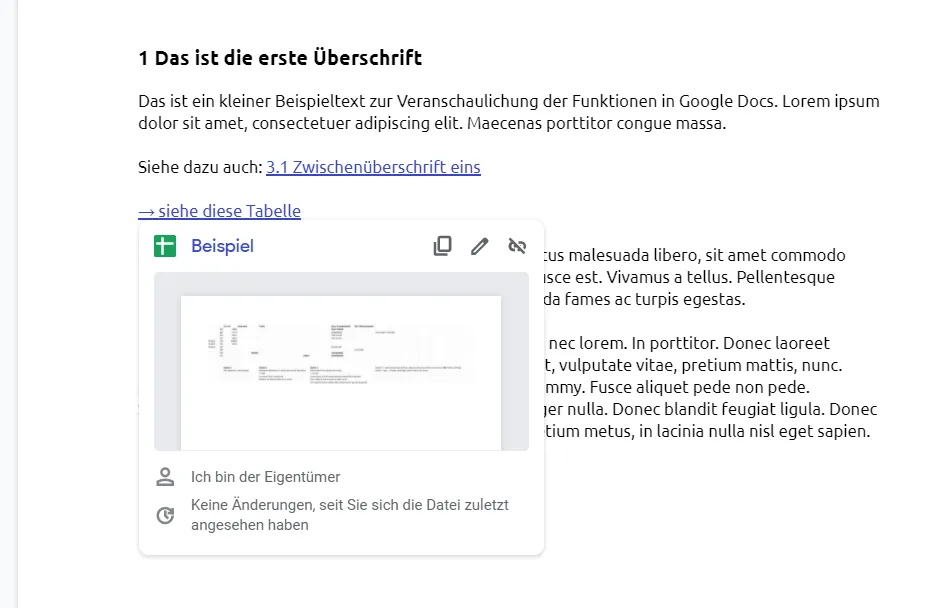
... and can then be used further and inserted into a Google Docs document, for example ... Bookmarks in Google Docs and links to specific cells in Google Sheets - we regularly use these two functions to jump back and forth between spreadsheets and documents .
6 | Keep an eye on the count: Display the number of words
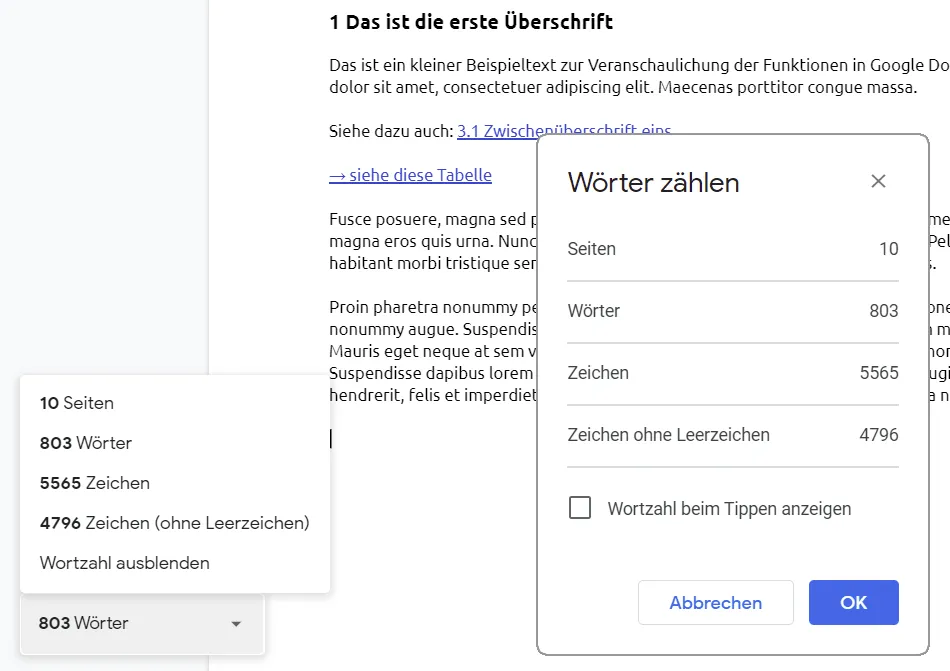
Often - really very often - the number of words or characters is important when writing texts. So how long is the document you are currently working on? You can find out in Google Docs under Tools and Word Count or via the shortcut Ctrl + Shift + C.
In the window, you can also activate the option to display the number of words as you type . A menu is then available at the bottom of your document, which you can use to display the number of pages, words, characters with and without spaces at any time. And the counting function also works if you select individual sections of text.
7 | Keep your fingers on the keyboard: Use keyboard shortcuts
Ctrl + C for copying, Ctrl + V for pasting, Ctrl + Z to undo the last action and Ctrl + A to select the entire text ... These and many other key combinations shorten the path to the desired result, and not just in Google Docs. Of course, we also use the named shortcuts there regularly - as well as these, our personal top 10 keyboard shortcuts for Google Docs:
| Place | Shortcut description | Keyboard shortcut |
| 1 | Insert text without formatting | Ctrl + Alt + V |
| 2 | Insert page break | Ctrl + Enter |
| 3 | Highlight text in bold | Ctrl + B |
| 4 | Italicize test | Ctrl + I |
| 5 | Call up window for linking | Ctrl + K |
| 6 | Search and replace | Ctrl + F |
| 7 | Jump to next/previous bookmark | Ctrl + Alt + N/P + B |
| 8 | Underline text | Ctrl + U |
| 9 | Apply standard styles (normal text and headings 1 to 6) | Ctrl + Alt + [0-6] |
| 10 | Count words | Ctrl + Shift + C |
By the way: The combination Ctrl + Alt + N probably stands for "next", i.e. calling up the next element, the combination Ctrl + Alt + P probably stands for "previous", i.e. calling up the previous element. Once you have memorized this and add one more of the following letters to the combinations, you can easily jump through the document - a few little mnemonics:
| Description | Keyboard shortcut |
| To the next/previous heading (H for "headline") | Ctrl + Alt + N/P + H |
| To the next/previous bookmark (B for "bookmark") | Ctrl + Alt + N/P + B |
| To the next/previous comment (C for "comment") | Ctrl + Alt + N/P + C |
| To the next/previous link (L for "link") | Ctrl + Alt + N/P + L |
| To the next/previous image element (G for "graphic"?!) | Ctrl + Alt + N/P + G |
| To the next/previous list (O perhaps for "ordered list"?!) | Ctrl + Alt + N/P + O |
8 | Cells, rows, columns and the row overflow: Formatting tables
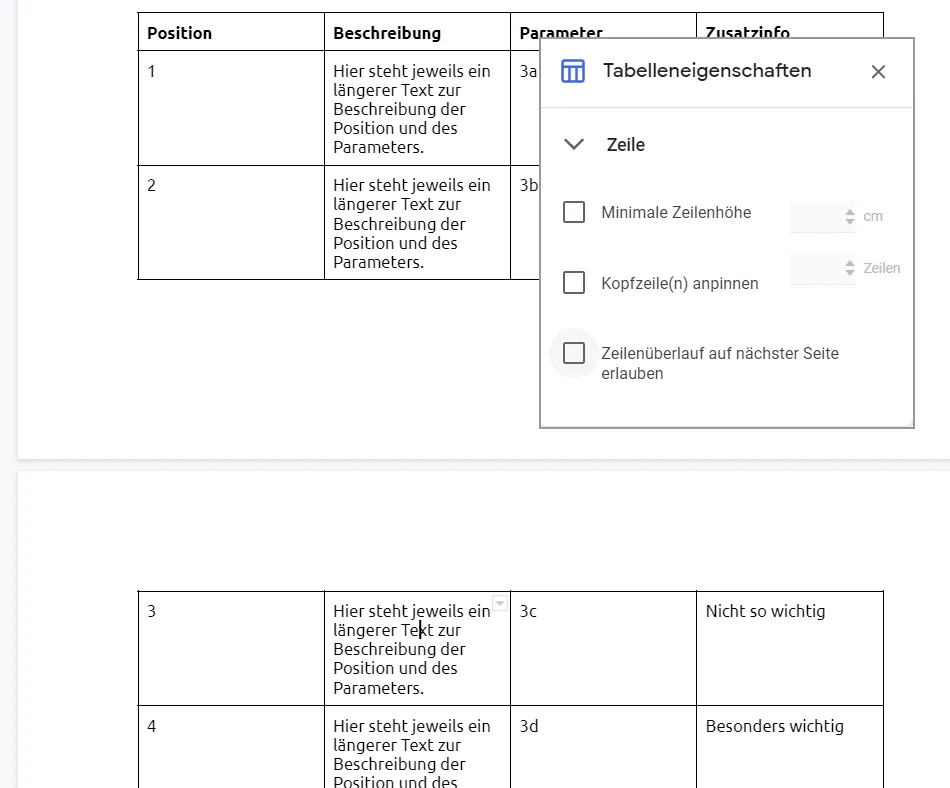
Do you know this? The table starts on one page, extends to the next - and a row is somehow stuck between the pages. You might think that's okay. But you don't have to like it.
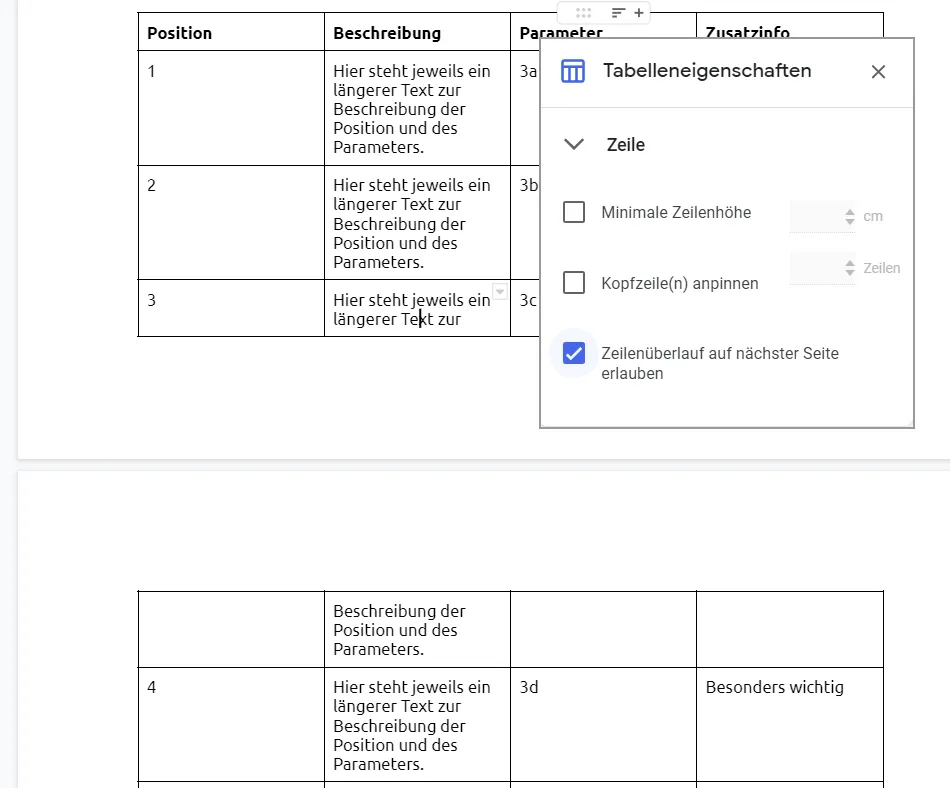
If you insist that this cross-page row starts nicely at the top of the next page, then: Right-click on the table to open the context menu and open the table properties. In the corresponding menu, open the Cell section and deactivate the Allow row overflow on next page checkbox. Zack - the row jumps to the next page.
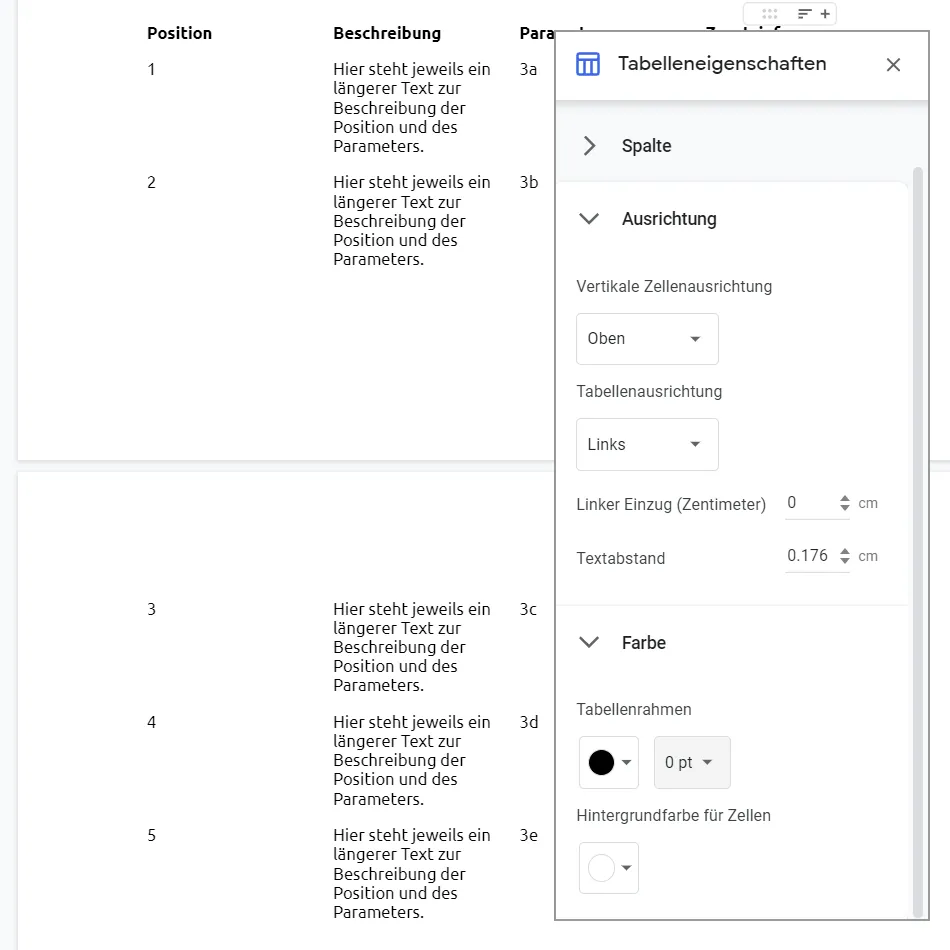
You will also find further setting and formatting options in the table properties. The most important ones can be found under Alignment, where you can set the vertical cell alignment, among other things, and under Color, where you can adjust the border of your table. If you want to switch this off, select 0 pt for the line width.
9 | Can be ticked off: the checklist problem (UPDATE)
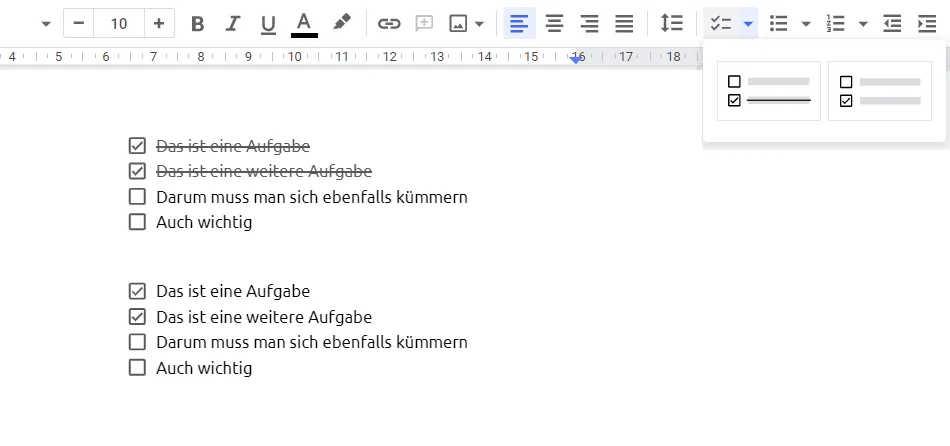
Wow. Google Docs has now recognized and solved the checklist problem. Previously, it was possible to add checklists to the document with just one click, but when you checked a checkbox, the text behind it was grayed out and crossed out. To get around this, you previously had to create a table in which checkboxes and texts were placed in two separate columns.
As I said, the checklist problem is no longer a problem: Under the icon for checklists, you can now choose which type of checklist you want to use: With one type, everything remains as it was (the text is grayed out and crossed out when checked). With the other type, the box is simply ticked. A small and simple, but wonderfully practical addition.
10 | Working on a document at the same time: How well does it work?
As mentioned at the beginning, we primarily use Google Docs when documents need to be edited with or reviewed by other people. This already answers the question in the heading of this section: Google Docs actually seems predestined for collaborative work on a document.
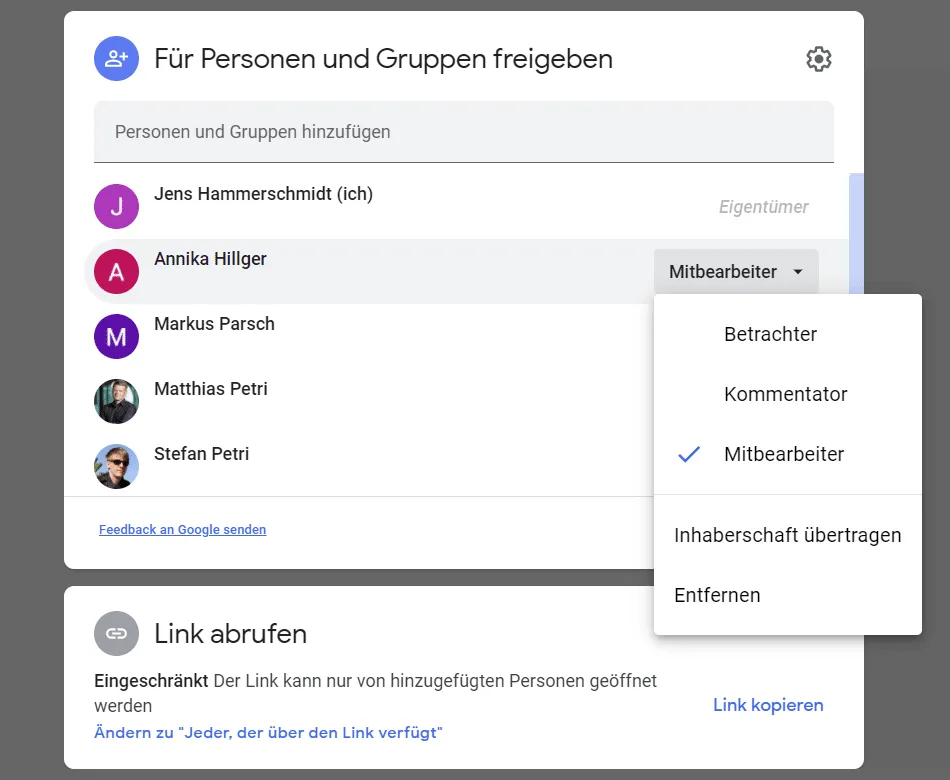
Simply invite the other editors (via File > Share or the big blue button at the top right) and grant them the desired rights. Viewers can only read the document. Commentators can add comments. And collaborators have full read and write permissions.
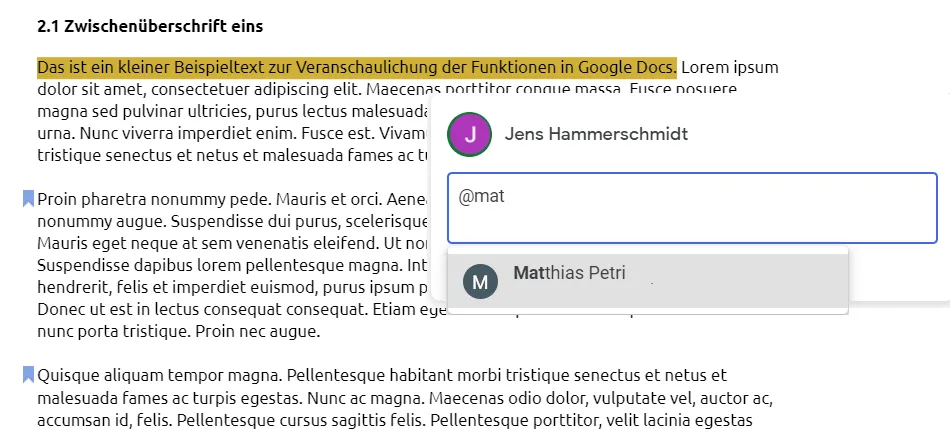
To comment , select the relevant area and add the comment via Insert > Comment. If you use the @ sign, you can even address individual people directly. This also works in the document itself.
Of course, co-workers can edit the document as they wish. The problem with this is that you can still track who has changed what via the version history (accessible under File or via the shortcut Ctrl + Alt + Shift + H). However, collaboration is often more effective when using the suggest mode.
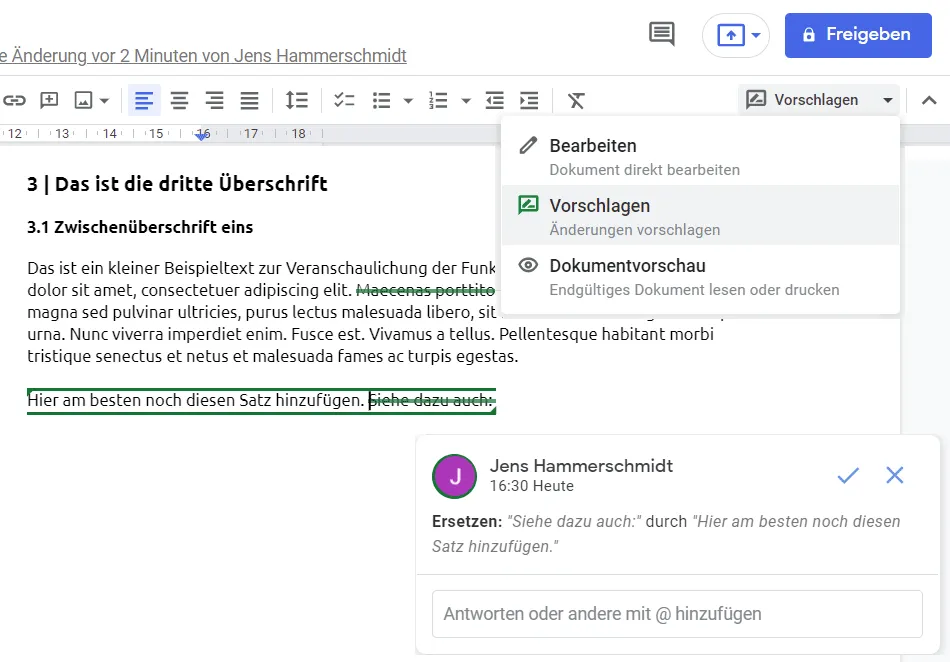
All contributors can activate this via the edit icon. If they now make changes to the document, these are initially saved as a suggestion. New sections of text are highlighted in color, deleted sections are crossed out.
Once the collaborators' suggestions are in the document, they can be accepted, rejected or commented on using the automatically added comment fields. As I said, the suggest functioncan be extremely helpful when collaborating on a document!
11 | Download embedded images in the best quality
Do you have someone else's Google Docs document spread out in front of you, including numerous images? And now you want to copy them out in the same quality as they were inserted into the document? Unfortunately, you won't get very far with the usual copy and paste, because you will only get the quality in which it is displayed in Google Docs.
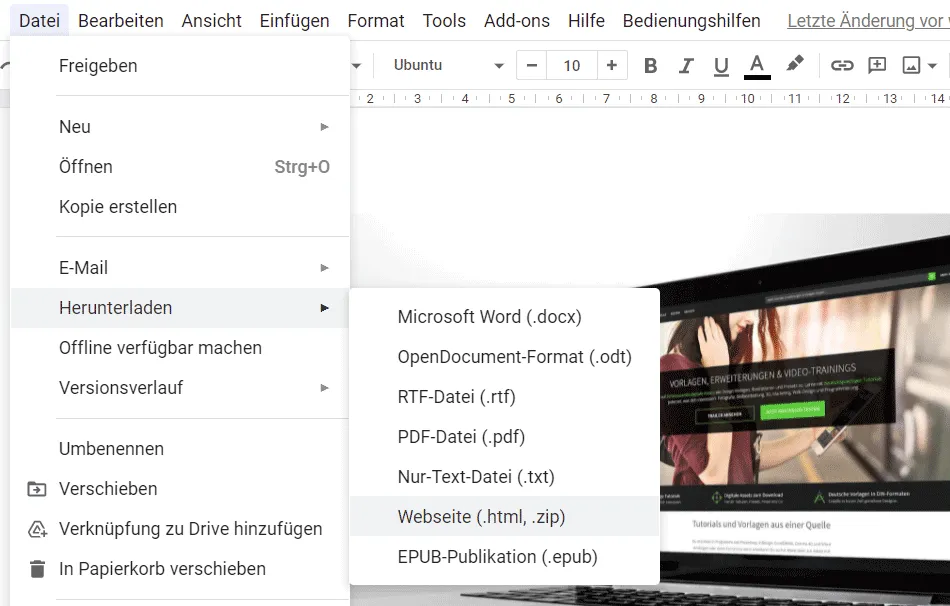
This is how it works: Under File and Download, click on Website (.html, .zip). The application will then compress the entire document for you. The ZIP file that you download will then also contain all the images in the best possible quality .
12 | Briefly noted: More tips for Google Docs
Should that be it? No! Here are a few more tips and tricks for Google Docs that we have only tried out briefly so far:
Change background color & set up page in landscape format
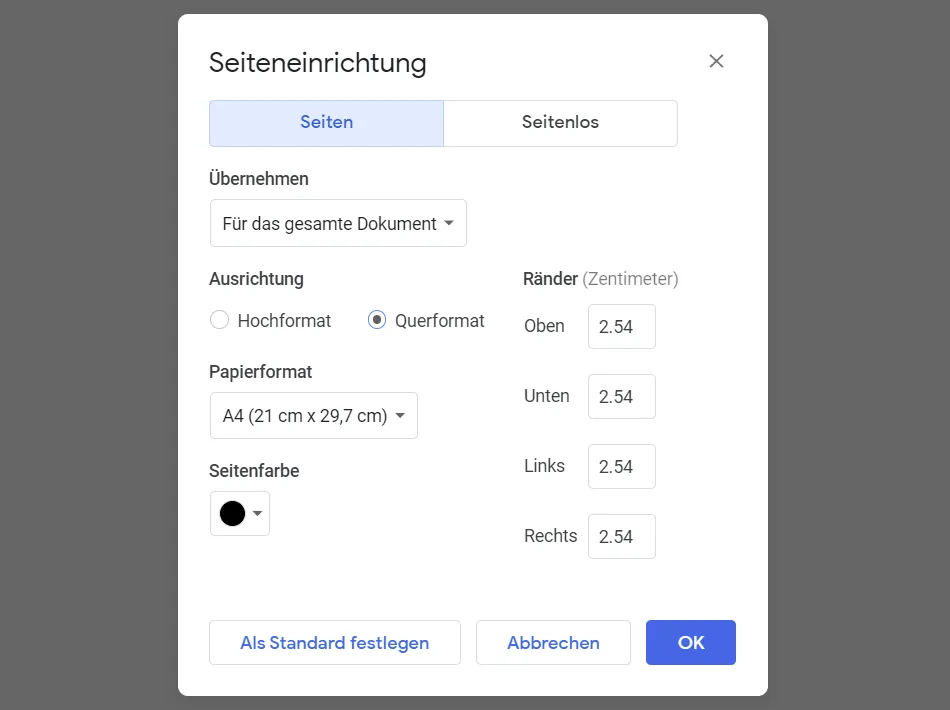
Not in the mood for black on white? Or do you need landscape format? You can define the background color of your document as well as the paper format and page orientation under File in the page setup.
Inserting footnotes
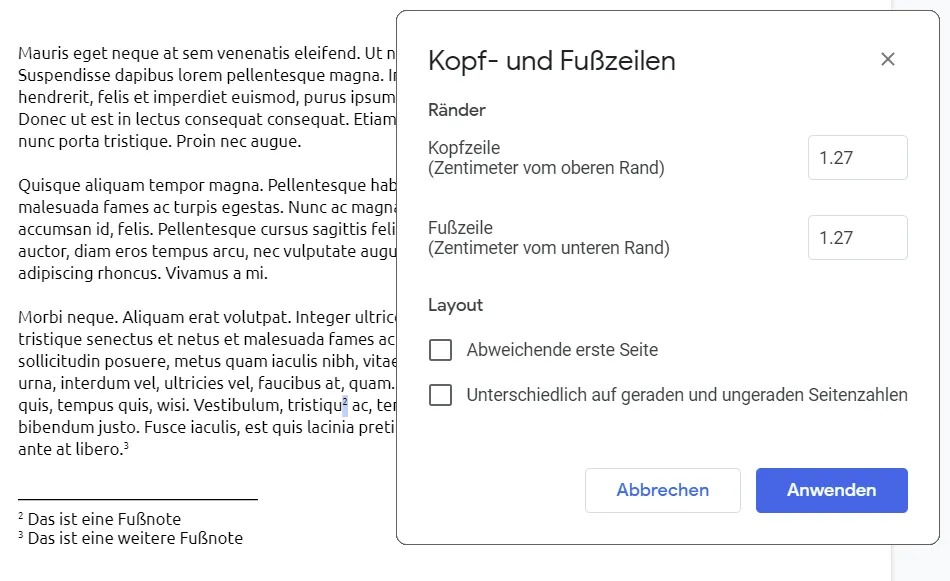
You can define the size of headers and footers under the corresponding item under Format. There you can also set that the first page should be different from the rest of the document and that headers and footers should be displayed differently on even and odd pages. The easiest way to insert footnotes is to use the keyboard shortcut Ctrl + Alt + F.
The Explore function for quick research
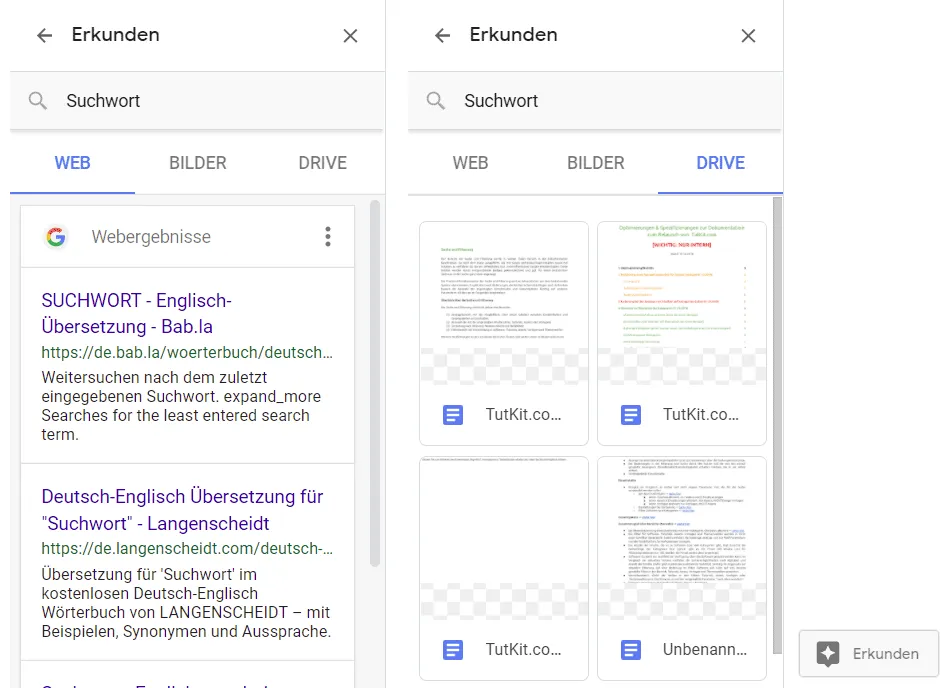
Explore is basically an internal Google Docs web search. You can find the function under Tools. Alternatively, you can call it up via the icon with the speech bubble and the star at the bottom right or with the shortcut Ctrl + Alt + Shift + I. Enter your search term in the search field of the Explore window - suitable results will be displayed in the Web, Images and Drive categories.
Spelling and grammar
If you want to use the internal Google Docs spelling and grammar check function, you can find it under Tools. Once activated, you can use it to jump from one (supposed) error to the next and accept or ignore the suggested change.

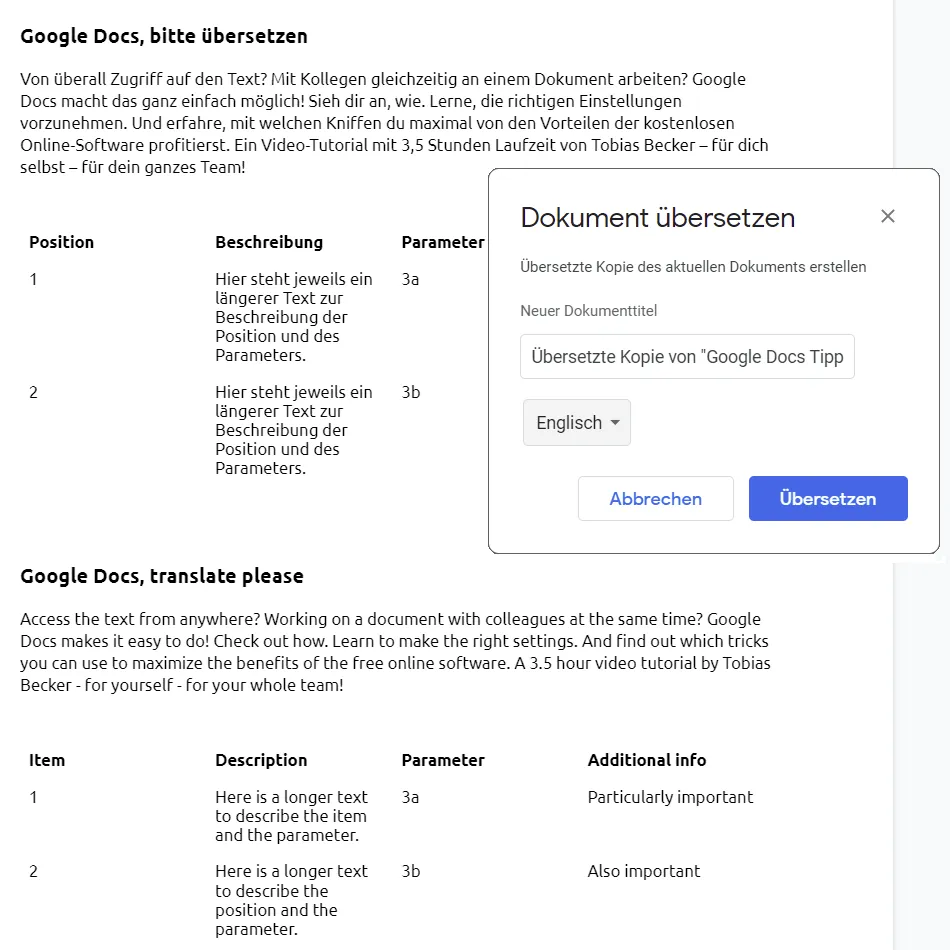
Have Google Docs translate your document
The Google Docs translation function is also located under tools. If you use it, you have to enter the target language and the name of the new document in the corresponding window. The application will then translate your entire text. It seems to deliver at least acceptable results, which should certainly be edited manually afterwards.
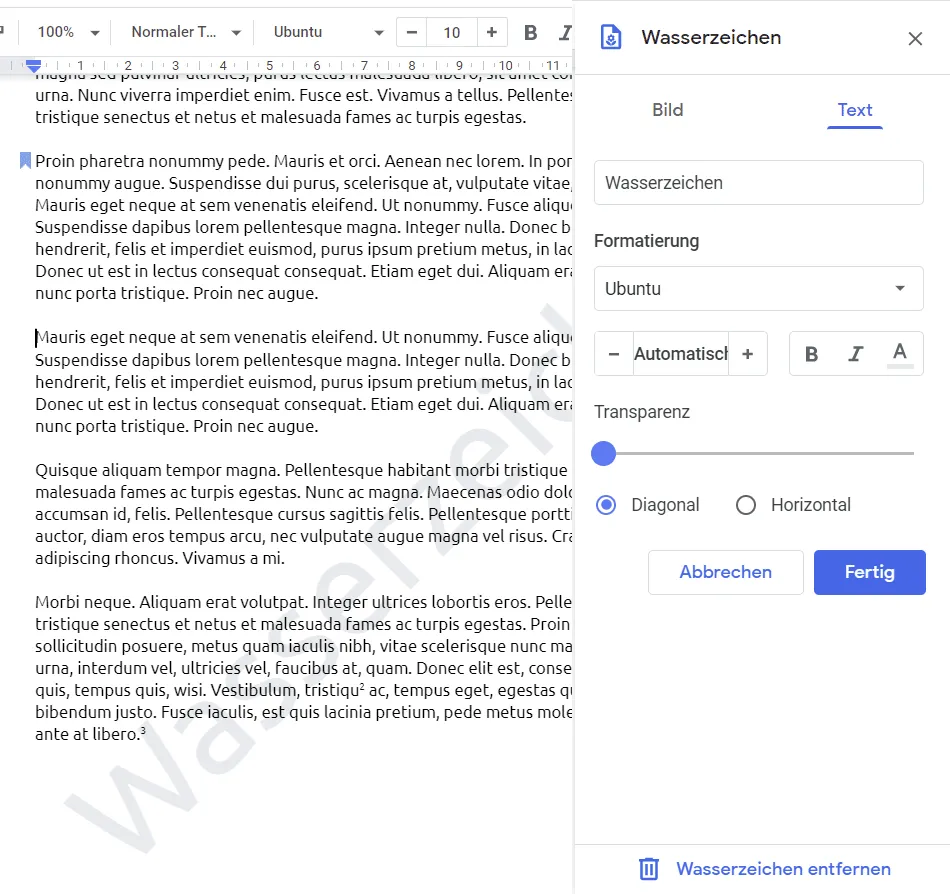
Insert watermark
The function for watermarks is still relatively new and can be found in the Insert tab. Here you can choose whether you want to create a watermark based on text or an image. In the case of text, you can of course specify the text content itself as well as its font, formatting, transparency and alignment. The result looks like this:
Save as DOCX for Word
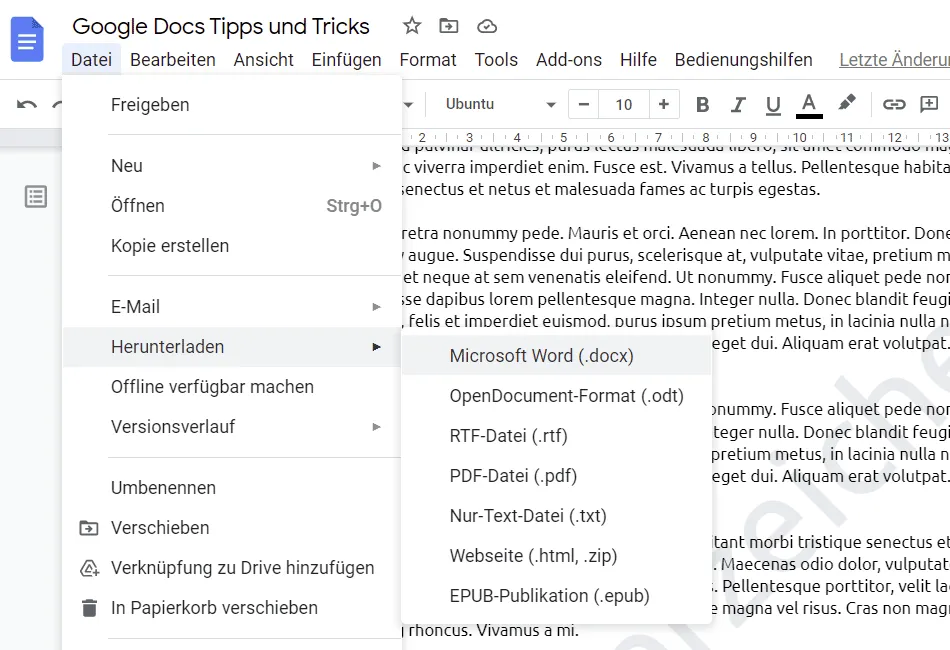
If you would prefer to continue working on your document in Word or save it locally on your computer, you can save it as DOCX under File and Download. Your standard styles, such as the formatting of the headings, will be adopted.
In general, it is worth taking a look at the download area. You can currently download documents in DOCX, ODT, RTF, PDF, TEXT, HTML and EPUB formats.
Watch our video training on Google Docs
Want to learn even more about Google Docs? Then take a look at our video training on the application. In it, Tobias Becker shows you how to format your documents, work with tables, images and graphics, insert drawings and use text fields, for example.
We hope you've picked up a few valuable tips and hope you have fun and enjoy working with Google Docs or perhaps trying it out for the first time.
