In our help article, we focus on an essential component of professional documentation: the table of contents. A well-structured table of contents in Word is not only the flagship of any document, it also makes navigation easier and significantly improves readability. Whether it's academic papers, business reports or personal projects, the ability to create a table of contents effectively is an essential skill.
In this post, we'll introduce two main methods for creating tables of contents in Microsoft Word: manual and automatic. Each method has its own advantages and usage scenarios, depending on the specific requirements of your document and your personal preferences.
Manual TOCs give you complete control over the design and content of your table of contents. This approach is ideal if your document has a unique structure or you need special formatting that goes beyond Word's standard options.
Automatic tables of contents , on the other hand, use Word's built-in features to recognize headings and subheadings and generate a table of contents based on them. This method saves time and is particularly useful when working on large documents, as changes to the document structure are automatically updated in the table of contents.
To explain both methods in detail, we not only offer a written guide, but also a clear video tutorial. Our aim is to provide you with the necessary tools to create a table of contents according to your wishes, regardless of your previous knowledge. Whether you're a beginner or an experienced Word user, our help article will help you take your documents to the next level.
Create a manual table of contents in Word
A manual table of contents in a document is a self-created overview of the structure and content of the document. Unlike an automatic table of contents, which is generated by Word by recognizing and summarizing headings and subtitles, the manual table of contents is created entirely by the user. This means that the user enters and formats the titles of the chapters or sections and the corresponding page numbers themselves. This allows complete customization in terms of design and content, but requires more effort as changes in the document are not automatically updated in the table of contents. Manual TOCs are particularly useful in documents that require specific or unconventional structuring that automatic TOCs cannot capture correctly. In most cases, however, automatic TOCs are used for convenience.
We have a video on creating a manual table of contents for you here (it is part of the training Word course for beginners: Learning the basics from A to Z):
Text tutorial on the manual table of contents
Step 1: Prepare the document
- Structure the text: Before you start with the table of contents, you should structure your text. Use headings and subheadings to define the structure of your document.
- Format headings: Highlight the headings and apply the styles "Heading 1", "Heading 2", etc. This helps Word to recognize the structure of your document.
Step 2: Choose the position of the table of contents
- Start page: Decide where your table of contents should appear. It is usually located at the beginning of the document.
- New page: If necessary, insert a new page by pressing
Ctrl+Enterat the desired position.
Step 3: Inserting a manual table of contents

- Go to the References tab.
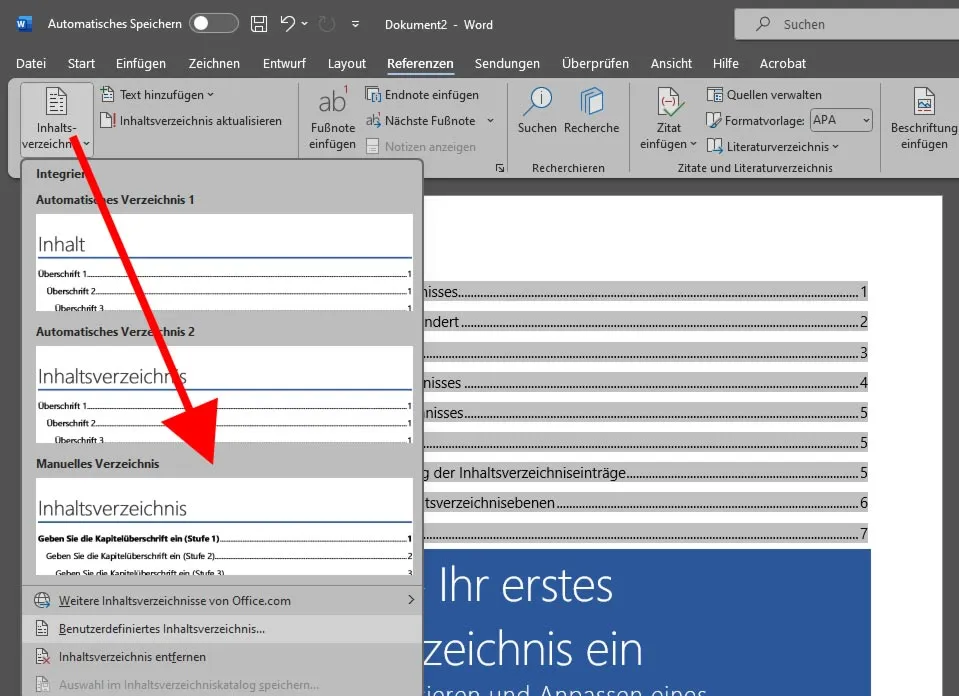
- Click on the drop-down arrow in the Table of contents area and select Manual table of contents.
Step 4: Add entries manually
- Once you have inserted the manual table of contents, it's time to add the entries manually.
- Enter text: Write the titles of your chapters or sections as they appear in the document.
- Assign page numbers: Add the appropriate page number next to each title.
- Formatting: Use tab stops or the tab key to right-align the page numbers and add a leader line if you wish.
Step 5: Update and check
- Even if your table of contents is manual, you should check and update it regularly, especially if you make changes to the document that could affect the page numbers.
- To update the table of contents, you need to adjust the entries and page numbers manually as it is not done automatically.
Tips:
- Maintain consistency: Make sure the formatting of your table of contents is consistent to maintain professionalism.
- Use hyperlinks: For digital documents, you can add hyperlinks to the headings in the text to make navigation easier. However, this must be done manually for each entry.
With these steps, you can create a manual table of contents in Word that is perfectly tailored to your document. This process gives you complete control over the look and structure of your table of contents. It's a good idea to save your table of contents so that you always have it to hand with other professional Word templates.
Create an automatic table of contents in Word
An automatic table of contents in Microsoft Word is a function that allows you to automatically create and update a table of contents based on the heading formatting used in the document. Word recognizes the heading levels defined by the user (such as Heading 1, Heading 2, etc.) and generates a structured table of contents containing the titles and page numbers of the sections. This table can be updated at any time to reflect changes in the document, such as adding or removing text, moving sections or changing page numbers. The automatic table of contents greatly simplifies document creation, improves navigation within the document and gives it a professional look.
We have a video on creating an automatic table of contents for you here (it is part of the training Word course for beginners: Learn the basics from A to Z)::
Automatic table of contents text tutorial
Step 1: Formatting headings
Before you create an automatic table of contents, you need to make sure that all the headings in your document are formatted correctly using Word's built-in styles. Word uses this formatting to recognize which parts of the text should appear in the table of contents.
- Select your chapter headings and apply the "Heading 1" style.
- For subchapters, use "Heading 2", "Heading 3" and so on.
- You can find these styles in the Start tab under "Styles".
Step 2: Insert table of contents
Once your headings are formatted, you can insert the table of contents:
- Position the cursor where you want the table of contents to appear, ideally at the beginning of your document.
- Go to the "References" tab.
- Click on "Table of contents" and select a format from the designs offered or click on "Custom table of contents" to customize further options.
Step 3: Customize the table of contents
If you select "Custom table of contents", you can customize various settings:
- Decide whether page numbers should be displayed and whether they should appear right-aligned with leader lines.
- Select how many levels of headings should be included in the table of contents.
Once you have made your selection, click "OK" and Word will insert a table of contents based on your headings.
Step 4: Update the table of contents

If you make changes to your document after inserting the table of contents, such as adding or deleting headings or changing the text, you will need to update the table of contents:
- Simply click on the table of contents.
- A "Update table of contents" button will appear. Click on it.
- Select whether you only want to update the page numbers or the entire table of contents.
Tips:
- Check your style sheets: Make sure that all headings are formatted consistently with Word's style sheets to avoid errors in the table of contents.
- Use the preview: Before you insert the table of contents, you can see a preview of your table of contents in the options. This will help you to get an idea of how it will look.
With these steps, you can create a professional-looking, automatic table of contents in your Word document that makes navigation easier and gives your document a structured overview.
